Posts Tagged ‘ Power Apss

Dynamics 365 Finance and Operations Security Infrastructure?

In this article, I will try to explain the Dynamics 365 Finance and Operations security architecture. There is a docs article that I like very much, I will try to recap the topics by referencing it. It is very important to understand the security infrastructure. In today’s projects, managing security and authorization can be a very demanding process. In order to manage the needs correctly, it is necessary to know the infrastructure and the features, capabilities and constraints of security tools. In this article I will address the following topics. I did not translate them into Turkish. Sometimes there is a semantic shift, so I think explaning them is better.

•             Security architecture

•             Role-based security

•             Duties

•             Privileges

•             Permissions

•             Authentication

•             Authorization

•             Auditing

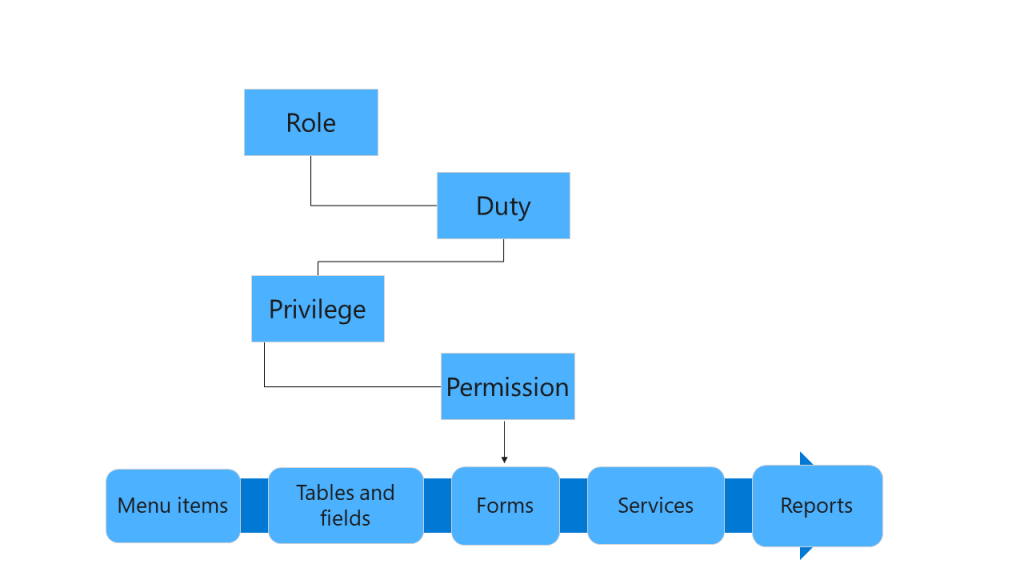
Finance and Operations application uses role-based security structure. Authorizations are given to roles, users are not directly authorized. Users are assigned roles. A user without any role has no authority in the system. The user assigned the admin role has full authorization. More precisely, they are not subject to any restrictions. Role-based security is a hierarchical structure as seen in Image-1.

Image-1

Role-based security

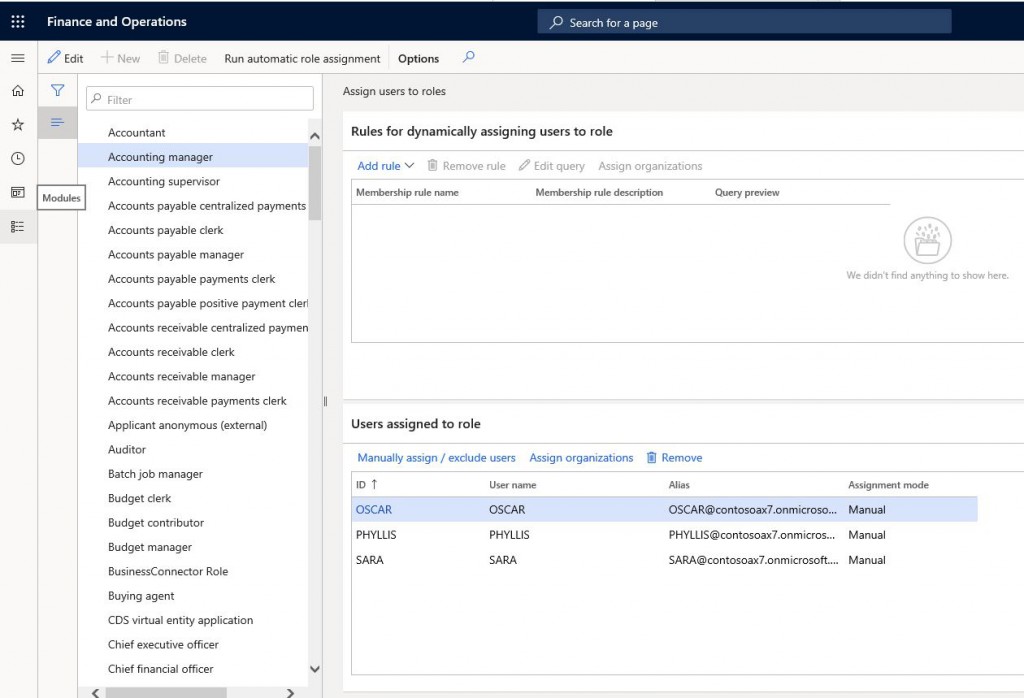
Role-based security has actually been created parallel to the work of business units. Role is the structure in which the necessary authorizations are gathered for a position with certain duties to fulfill those duties. The role is actually parallel to the employee’s actual job in the company. It does not mean that every employee has a role. In some cases, a single person may be managing different business processes. So they must have multiple roles. It is essential to organize roles according to the job, not the person. At least one role is required to log into the system. Generally, everyone is given the role of System User.  You can use the System administration > Users > Assign users to roles form to assign the role.

Role assignment is made by admin accounts. Basically, roles consist of Duties and Privileges.

Image-2

Duties

Duties are where the necessary authorizations are gathered to carry out a certain work process. A task can be assigned to multiple roles. Therefore, a change you make to the duty automatically affects the assigned roles. The role can be assigned directly in Privilege, but for a more manageable infrastructure, it is necessary to create and use the duties.

Image-3

Privileges

It is the structure where the authorizations required to do a certain job are gathered. For example, the payment cancellation privilege only has the authorization required to do this job. You can give this privilege directly to the role, but as I said above, it would be a better approach to collect them in duties and assign them to roles. Security and authorization objects are defined for all objects in the system. You can find and replace the ones you need and add new ones. Especially in new developments, it is absolutely necessary to create Privilege. Duty may not be required for every development. It may be enough to grant this authorization with a specific duty, but not without Privilege.

Image-4

Permissions

Permissions refers to the level of authorization to access a specific object. This can be a MenuItem or any object. Generally, authorization is given through the entry point. And these are usually MenuItems. In some cases we also use it to directly define authorization for an object of the form.

Authentication

This is my favorite feature in the new version. I can use all tools with a single email. One of them, of course, is the Finance and Operations application. To enter the application, your user login must be created. I explained it in my previous article. Usually users are expected to be in Microsoft Azure Active Directory (AAD), but you can also add external users. You can set up 2-step verification.

Authorization

Authorization controls access to the Finance and Operations application. Security permissions are used for this. Security permissions determine how certain objects of the application are accessed. These objects are: menus, menu items, action and command buttons, reports, service operations, web URL menu items, web controls and fields.

Finance and Operations application uses a context-based security, so we define the level of access to a certain object. When you associate a privilege with an entry point, you also define an access level. Such as Read, Delete, update.

Auditing

User login and logout times are recorded. You can access these records from the admin account. (System administration > Inquiries > User log).

In this article, I tried to introduce you to the security infrastructure. It is a very extensive and detailed topic. Generally, projects have a person or team responsible only for these processes. When not designed correctly, maintenance costs and problems can be annoying. It is imperative to place the due importance and test well during the project phase. Generally, since consultants have admin privileges, they can skip tests with the required roles. Here it is recommended that key users do tests with the relevant role, not as an admin. I will continue to address security-related issues.

Regards.

www.fatihdemirci.net

TAGs: Microsoft Life Cycle Services, LCS, Azure, Azure DevOps, security architecture, Microsoft Dynamics 365, MsDyn365FO, MsDyn365CE, MsDyn365, Dynamics 365 Insights Power BI, Power Automate, Power Apss, Power Virtual Agents, what is Dynamics 365, Dynamics 365 ERP, Dynamics 365 CRM
Dynamics 365 Finance and Operations Segregation of Duties Nedir?

Segregation of Duties görev ayrılığı olarak çevriliyor. Şöyle izah etmeye çalışayım. İki kritik görevi(Duty) aynı kişide toplanmasın istiyorsunuz örneğin fatura işleme ve ödeme çıkma gibi iki görevin aynı kişide olmaması gerekiyor. Binlerce kişinin çalıştığı bir firmadasınız ve bunu takip etmek belli bir aşamada mümkün olmuyor işte tam burada SoD devreye giriyor. Duty üzerinden yaptığınız bir tanım size bu tip durumlar için uyarı veriyor ve kontrol etme imkânı sağlıyor.

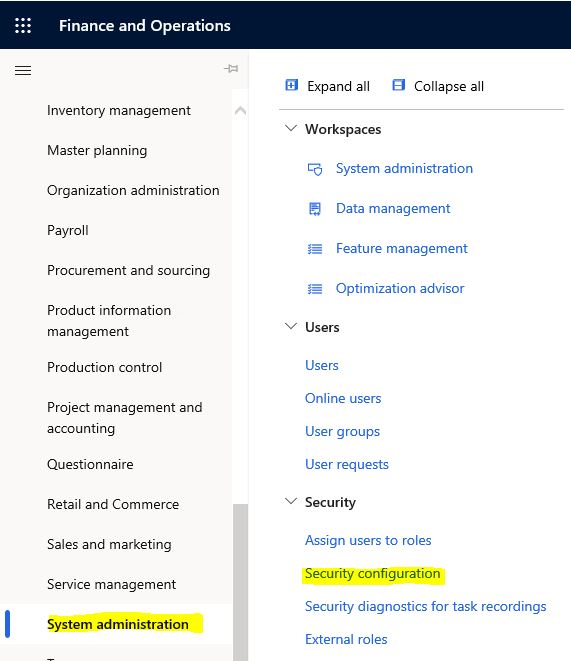
Önceki yazılarda kullandığımız güvenlik nesnelerini kullanarak bir örnek yapalım. Security Configuration formunu açıyoruz.

Resim-1

Read more

Dynamics 365 Finance and Operations Data Management 2. How to Transfer Data Again Using Old Projects?

Dynamics 365 Finance and Operations Data Management 1. How to Import Data? Dynamics 365 Finance and Operations Data Management 1. How to Import Data? Now I will try to explain how we can transfer data over and over again using the project we created in that article.

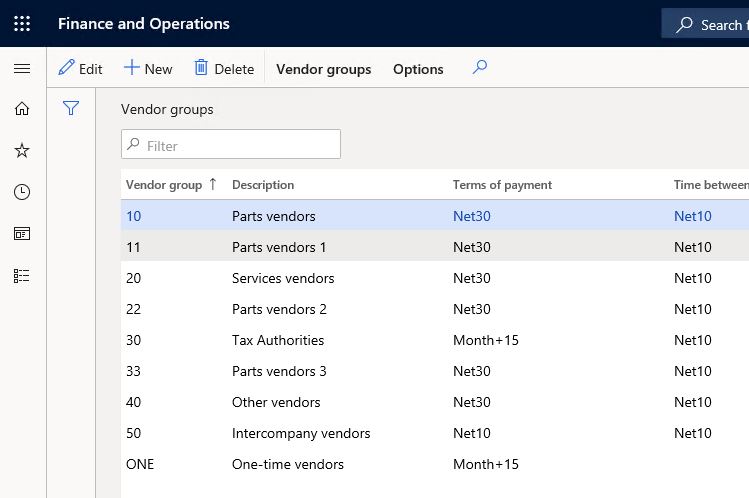
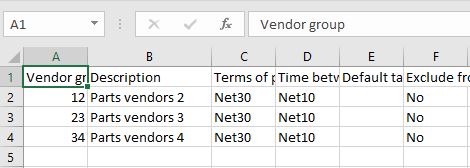
We had created a transfer project for VendGroup. Currently, the data is as in Image-1.

Image-1

This is the CSV file I just created. I will use this for import.

Image-2

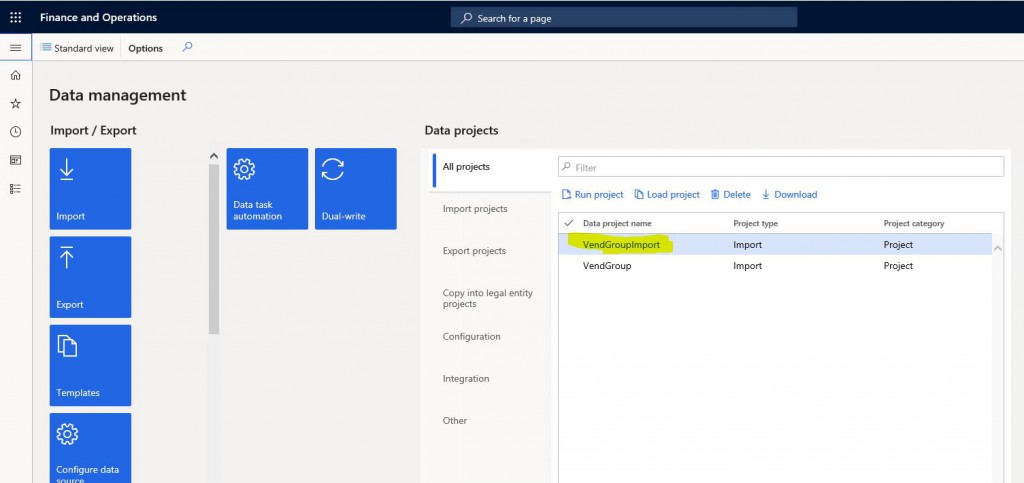
Open Data managament. In the All projects section, we click on our project and open it.

Image-3

Click Re-import from the Import Options tab.

Image-4

Click Upload file on the page that opens.

Image-5

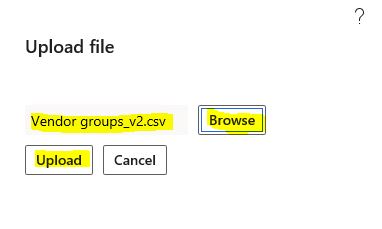
Select the import file and click Upload. Then click OK.

Image-6

You have uploaded your file. Now you can click Import.

Image-7

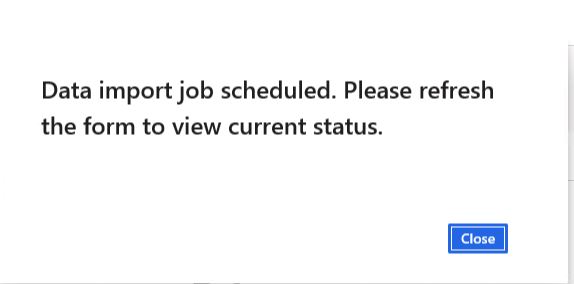
The information screen will appear. Close it and wait for a while.

Image-8

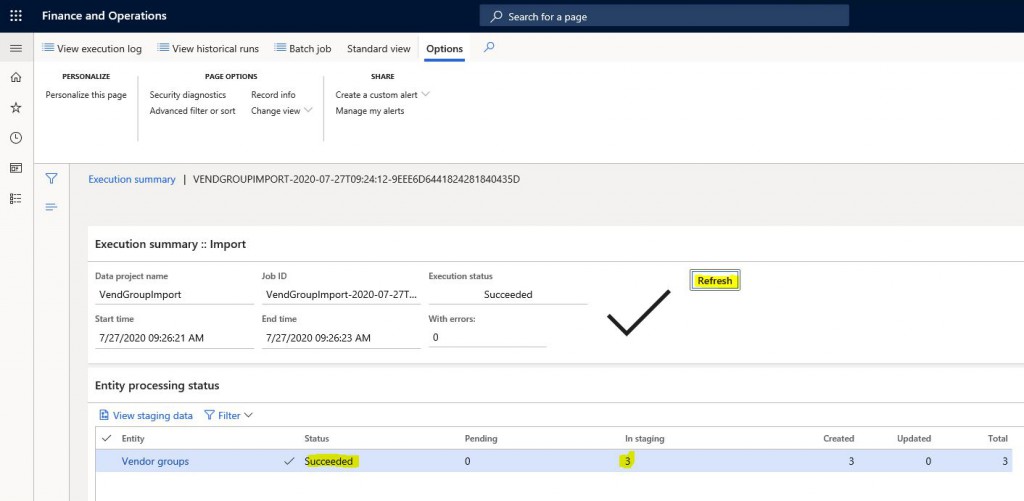
If there is no problem, you will see a screen like the one below. If there is an error, you can see its details on this screen as well.

Image-9

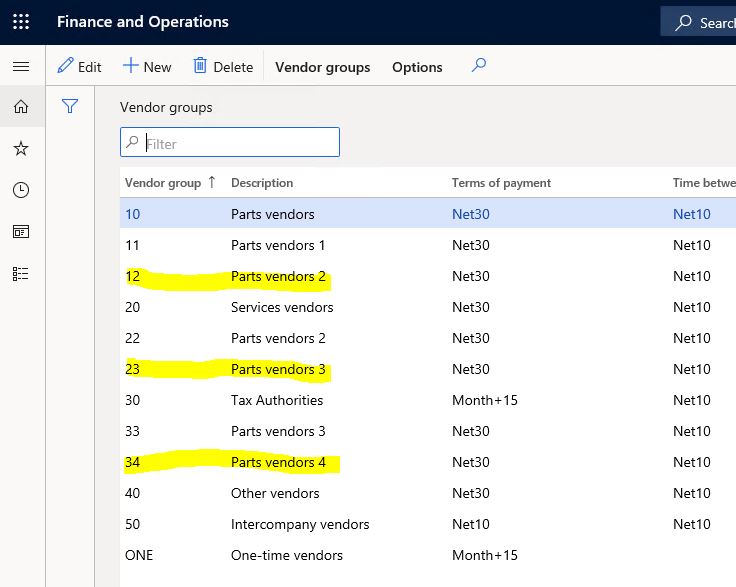
I renew my form to see if it really worked and see the data is there.

Image-10

In this article, I tried to show how you can transfer data over and over again through a project that we have created and established before. These very useful features are generally used by consultants, but it is necessary to provide good training to the users and ensure that they benefit from these features.

Regards.

www.fatihdemirci.net

TAGs: Microsoft Life Cycle Services, LCS, Azure, Azure DevOps, Import, DMF, Microsoft Dynamics 365, MsDyn365FO, MsDyn365CE, MsDyn365, Dynamics 365 Insights Power BI, Power Automate, Power Apss, Power Virtual Agents, what is Dynamics 365, Dynamics 365 ERP, Dynamics 365 CRM

How to Publish Dynamics 365 Finance and Operations SSRS Reports?

In this article, I will explain how you can publish SSRS reports (Deploy) for Dynamics 365 Finance and Operations application. It is one of the basic reporting tools of SSRS. You can use it in the reports you want to produce output. After the initial installation or after creating a new report, you need to publish it to see it in the app.

First, open Power Shell as Admin.

Run the following code for your Azure environments. Folder paths may change with updates.

K:\AosService\PackagesLocalDirectory\Plugins\AxReportVmRoleStartupTask\DeployAllReportsToSSRS.ps1 -PackageInstallLocation “K:\AosService\PackagesLocalDirectory”

Run the following code for local environments.

C:\AOSService\PackagesLocalDirectory\Plugins\AxReportVmRoleStartupTask\DeployAllReportsToSSRS.ps1

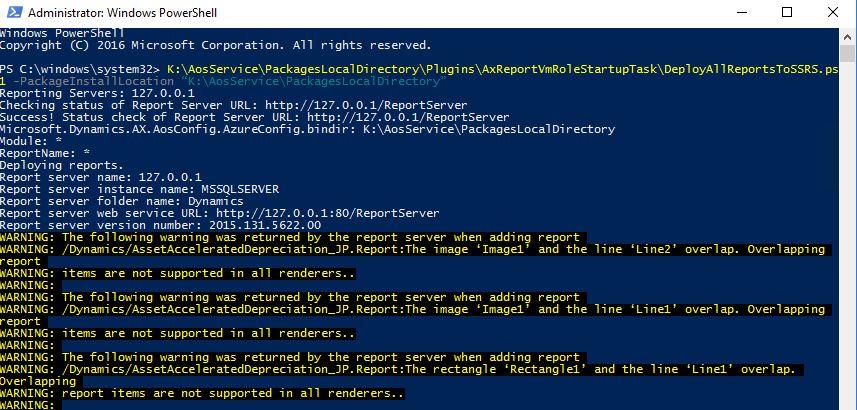
There may be some warnings, but you can ignore them while waiting for the result.

Image-1

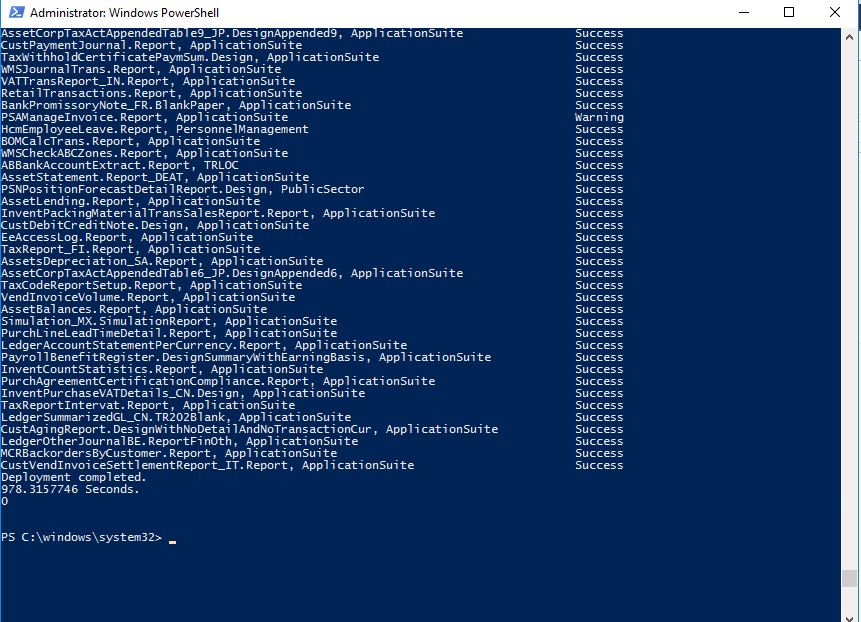
All reports published without any errors.

Image-2

If you want to publish a certain report with Power Shell, you can use the code below.

K:\AosService\PackagesLocalDirectory\Plugins\AxReportVmRoleStartupTask\DeployAllReportsToSSRS.ps1-PackageInstallLocation “K:\AosService\PackagesLocalDirectory” -Module ApplicationSuite –ReportName .Report

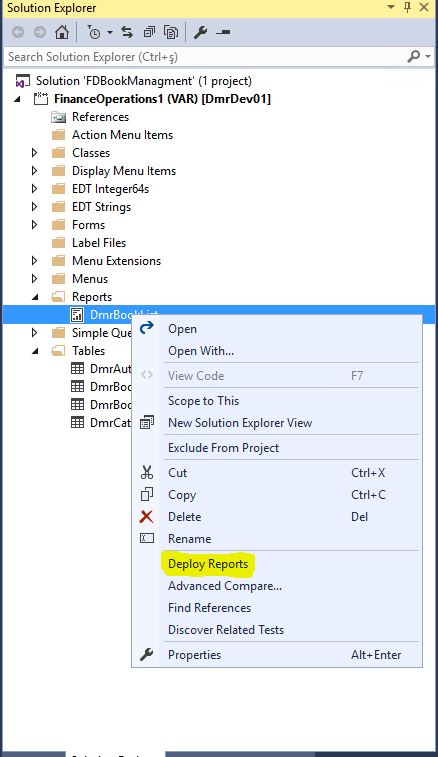
Finally, you can publish a newly created report via Visual Studio as shown in Image-3.

Image-3

In this article I explained how to publish SSRS reports. There are many topics related to reporting. In my following articles, I will talk mostly about reporting features.

Regards.

www.fatihdemirci.net

TAGs: Microsoft Life Cycle Services, LCS, Azure, Azure DevOps, SSRS, Deploy, Microsoft Dynamics 365, MsDyn365FO, MsDyn365CE, MsDyn365, Dynamics 365 Insights Power BI, Power Automate, Power Apss, Power Virtual Agents, what is Dynamics 365, Dynamics 365 ERP, Dynamics 365 CRM

How to Import and Update Data to Excel via Dynamics 365 Finance and Operations Forms?

In this article, I will explain how to import data from Dynamics 365 Finance and Operations forms into Excel and change them in Excel. Yes, you can change the data through Excel and enter new data. Of course, it may not work the way you want in all situations, but it is quite successful in general. One of the biggest advantages of Microsoft is that all of these systems are integrated.

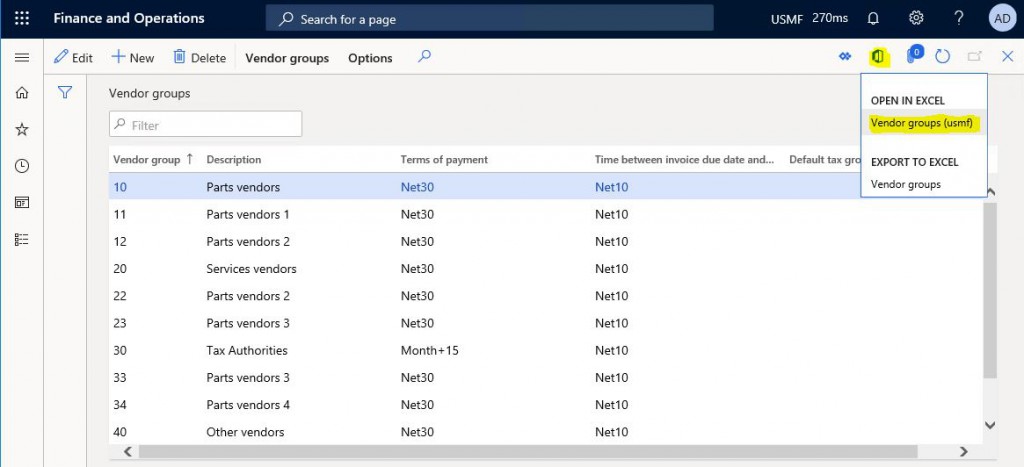
Let’s have a look at our example. I open the VendGroup form, from which I transferred data in my previous articles.

Image-1

From the form that opens, I click the Office icon and click Vend Group (usmf). If your form has multiple data sources and different structures, you can see several different options here.

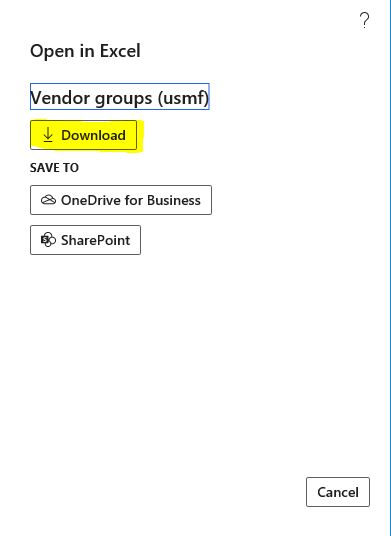
Image-2

I click Download to download it to the local machine.

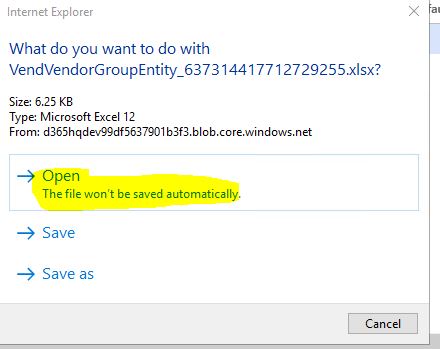
Image-3

There may be warnings due to security settings, you can accept them and continue.

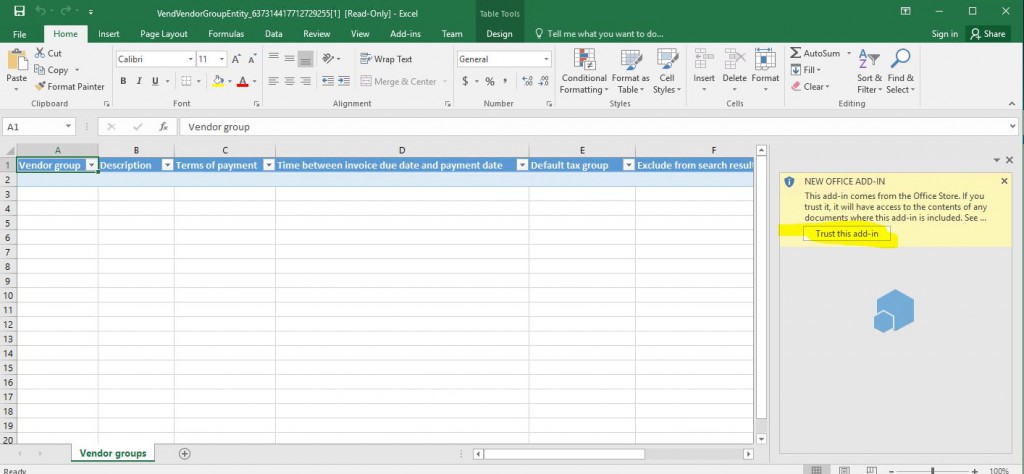
Image-4

I click Trust this add-in, which will appear when you open it for the first time.

Image-5

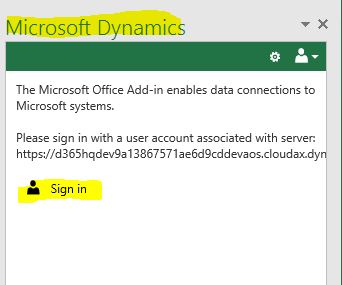
The home page is opened. Here you must log in as an authorized user.

Image-6

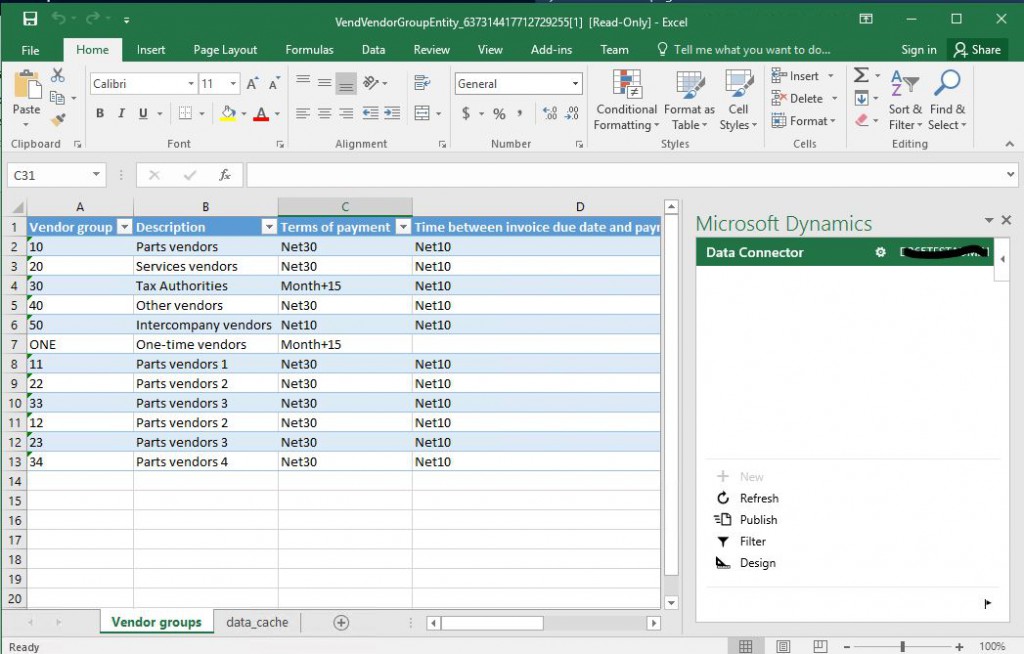
If there is no problem, the form will fill automatically and the menu will appear on the right.

Image-7

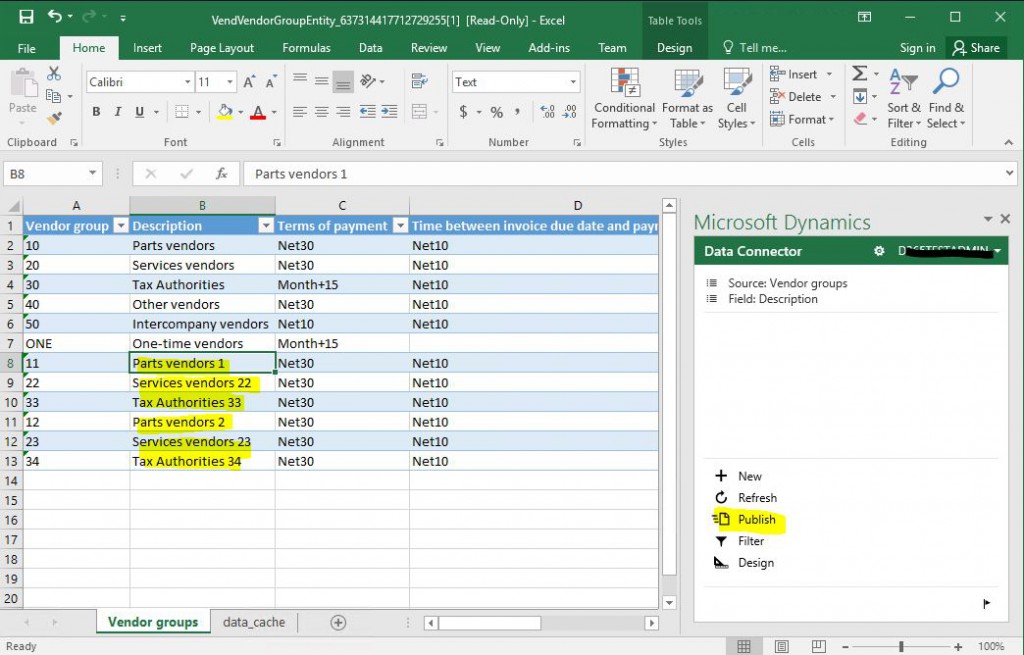
I did not correctly provide the Description information in data transfer, so I correct it and send it to the system by clicking Publish.

Image-8

When I refresh the VendGroup form, I see that the updates I made through Excel are applied.

In this article, I explained how you can transfer data to Excel via any form and upload your updates via Excel to the system. Of course, this does not work efficiently for very large data, you need to be careful. It is a feature that will facilitate the daily lives of the users at many points. It would not be wrong to say that the product is used very effectively with the Office applications. It was not that easy before.

Regards.

www.fatihdemirci.net

TAGs: Microsoft Life Cycle Services, LCS, Azure, Azure DevOps, Excel Export Import, Microsoft Dynamics 365, MsDyn365FO, MsDyn365CE, MsDyn365, Dynamics 365 Insights Power BI, Power Automate, Power Apss, Power Virtual Agents, what is Dynamics 365, Dynamics 365 ERP, Dynamics 365 CRM
How to Authorize Dynamics 365 Finance and Operations Lower Level Form Objects?

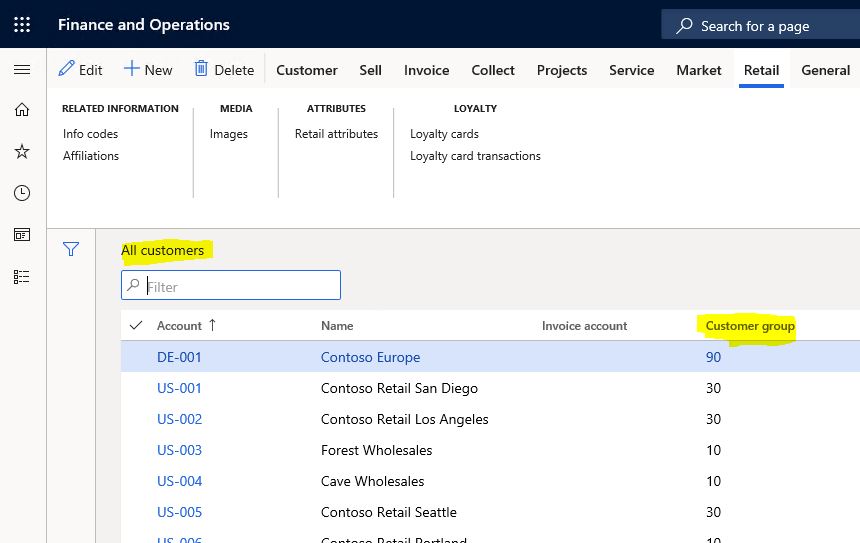
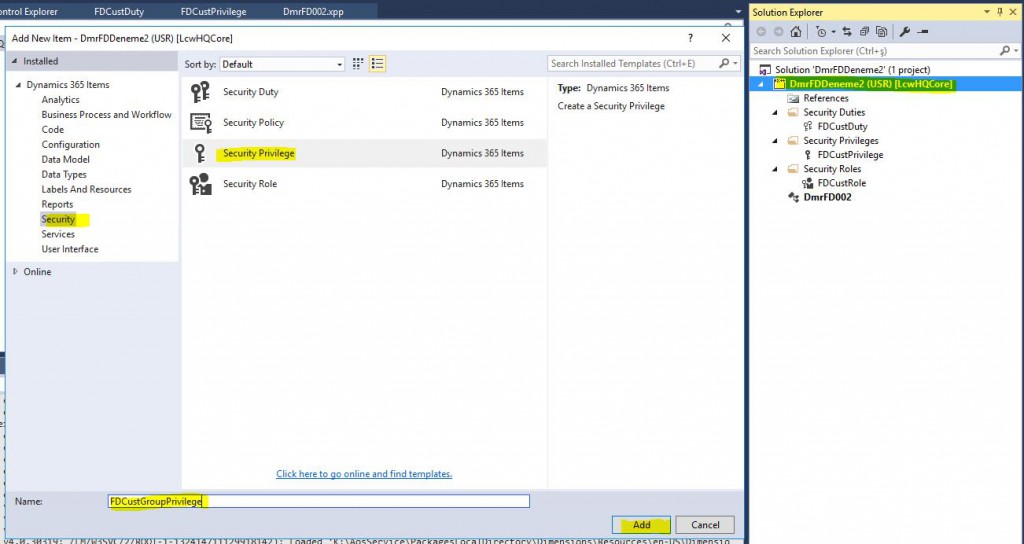
In this article, I will try to explain how to define an authorization for any object in Dynamics 365 Finance and Operation application. I do not recommend using this. The more details you go into, the more difficult it will be to manage security. However, in some cases, this will be needed. One mistake I see in these cases is to solve this with code, not with the security infrastructure. Never write code for security related work. It seems like a quick solution at first, but there will be a lot of trouble in the future. The support and subsequent requests become very difficult to meet. In this article, I will continue with the project I used in my previous articles. We had authorized a test user for the Customers form. Now they can open the form and see its data. Assume that the Customer group field was asked to appear on this user. Let’s see how we can do this.

Image-1

I add a new Privilege.

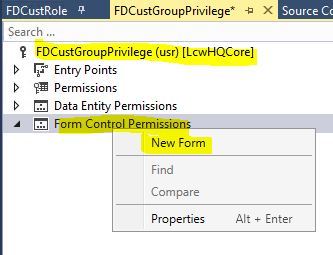
Image-2

Under Privilege, right click the Form Control Permissions section and click New Form.

Image-3

In the Name field, select CustTable form.

Image-4

Right click on CustTable to create a new object and type the name of the object you want to authorize. Grant is the key part. With No Access, we ensure that those who own this Privilege do not see this object. It may not appear in the lookup here. It doesn’t matter, you can directly write the name. These definitions will not be sufficient. We need to change a property of the object for which we will define the authorization.

Image-5

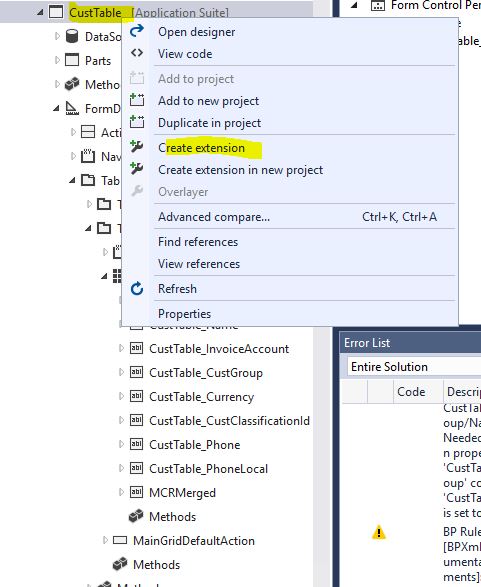
In order to make this change, we need to create an extension for our form at this stage.

Image-6

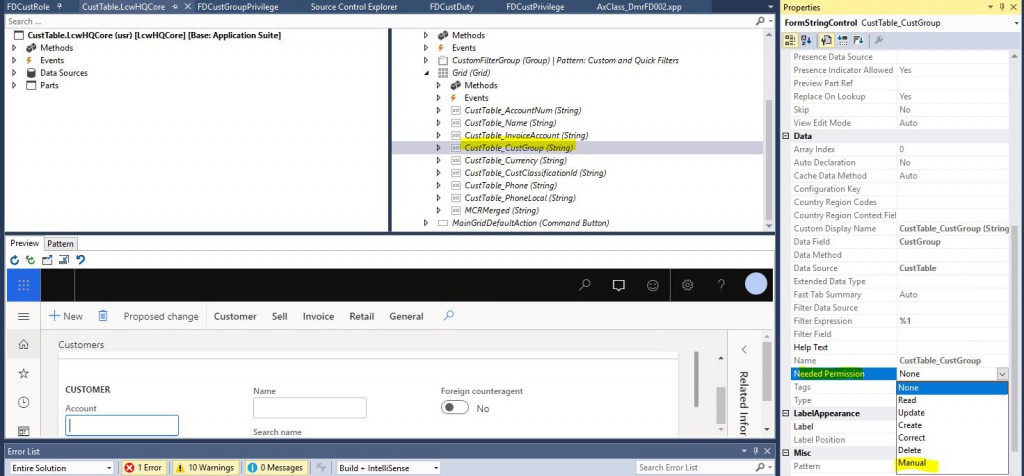
Open the Extension you created. Find the object you want to authorize and from its properties, change NeedPermission to Manual. It means that you will manage the authorization of this object. It’s better to use the Extension as the first step.

Image-7

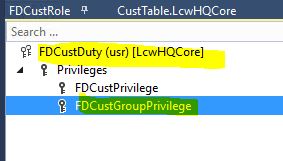
Then add the Privilege to Duty we used in our previous articles.

Image-8

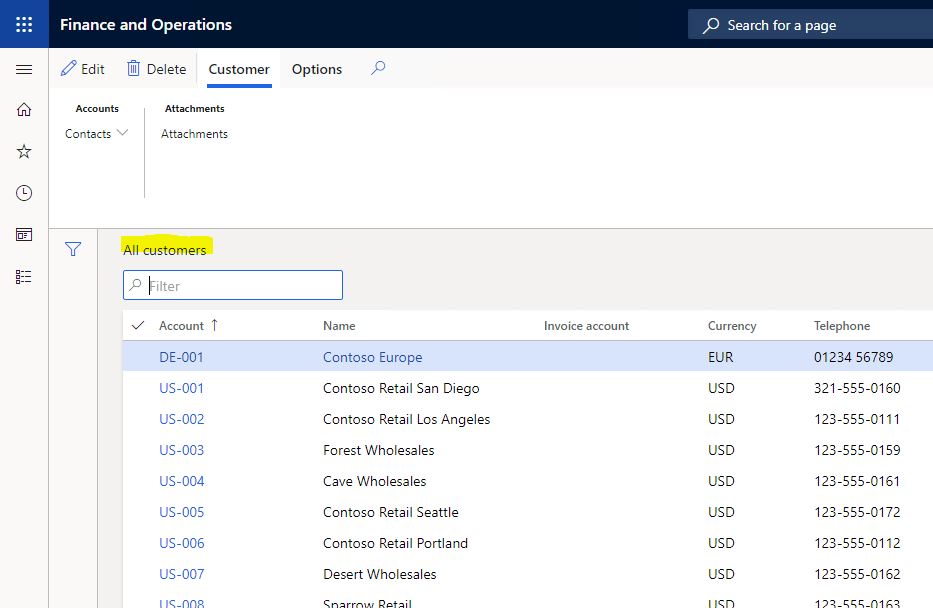
Save and compile our project and run DB synchronization for our project only. After that, when you log in with the test user and open the Customers form, you will see that the Customer Group field does not appear.

Image-9

In this article, I tried to explain how a low-level object is authorized. It can be done very simply, but if you define too many low-level authorizations, it is very difficult to work it out. Try to authorize from the entry point as much as possible.

Regards.

www.fatihdemirci.net

TAGs: Microsoft Life Cycle Services, LCS, Azure, Azure DevOps, Security, Microsoft Dynamics 365, MsDyn365FO, MsDyn365CE, MsDyn365, Dynamics 365 Insights Power BI, Power Automate, Power Apss, Power Virtual Agents, what is Dynamics 365, Dynamics 365 ERP, Dynamics 365 CRM
How to Move Developments to Dynamics 365 Finance and Operations Test and Live Environments? 4- Installing Deployable Package to Asset Library

In this article, I will explain how to install the Deployable Package created with Build, which is the last step of moving the developments we made from Visual Studio for Dynamics 365 Finance and Operations to Test and Live environments, to Asset Library and then how to carry this package to test and live systems. I talk about performing a simple development movement with this article. Of course, there are too many details here. There are many steps that need to be examined, especially when problems arise.

This process may be more troublesome compared to the old version, but it is definitely a better method. It will be difficult for customers who still develop live and move codes to live every day, but they should definitely switch to moving at least once a week. Even for the old version, we recommend moving to live once a week (twice at most). In this version, moving to live more frequently causes a great loss of time. The problem I usually see in projects that require intervention to live too much is that your test and design stages are insufficient. Developments that are not well designed and tested, constantly create a need to intervene to live environment. With this work logic, you cannot create projects in the new version.

In the third article of this series, we downloaded the Deployable Package, which was the result of Build. We can now upload this package to Lifecycle Services. Log in to the LCS and select our project. Open Asset Library from the menu.

Image-1

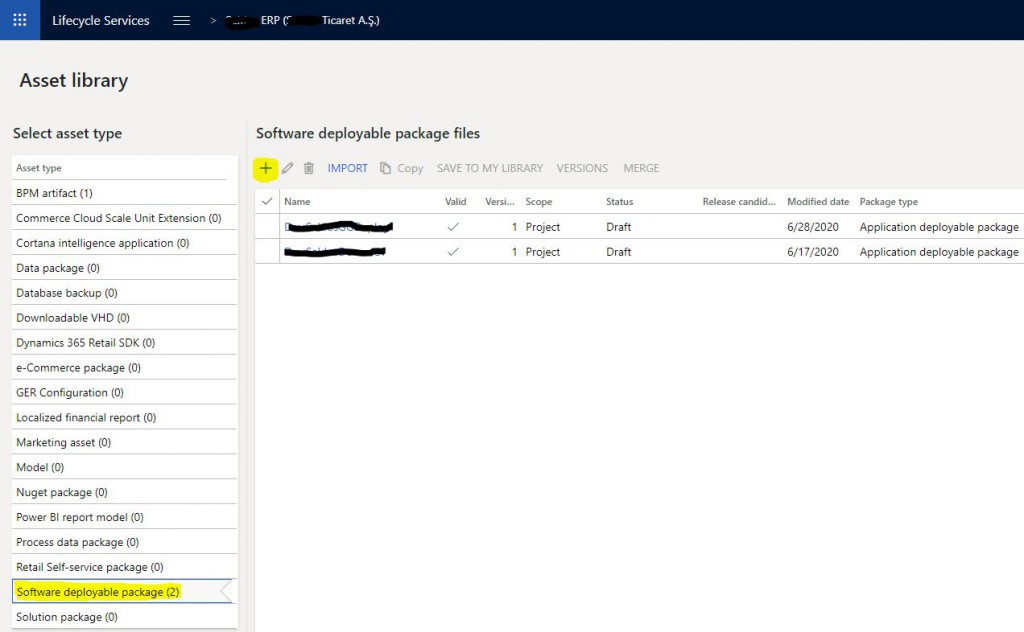
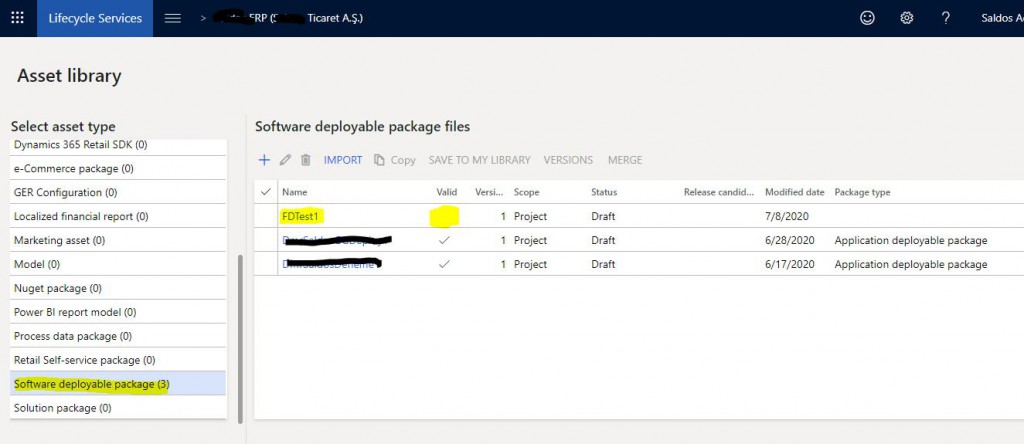
Open the Software Deploable Package tab. Open the new package download page by clicking +.

Image-2

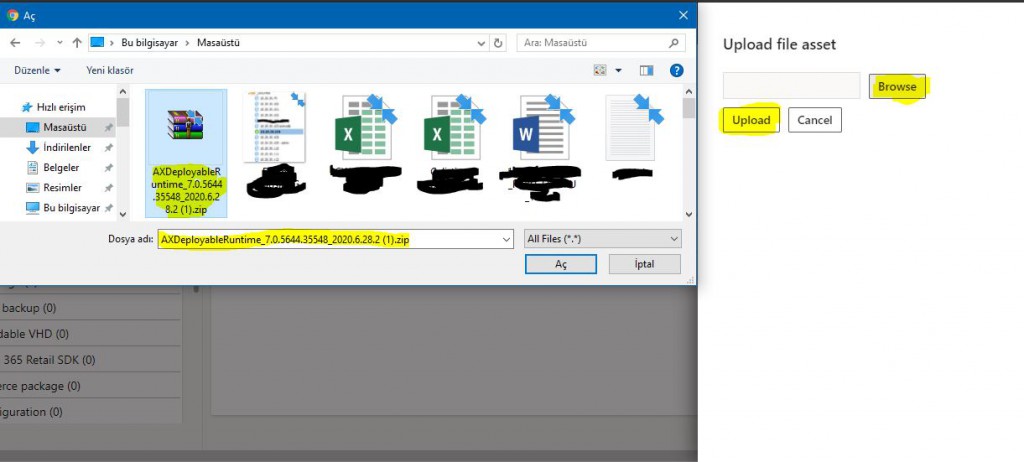
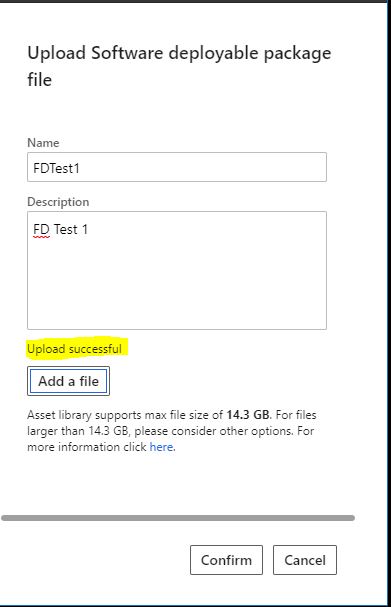
On the page that opens, enter a name and description. It is useful to set a standard here.  Click Add a file.

Image-3

Select the package you downloaded.

Image-4

After the installation is complete, click Confirm.

Image-5

Our package appears in the list. It is not yet confirmed. After a few minutes the Valid part will also be checked. Now we can install this package in our test and live environments.

Image-6

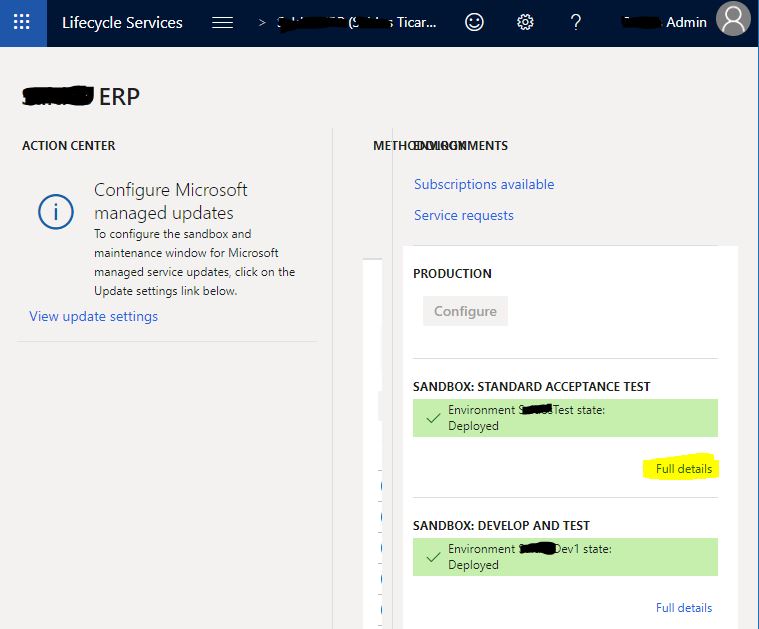
Since it is not live in this environment, I will first show it from the test. The same steps are required for live as well.  Open your SANDBOX Test environment by clicking Full details.

Image-7

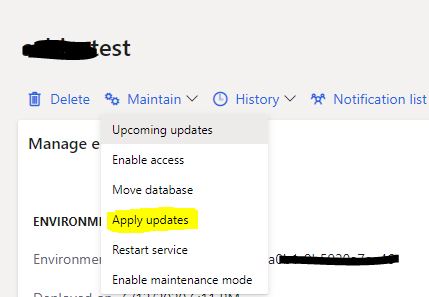
Click Maintain-> Apply updates.

Image-8

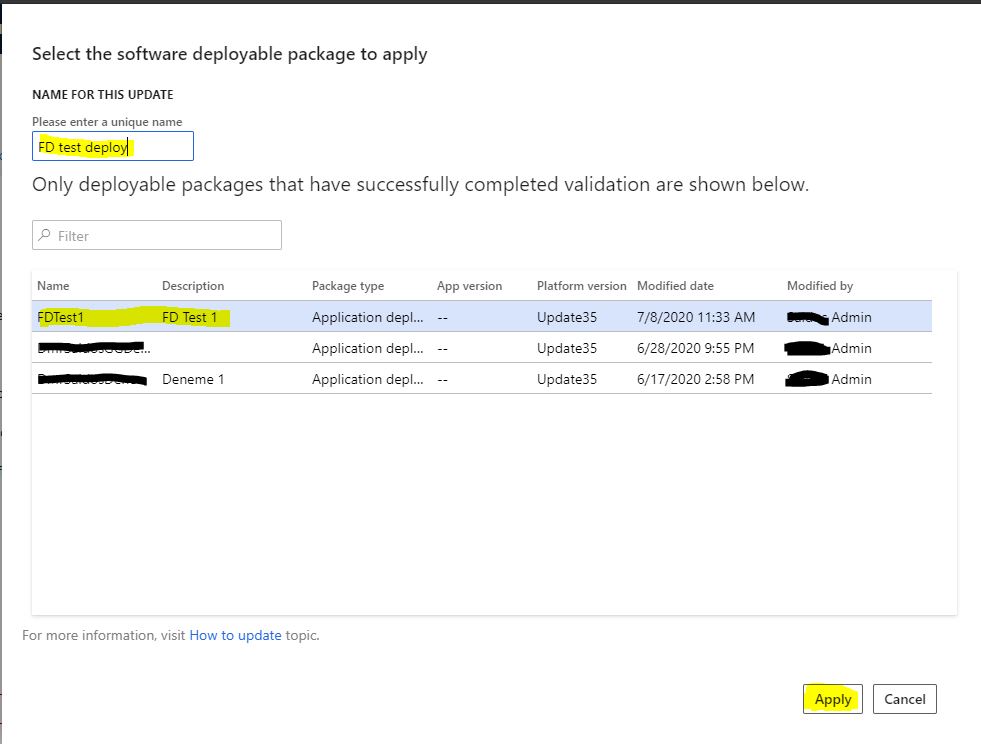
Select the package you installed from the window that opens. Apply is not active without naming it. You need to specify a suitable name format. In the new version, one of the most difficult things seems to be naming. You have to give names so many times that it is difficult to set and apply rules everywhere. After you click Apply, the test environment will automatically start to install the package and you will not be able to access the environment for at least 1 hour. You should be aware of that. You can follow the status of the installation process on the detail page of your environment.

Image-9

The process of making the package live is the same, except there are two differences. Firstly, you need to mark the Package as Release Candidate. Second, you need to set the date you want the package to go live. This is done by using the Schedule button. I could not provide an image of it because it was not live in this environment yet.

Image-10

In this article, we completed the process of moving a development environment to test and live. Of course, I explained it through a very simple and problem-free scenario. In real life, things are not that simple, but not so difficult as well. There are many tools to solve problems. Being organized is very important. You should pay attention to naming and standards. I will continue to explain the details and solution methods of this whole process. I hope it is useful for you.

Regards.

www.fatihdemirci.net

TAGs: Microsoft Life Cycle Services, LCS, Azure, Azure DevOps , Release Candidate, Deployable Package, Microsoft Dynamics 365, MsDyn365FO, MsDyn365CE, MsDyn365, Dynamics 365 Insights Power BI, Power Automate, Power Apss, Power Virtual Agents, what is Dynamics 365, Dynamics 365 ERP, Dynamics 365 CRM
How to Change the Default Model for Dynamics 365 Finance and Operations Developments?

When you install a new DevBox for Dynamics 365 Finance and Operations, the default model is Fleet Management. If you create a new model, you can mark it as the default model while creating it. However, to use an existing model, it is necessary to make changes to the DynamicsDevConfig file.

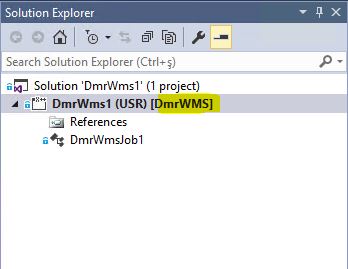
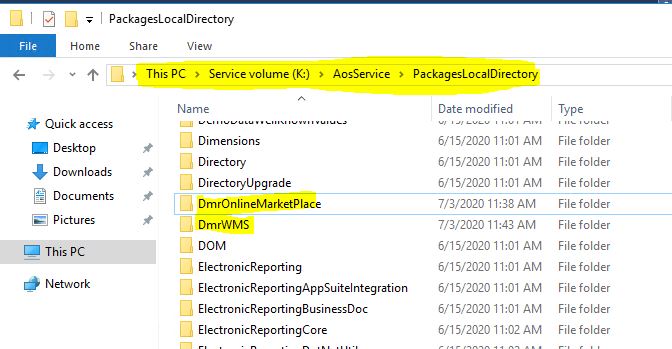
In my previous articles, I created the DmrWMS model and marked it as the default model. Therefore, my every new project opens in the DmrWMS model.

Image-1

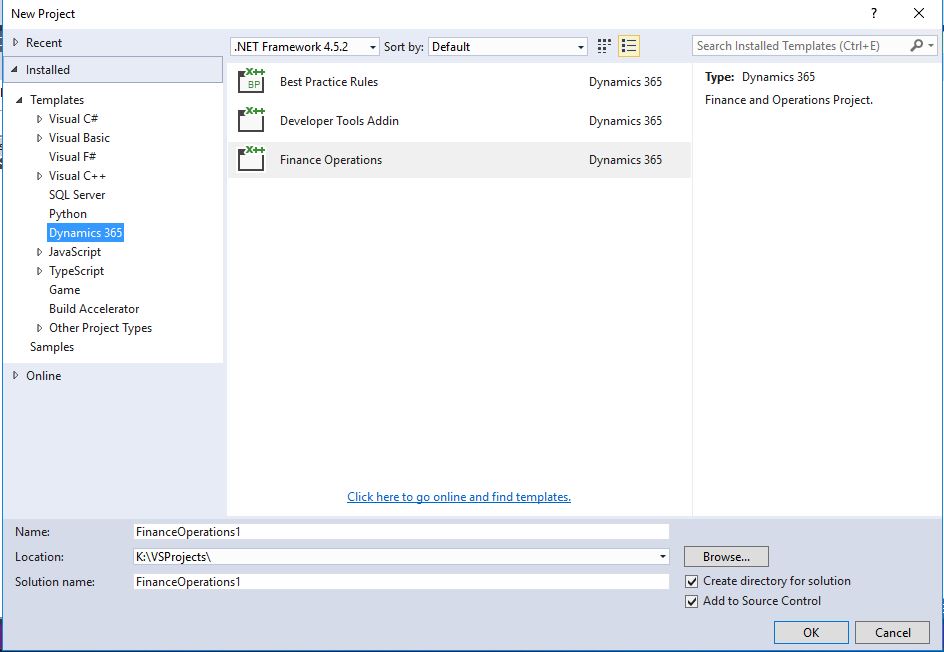
I have two models in this environment. If I want to work on the other model, unfortunately I cannot choose it while creating the project.

Image-2

As you can see, it is not possible to choose a model in the new project creation screen, or I could not find it. Of course I did some research.

Image-3

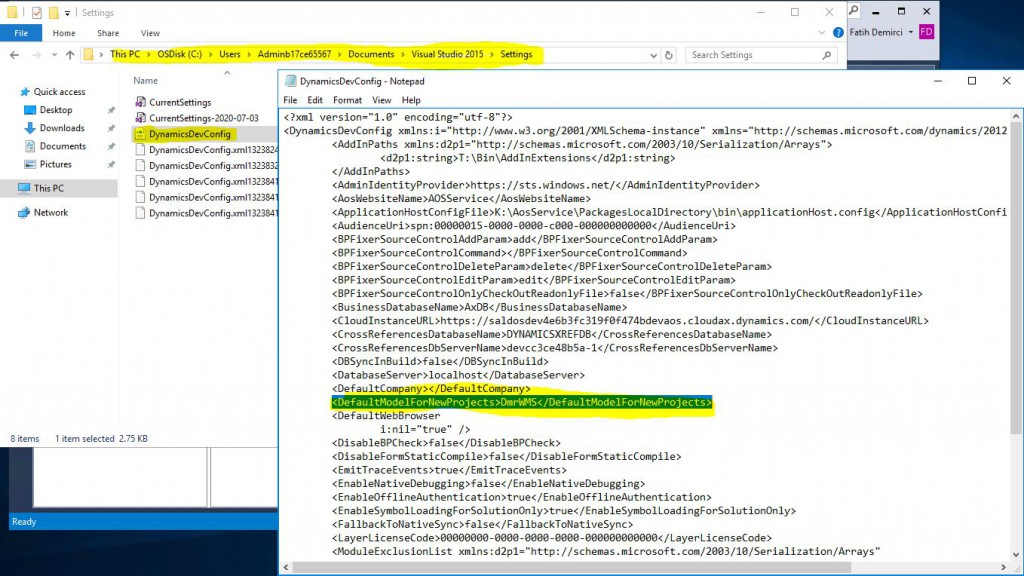
To change this, it is necessary to open the DynamicsDevConfig file in C:\Users\Adminb17ce65567\Documents\Visual Studio 2015\Settings.  You must go to this path with your own user. Adminb17ce65567 is my auto-generated admin user. That is the user I connect with Remote Desktop. You can find very useful information in the DynamicsDevConfig file. Let’s go over these 3 features for now.

<DefaultCompany></DefaultCompany> // You can set the default company here.

<DefaultModelForNewProjects>DmrWMS</DefaultModelForNewProjects> // You can change the default model here. When first opened, you will see Fleet Management here.

<DefaultWebBrowser                   i:nil=”true” /> // You can set the default browser here. Sometimes if you want to use Chrome for tests you can change this.

Image-4

In this article, I tried to explain how you can change the default model with the DynamicsDevConfig file. It is imperative to work with the model and it is necessary to set up the model management correctly and make sure that the software developers develop the right model. It becomes troublesome to fix them later.

Regards.

www.fatihdemirci.net

TAGs: Microsoft Life Cycle Services, LCS, Azure, Azure DevOps, DynamicsDevConfig, Microsoft Dynamics 365, MsDyn365FO, MsDyn365CE, MsDyn365, Dynamics 365 Insights Power BI, Power Automate, Power Apss, Power Virtual Agents, what is Dynamics 365, Dynamics 365 ERP, Dynamics 365 CRM
Dynamics 365 Finance and Operations Alt Seviye Form Nesnelerine Yetki Nasıl Verilir?

Bu yazıda Dynamics 365 Finance and Operation uygulamasında herhangi bir nesneye nasıl yetki tanımı yapılır anlatmaya çalışacağım. Bunu çok kullanmanızı tavsiye etmiyorum. Ne kadar çok ayrıntıya girerseniz güvenliği yönetmek o kadar zor olacaktır. Ancak tabi bazı durumlarda bu ihtiyaç olacaktır. Bu durumlarda gördüğüm bir yanlışta bunu güvenlik altyapısıyla değil de kodla çözmek oluyor. Kesinlikle güvenlikle ilgili işler için kod yazmayın ilk etapta hızlı çözümmüş gibi görünür ama ilerde çok baş ağrısı olur. Desteği ve sonra gelen taleplerin karşılanması çok zorlaşır. Bu yazıda önceki yazılarımda kullandığım proje ile devam edeceğim. Bir test kullanıcısına Müşteriler formu yetkisi vermiştik. Artık formu açıp verilerini görebiliyor. Varsayalım Customer group alanı bu kullanıcıda görünmesin istendi. Bunu nasıl yapabiliriz görelim.

Resim-1

Read more

How to set up the Dynamics 365 Finance and Operations Help system?

In this article, I will explain how to set up and use the Help system for Dynamics 365 Finance and Operations. We usually perform this set up for test and live environments. I’ll show it on a test environment.

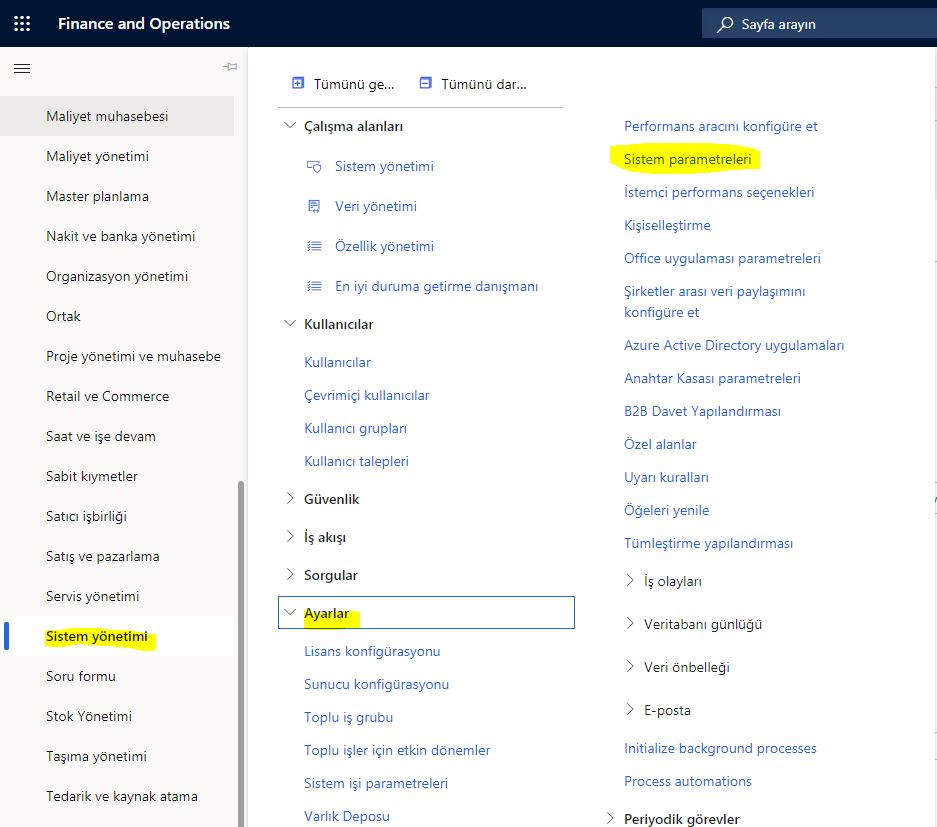
First, log into the test environment and open the System Management->Settings->System parameters screen.

Image-1

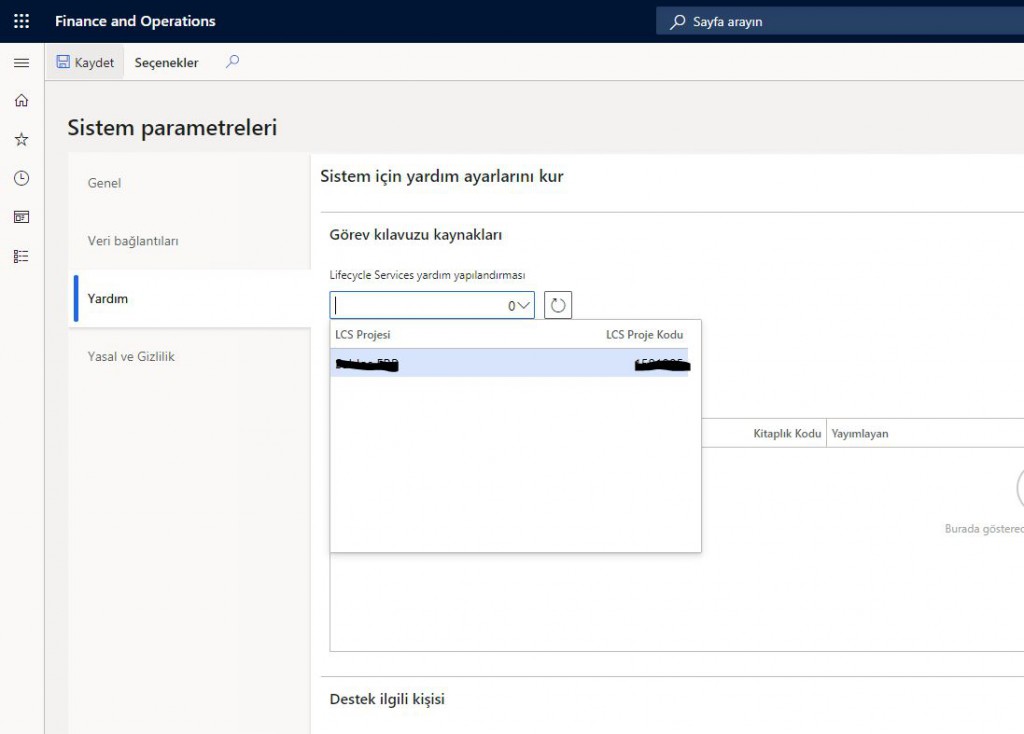
Open the help window. If you are opening it for the first time, a warning window appears and tells you to connect to the LCS project. If you have opened it before and you have not established the connection like me, you can choose it as follows. You may have more than one project, but it is useful to choose the project which you created this environment on.

Image-2

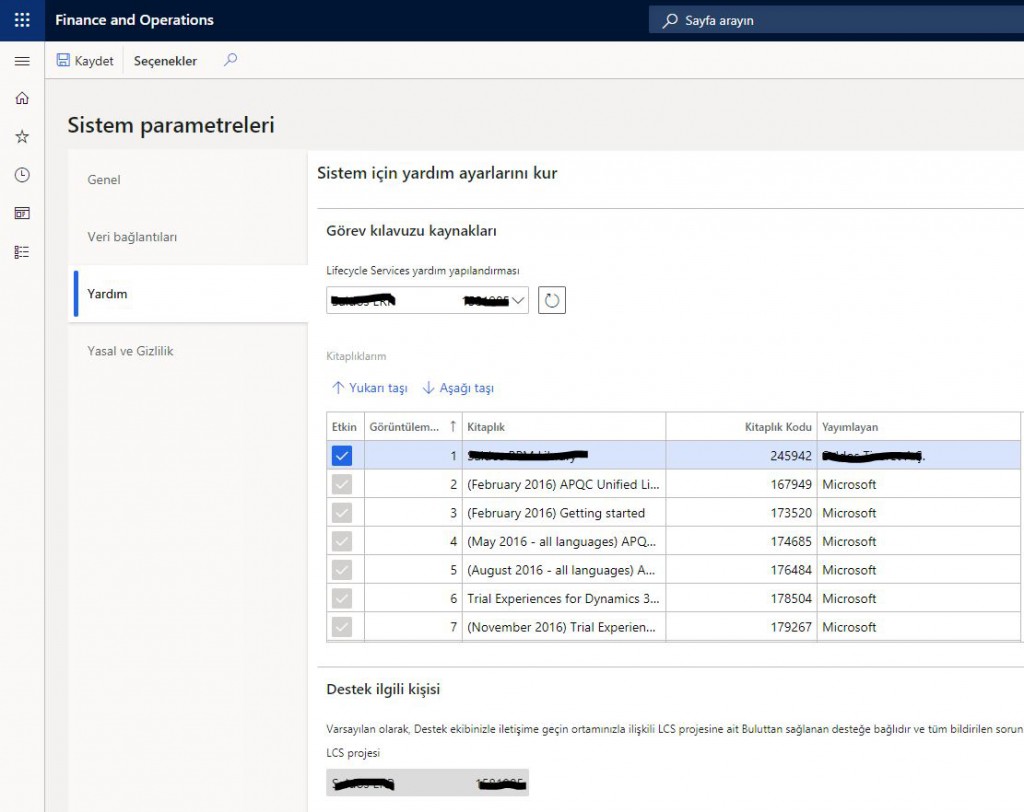
After selecting it, standard Task guide libraries will appear. You can add via LCS and choose from here. Select the LCS project for support as well.

Image-3

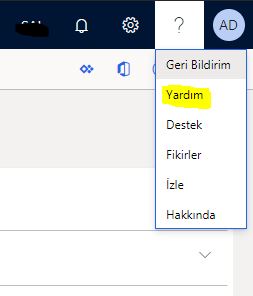
After these steps, the help setup is ready. Now you can click ? And open the help screen.

Image-4

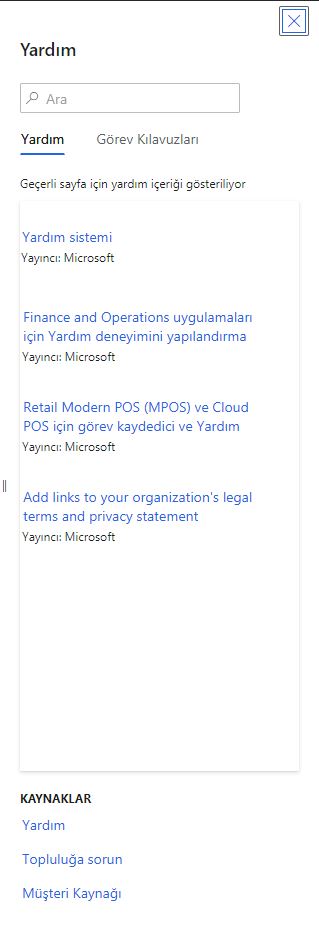
If you are not in a form, a screen like the one below will open.

Image-5

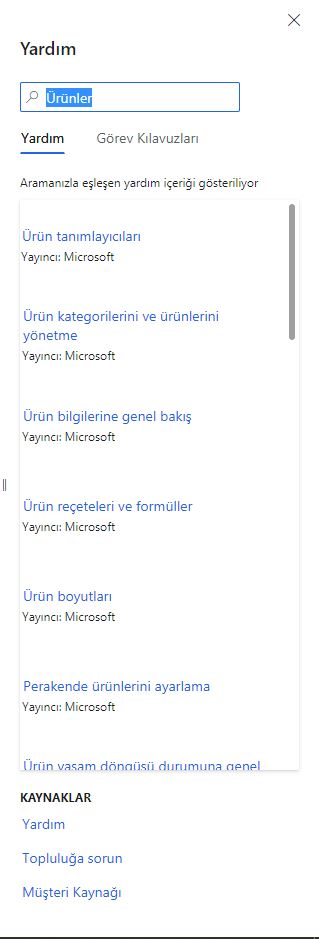
Since our environment is in Turkish, help is displayed in Turkish. You can also set it to be displayed in different languages.

Image-6

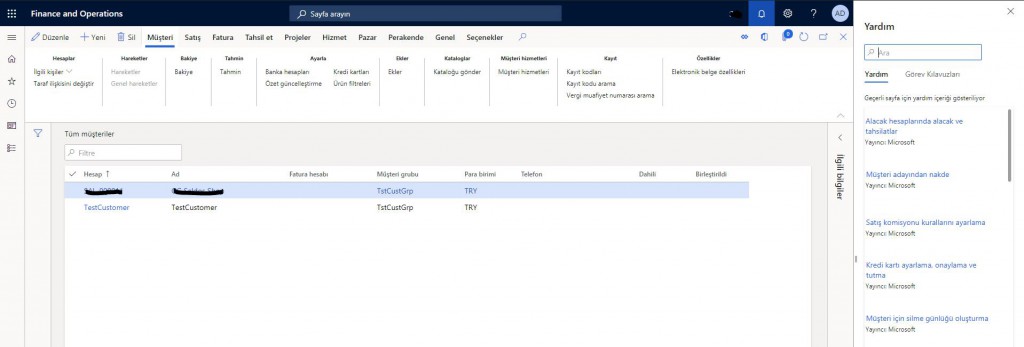
If you open it from a form, related topics will appear. Since I opened the Help screen through the all customers form, the related topics were listed.

Image-7

In this article, I explained how to setup help. Help is a vast resource. It is useful to look into it. You can learn many details here. In addition, thanks to this setup you can create support requests. I will also talk about support requests in another article.

Regards.

www.fatihdemirci.net

TAGs: Microsoft Life Cycle Services, LCS, Azure, Azure DevOps, Help, Microsoft Dynamics 365, MsDyn365FO, MsDyn365CE, MsDyn365, Dynamics 365 Insights Power BI, Power Automate, Power Apss, Power Virtual Agents, what is Dynamics 365, Dynamics 365 ERP, Dynamics 365 CRM

Page 8 of 9« First...56789