Posts Tagged ‘ MsDyn365CE

Dynamics 365 Finance and Operations Data Management 2. How to Transfer Data Again Using Old Projects?

Dynamics 365 Finance and Operations Data Management 1. How to Import Data? Dynamics 365 Finance and Operations Data Management 1. How to Import Data? Now I will try to explain how we can transfer data over and over again using the project we created in that article.

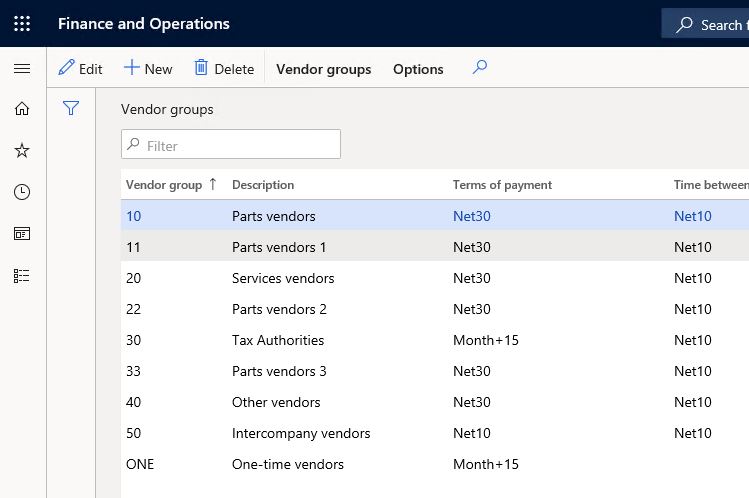
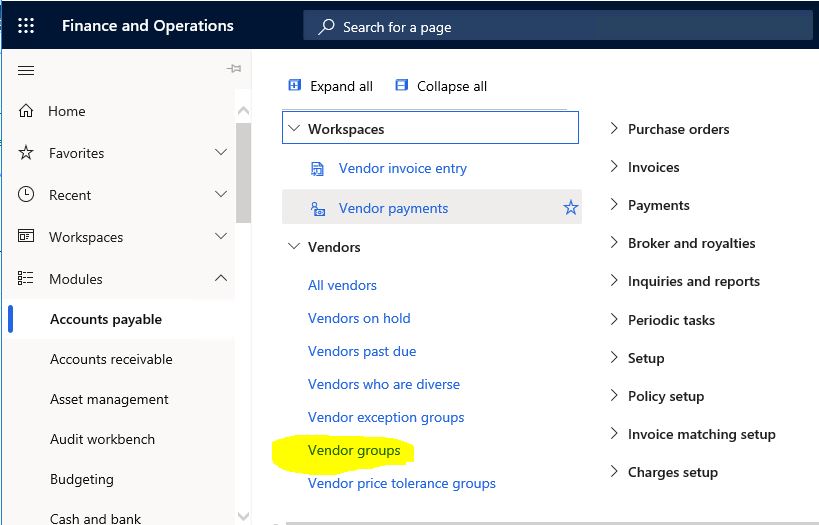
We had created a transfer project for VendGroup. Currently, the data is as in Image-1.

Image-1

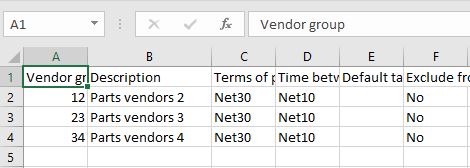
This is the CSV file I just created. I will use this for import.

Image-2

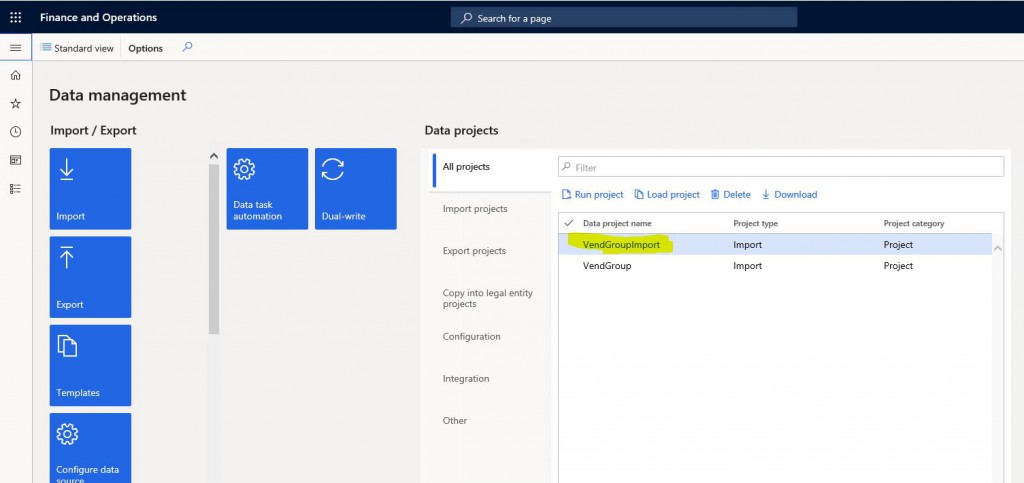
Open Data managament. In the All projects section, we click on our project and open it.

Image-3

Click Re-import from the Import Options tab.

Image-4

Click Upload file on the page that opens.

Image-5

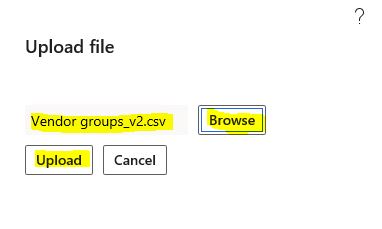
Select the import file and click Upload. Then click OK.

Image-6

You have uploaded your file. Now you can click Import.

Image-7

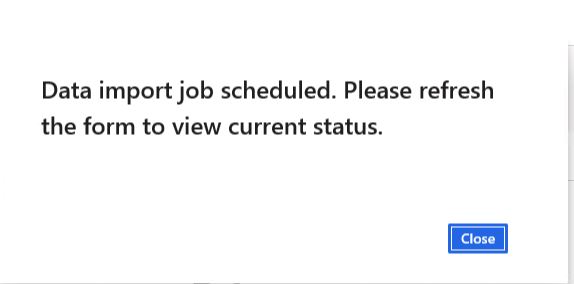
The information screen will appear. Close it and wait for a while.

Image-8

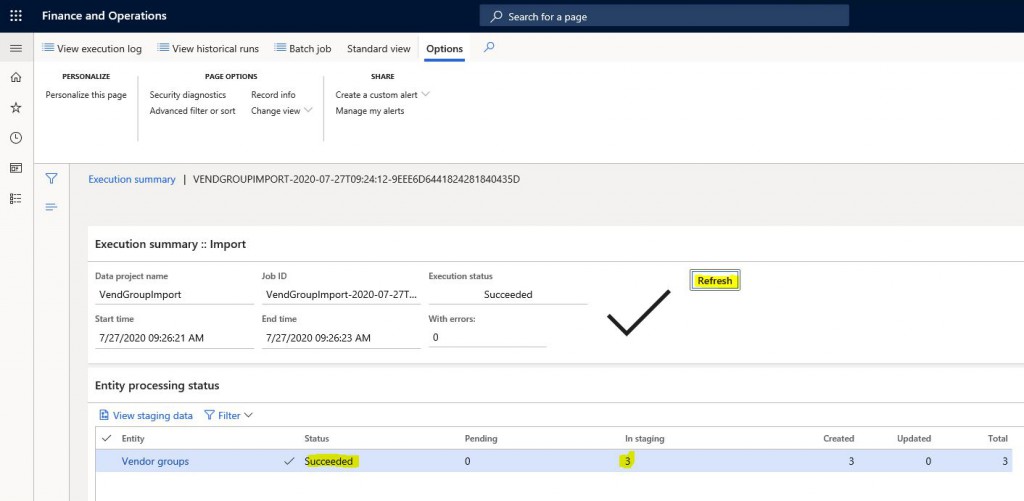
If there is no problem, you will see a screen like the one below. If there is an error, you can see its details on this screen as well.

Image-9

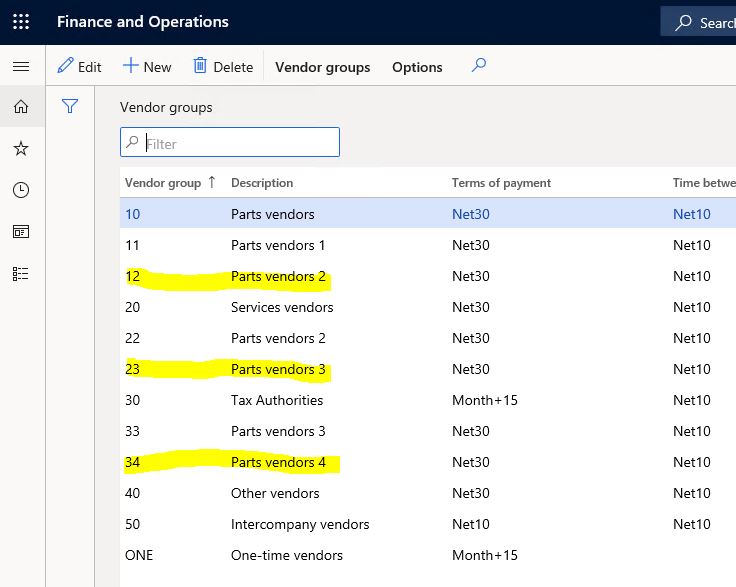
I renew my form to see if it really worked and see the data is there.

Image-10

In this article, I tried to show how you can transfer data over and over again through a project that we have created and established before. These very useful features are generally used by consultants, but it is necessary to provide good training to the users and ensure that they benefit from these features.

Regards.

www.fatihdemirci.net

TAGs: Microsoft Life Cycle Services, LCS, Azure, Azure DevOps, Import, DMF, Microsoft Dynamics 365, MsDyn365FO, MsDyn365CE, MsDyn365, Dynamics 365 Insights Power BI, Power Automate, Power Apss, Power Virtual Agents, what is Dynamics 365, Dynamics 365 ERP, Dynamics 365 CRM

How to Move Developments to Dynamics 365 Finance and Operations Test and Live Environments? 3- Build

How to Move Developments to Dynamics 365 Finance and Operations Test and Live Environments? 3- Build

In this article, I will talk about how to perform the Build operation required to move the developments we made from Visual Studio for Dynamics 365 Finance and Operations to Test and Live environments. Build needs to be performed on a certain Branch. When Build is complete, if there is no error, it will generate a Deployable Package for us. We need this package for code migration.

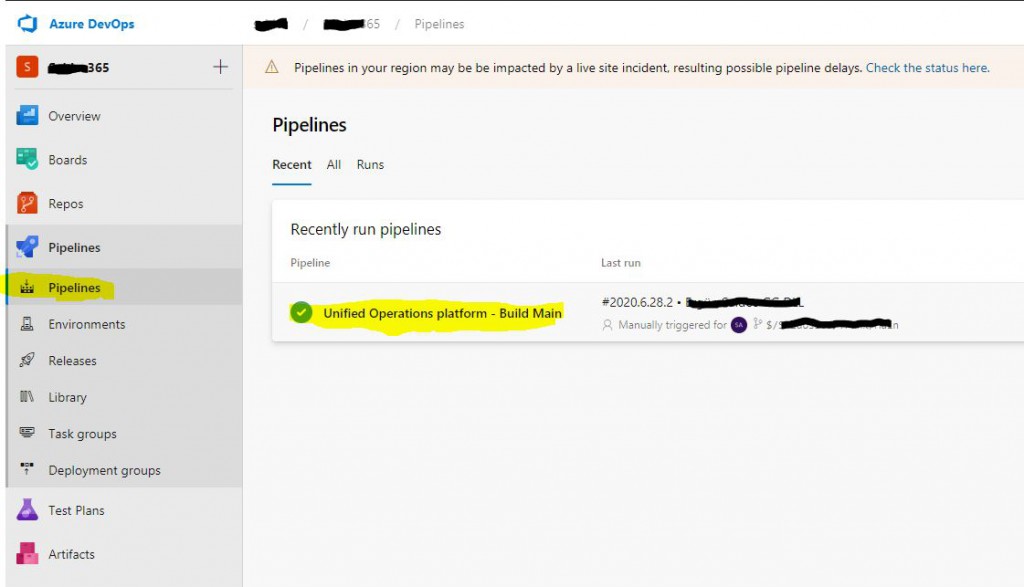
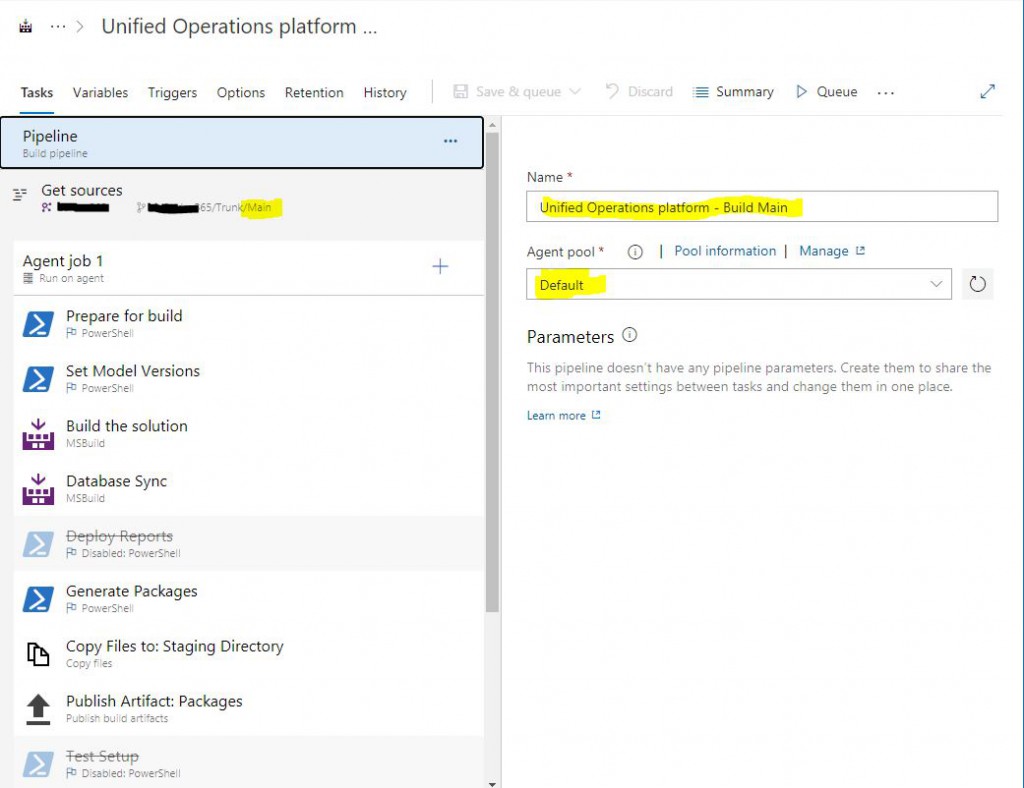
You have to perform Build through Azure DevOps, not from Visual Studio. After logging in as a user with admin rights, open the Pipelines tab. Unified Operations platform – Build Main will be created automatically when you set Azure DevOps settings via LCS. We will take this as basis. Since our environment is only Main Branch, I continue without making any changes in the basic settings.  First let’s see how we can run it, then we will examine the other settings.

Image-1

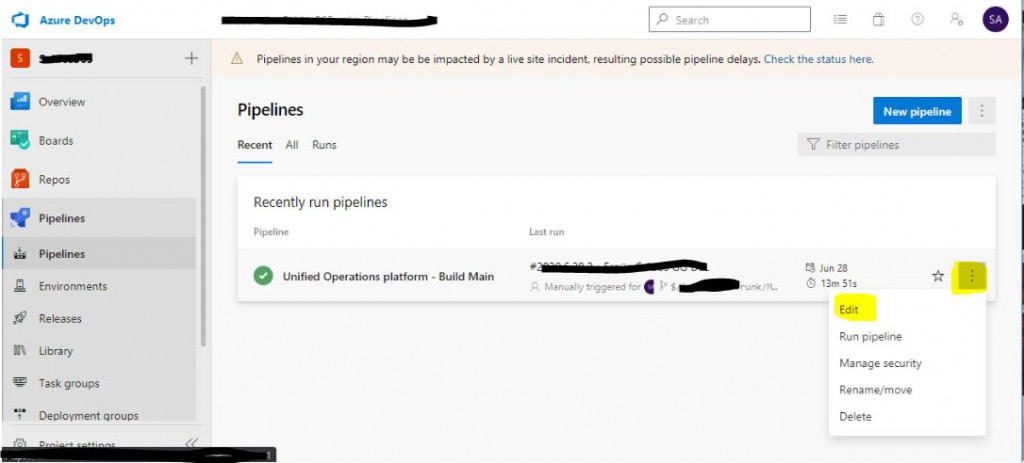
Click the Edit button from the ellipsis menu.

Image-2

Build steps are listed.

Image-3

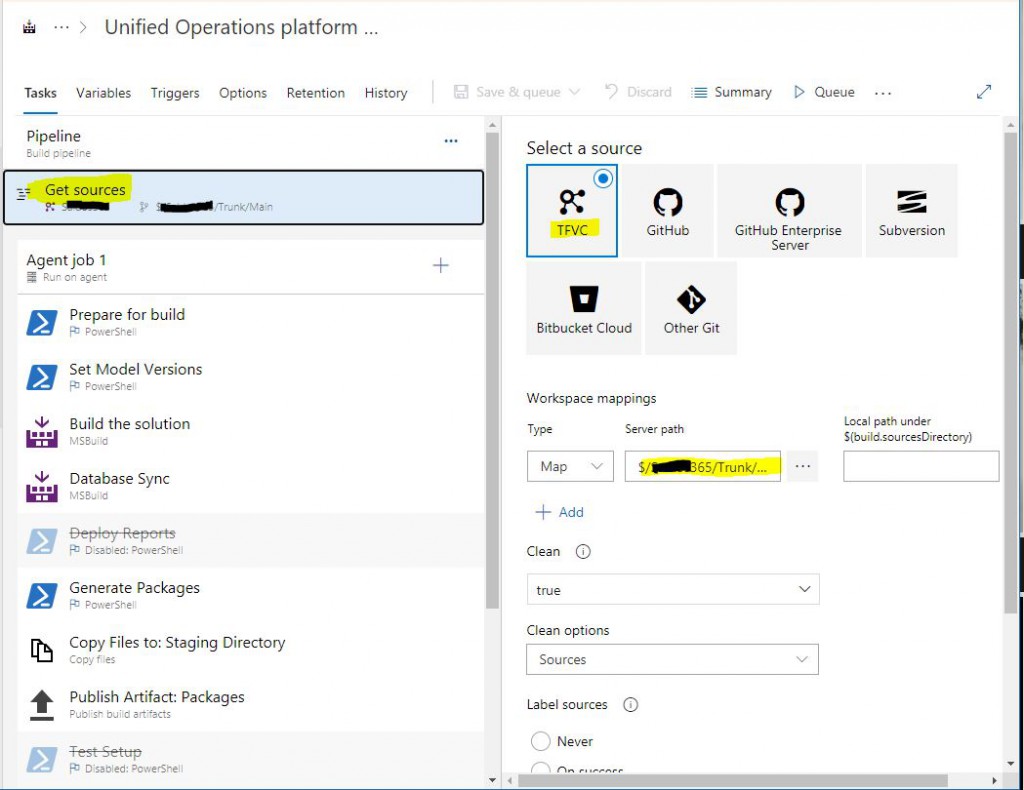
If you want to build a different Branch, you need to change the Server path. We are making a change here.

Image-4

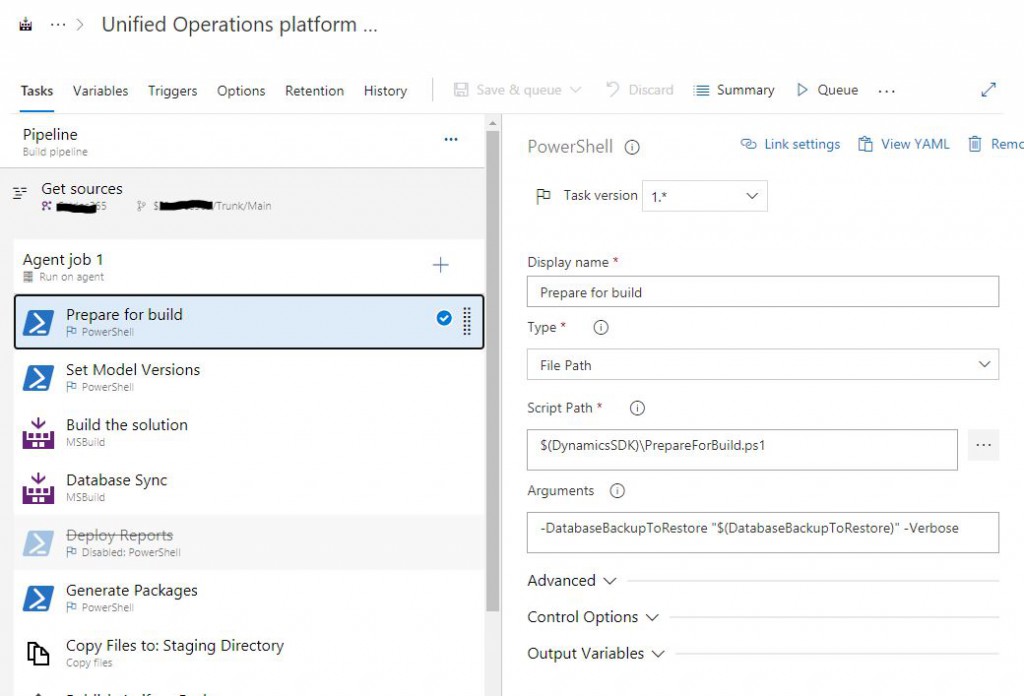
You can right click and Disable steps that are not required at this time. I disabled the Deploy Reports step because I do not have a report development.

Image-5

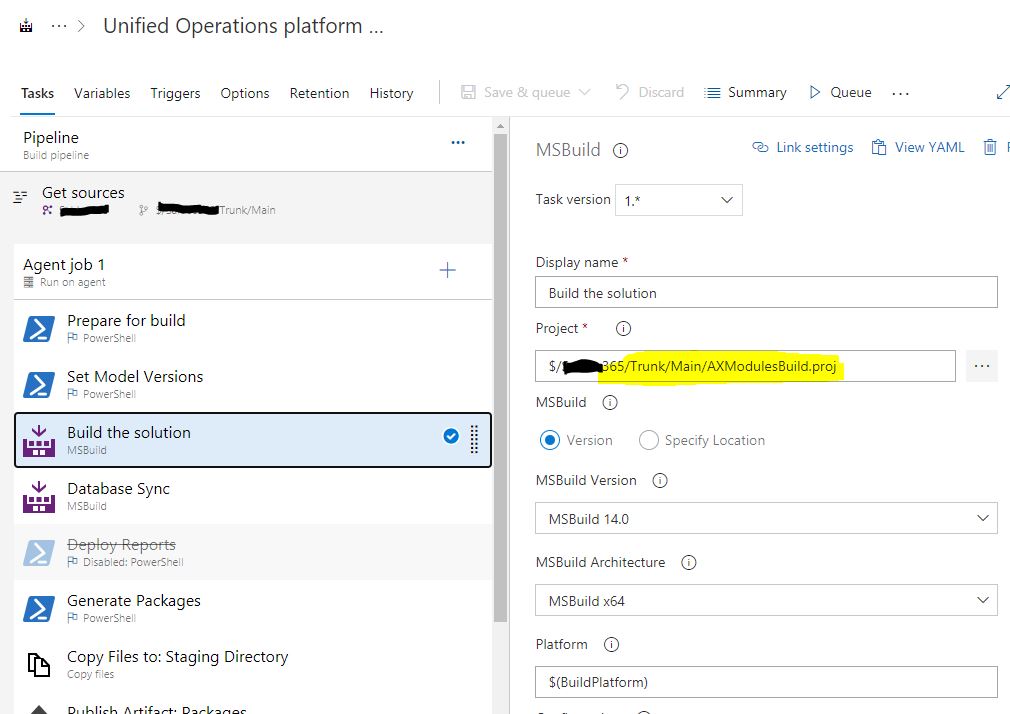
The main step is Build the solution. Our Branch path is here again. If you want to build a different Branch, you should change this as well.

Image-6

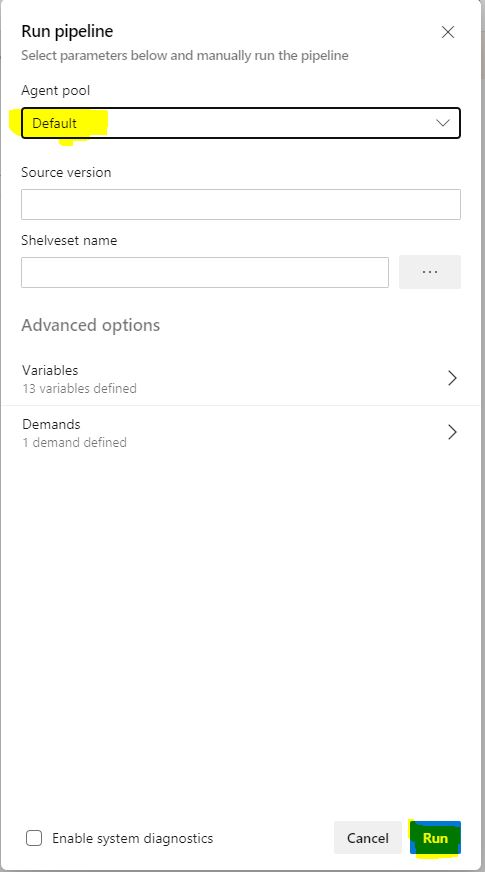
Click Queue. Whn you click Run in the popup window, Build operation starts.

Image-7

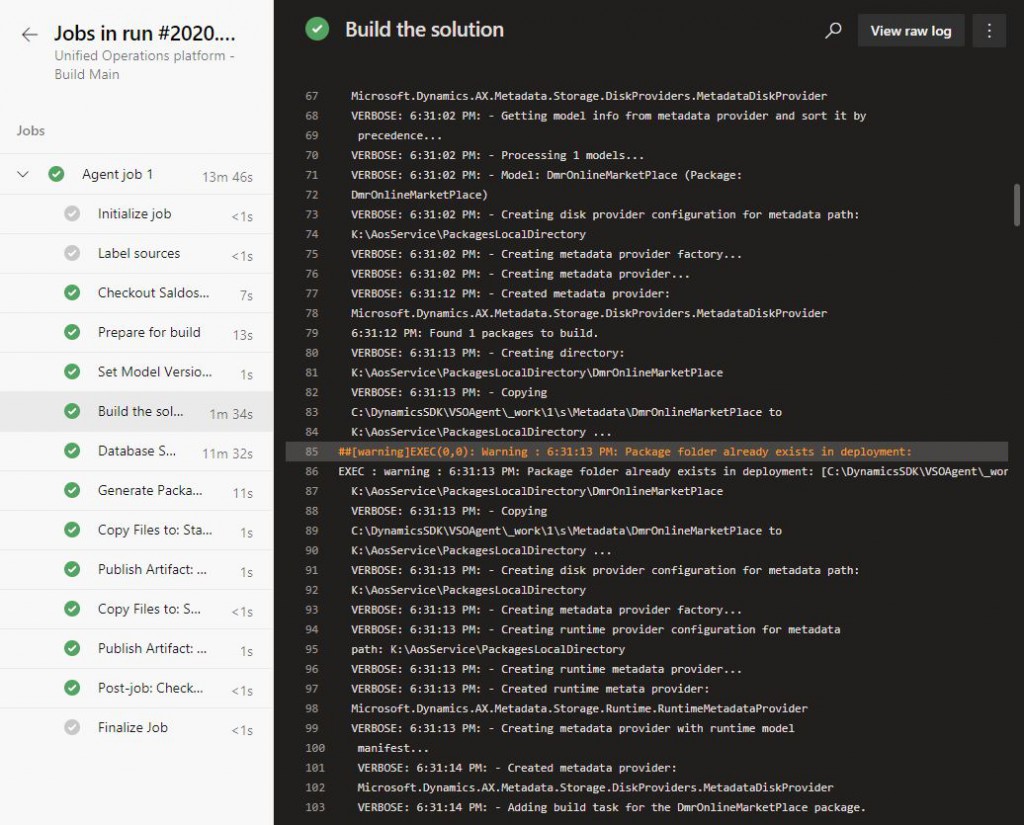
You can follow the Build steps.

Image-8

If it completes with no errors, it will look like the following. If it gives errors, it is necessary to examine the logs and errors. Generally there are not very complex problems. There are cases such as missing reference, incorrect Check-in, but there may be situations that need to be further examined. You can open it by clicking on the record.

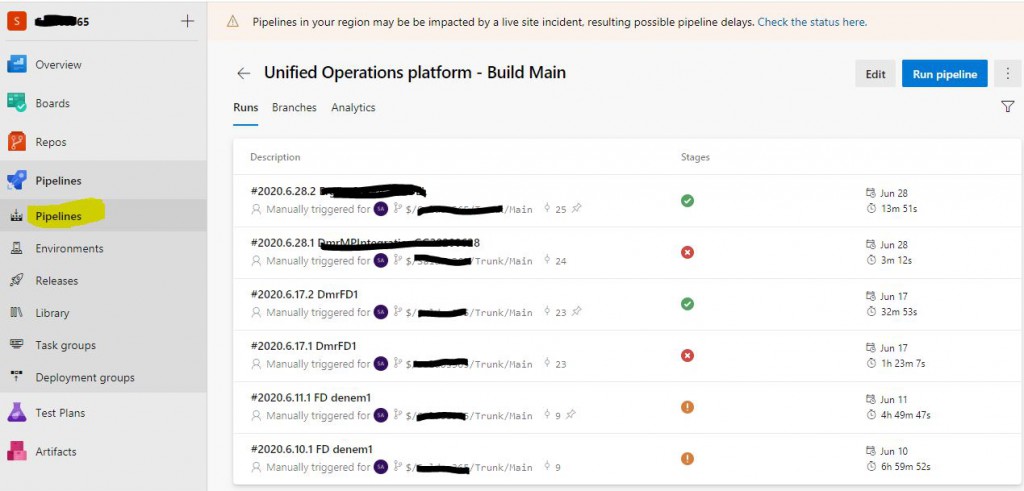
Image-9

When you enter, all your previous Builds will be listed. You can view their status and information. The first record is our last Build, completed without error. Click to open it.

Image-10

You can see details about the Build here. Click and open the relevant part (3 published).

Image-11

Under Packages, Deployable Package starting with AxDeployableRuntime is created. We need to download it from here and upload it to the LCS. I will explain this in my next article.  At this stage, the Build operation is done. Now let’s look at how you can create a new Pipeline.

Image-12

Main Pipelines are created by default. If you want to create them in other Branches, you either make all the definitions manually, which is very demanding, or you can use the Clone or Export features. For both cases, do not forget to change the path settings for the new Pipeline.

Image-13

You can Import the Exported file from the following path again. Generally code is transferred to live environment from Main or Release Branch, and to test environment from Dev Branch. Of course, these are approaches that vary depending on the project and the team.

Image-14

In this article, I tried to explain how Build is triggered through Azure DevOps. A machine is required for Build right now, but we will soon be able to do this thanks to an agent. It will be a faster and inexpensive solution. By completing this stage, we have reached the final stage in code migration. In my next article, I will explain how we deploy code over LCS.

Regards.

www.fatihdemirci.net

Microsoft Life Cycle Services, LCS, Azure, Azure DevOps, Build, Microsoft Dynamics 365, MsDyn365FO, MsDyn365CE, MsDyn365, Dynamics 365 Insights Power BI, Power Automate, Power Apps, Power Virtual Agents, what is Dynamics 365, Dynamics 365 ERP, Dynamics 365 CRM
X++ :16- ModifiedField Metodu Ne İşe Yarar?

Bu yazıda Dynamics 365 Finance and Operations tablo metotlarından ModifiedField () metodunu anlatacağım. ModifiedField () bir alanın verisi değiştirildiğinde eğer bir işlem yapmak gerekiyorsa bu metotta yapabilirsiniz. Doğrulama metodu olan validateField() bu metottan önce çalışacaktır. Metodun tetiklenmesi için alandan odağın çıkması gerekir. Bir örnek yapalım.

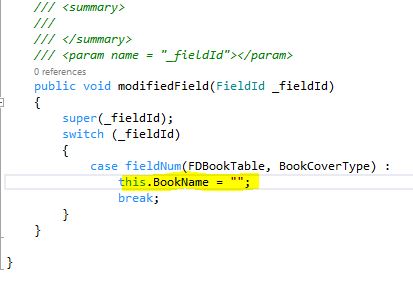
FDBookTable tablosunda metotlara sağ tıklayıp ModifiedField () metodunu Override ettim. Kapak tipi değiştirildiğinde kitabın adını boşaltan bir kod yazdım. Şöyle bir mantık eğer kapak tipi değişirse kitap adında bir değişiklik yapılması şarttır diye düşünüp örneklendirdim. Metot parametre olarak alan kodu alıyor ona uygun bir Switch Case yazmak lazım.

Resim-1

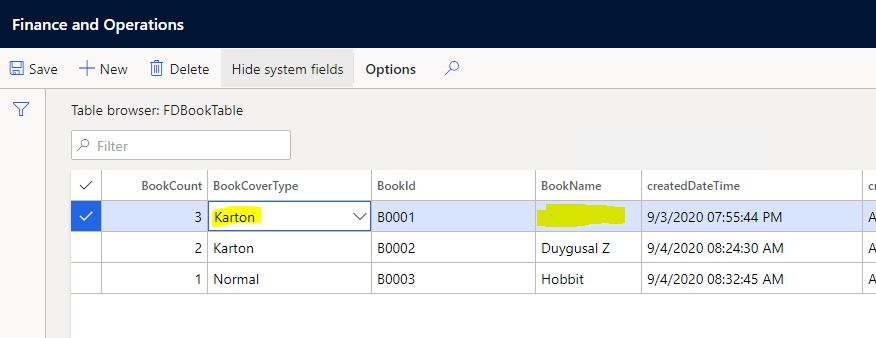
Derleyip tablo tarayıcısıyla açalım. Kapak tipini değiştirdiğimde Kitap adının boşaldığını göreceksiniz.

Resim-2

Bu yazıda ModifiedField() metodunun mantığını anlatmaya çalıştım. Bu metotları mantığına uygun kullanırsanız çok rahat edersiniz. Ama mantığını uygun olmayan kodları buraya yazdığınızda uygulama içinden çıkılmaz bir hal alıyor.

Selamlar.

www.fatihdemirci.net

TAGs: X++, ModifiedField, Azure, Azure DevOps, Microsoft Dynamics 365, MsDyn365FO, MsDyn365CE, MsDyn365

How to Add a User to Dynamics 365 Finance and Operations?

In this article, I will try to explain how to define new users for Dynamics 365 Finance and Operations. If you want to add users to the test and live systems, you usually use import from Azure Active Directory. If you want to create a test user for your development machine, you can create a new user. Let’s take a look at both now.

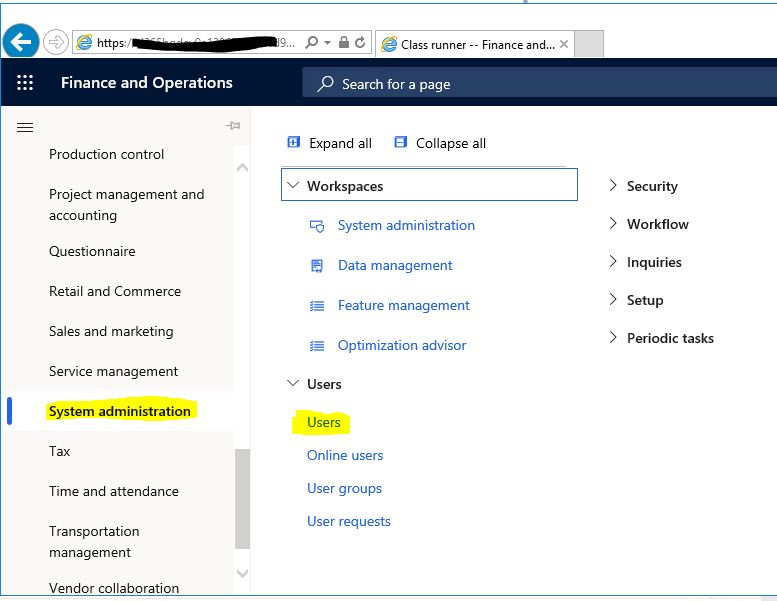
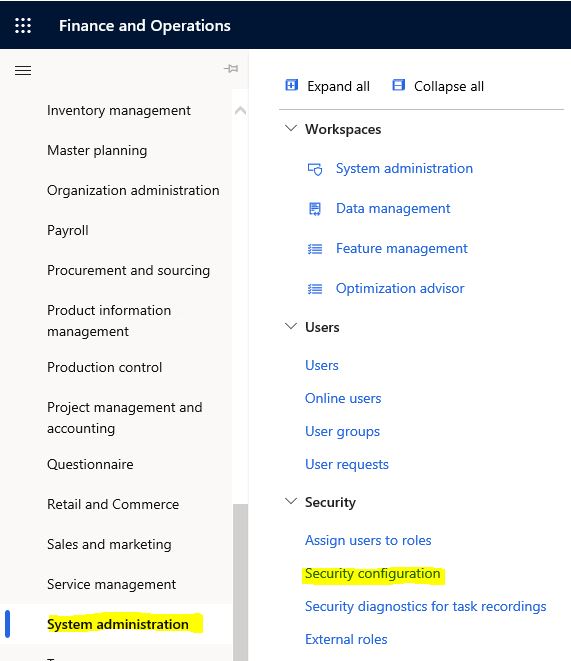
First, open the System Administration->Users form. You must login as a user with the Admin right. If this is a development environment, the account you used for installation already has this right. I explained it in my previous articles.

Image-1

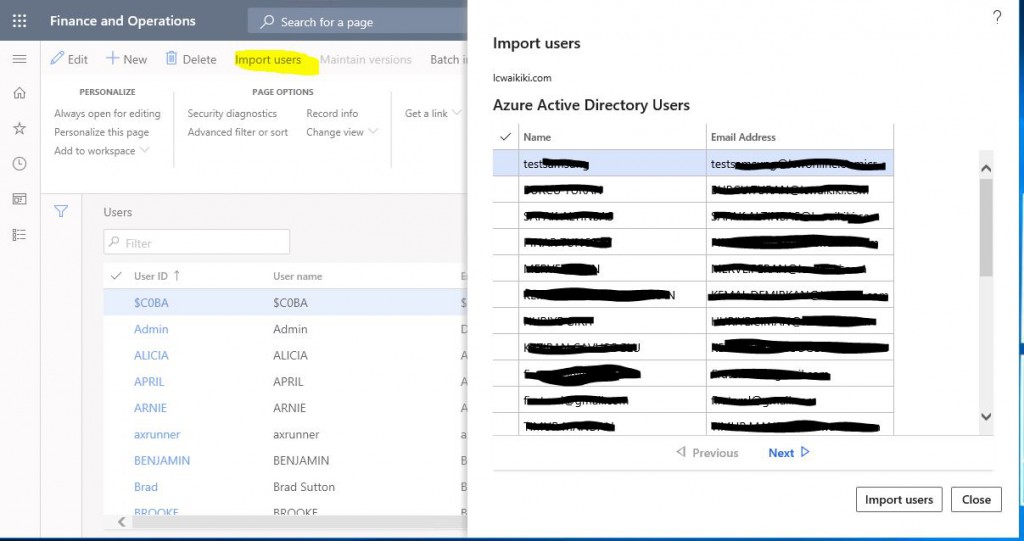
Click Import users, and the page that opens lists the users we can import. You can import the users you want.

Image-2

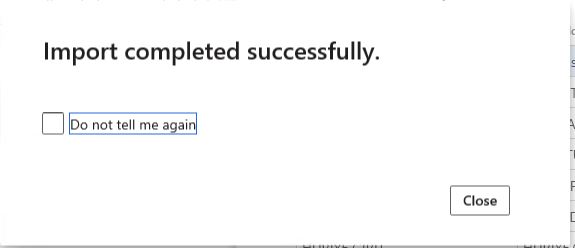
An information message appears. Then you need to grant the users the necessary roles. In the old version, there was a role assignment tab during Import. The new version does not have it. I think it was a nice feature. It gets messy especially when I transfer multiple users.

Image-3

Now let’s add a user that is not in Azure Active Directory. For example, I need to do some tests on my own development machine, or consultants need to do the initial tests in VM. Of course, security should be involved in these tests because when I open the application via VS, it opens as Admin and does not have any security restrictions. I need a user to assign the required roles. So I need to create a new user.

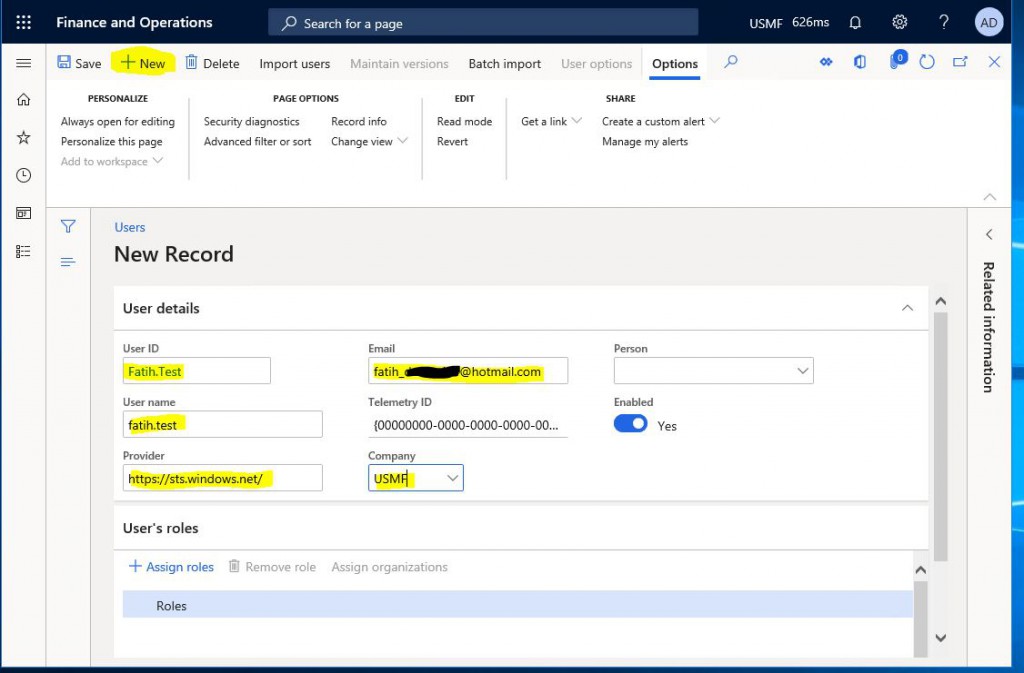
I click New and start creating. I enter the user information. I used a Hotmail account. You need to change the Provider according to the account you use.

  1. If it’s an account that’s in its own AAD Domain: https://sts.windows.net
  2. If it’s an account that’s in a different AAD Domain: https://sts.windows.net/XXXXX.XXX, (https://sts.windows.net/emiralfg.com)
  3. If it’s a Microsoft account: https://sts.windows.net/hotmail.com

Image-4

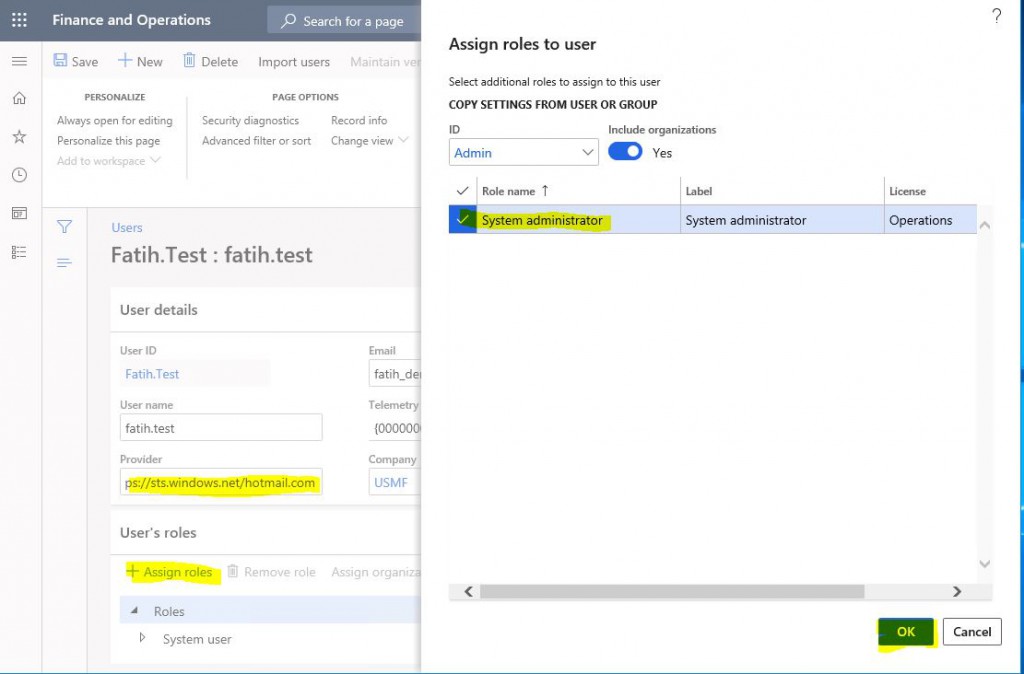
User is created after saving. In Image-4 the Provider is missing. It should be as in Image-5. Add new role by clicking Assign Role. Here you can assign any role you want. You can also have your own roles created for testing. Since I want to use it like Admin, I assigned the role of Admin.

Image-5

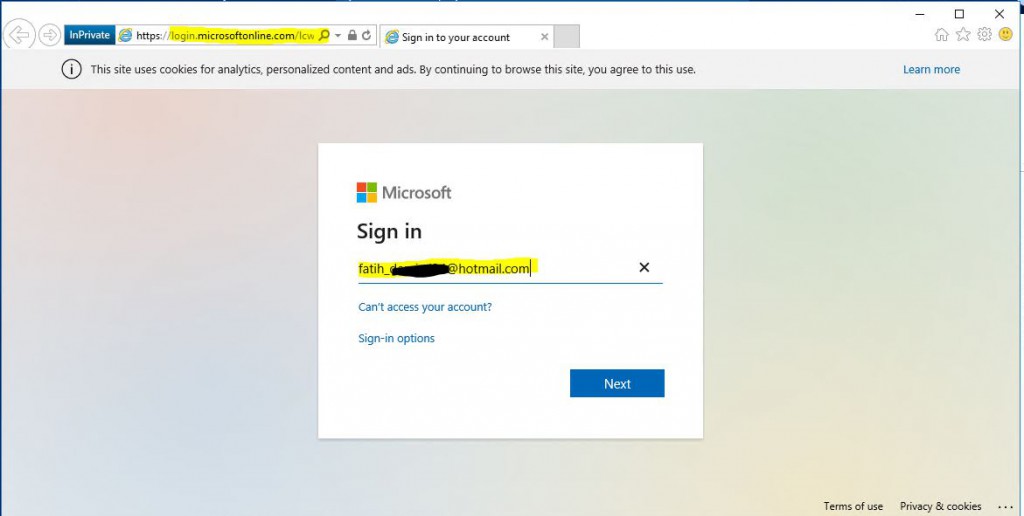
I try to open an InPrivate browser, paste the address of the environment, and login with my user.

Image-6

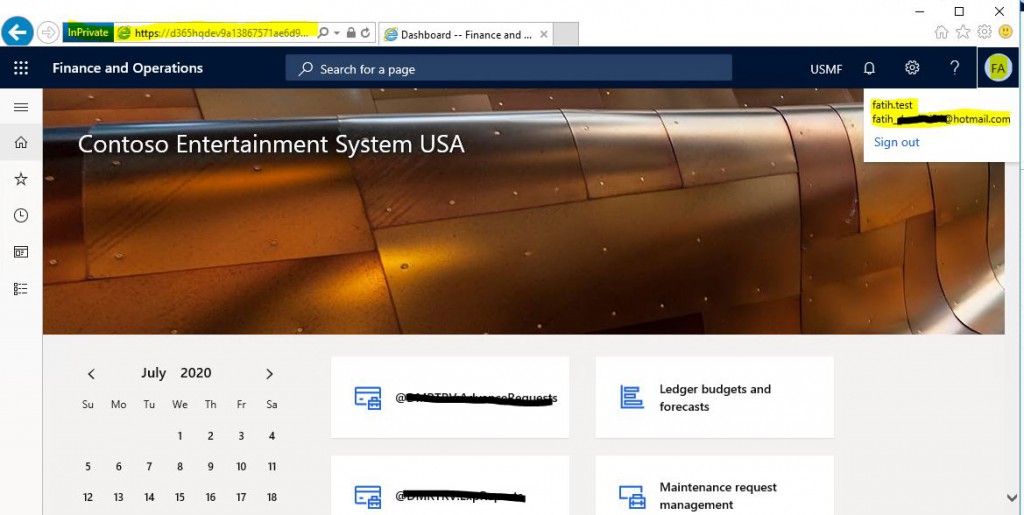
I entered the environment without any problems. Since I logged in from a different environment, a few security steps were required, but it didn’t cause any problems.

Image-7

In this article, I tried to explain how to add users to different environments of Dynamics 365. Security and user management is very important. Many details are available and I plan to mention them in the following articles.

Regards.

www.fatihdemirci.net

TAGs: Microsoft Life Cycle Services, LCS, Azure, Azure DevOps, Import User, Microsoft Dynamics 365, MsDyn365FO, MsDyn365CE, MsDyn365, Dynamics 365 Insights Power BI, Power Automate, Power Apps, Power Virtual Agents, what is Dynamics 365, Dynamics 365 ERP, Dynamics 365 CRM
How to Publish Dynamics 365 Finance and Operations SSRS Reports?

In this article, I will explain how you can publish SSRS reports (Deploy) for Dynamics 365 Finance and Operations application. It is one of the basic reporting tools of SSRS. You can use it in the reports you want to produce output. After the initial installation or after creating a new report, you need to publish it to see it in the app.

First, open Power Shell as Admin.

Run the following code for your Azure environments. Folder paths may change with updates.

K:\AosService\PackagesLocalDirectory\Plugins\AxReportVmRoleStartupTask\DeployAllReportsToSSRS.ps1 -PackageInstallLocation “K:\AosService\PackagesLocalDirectory”

Run the following code for local environments.

C:\AOSService\PackagesLocalDirectory\Plugins\AxReportVmRoleStartupTask\DeployAllReportsToSSRS.ps1

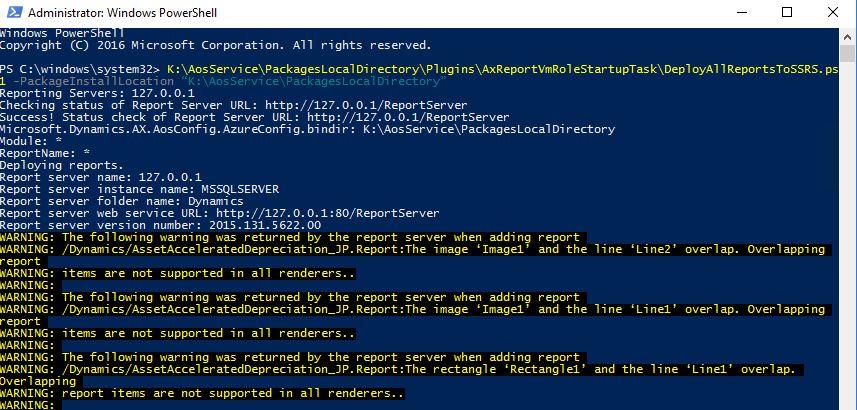
There may be some warnings, but you can ignore them while waiting for the result.

Image-1

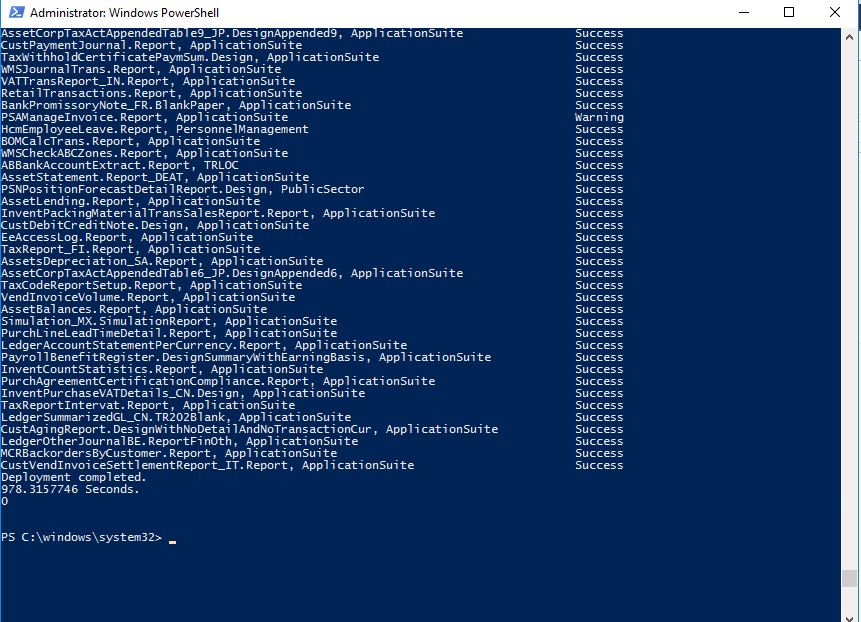
All reports published without any errors.

Image-2

If you want to publish a certain report with Power Shell, you can use the code below.

K:\AosService\PackagesLocalDirectory\Plugins\AxReportVmRoleStartupTask\DeployAllReportsToSSRS.ps1-PackageInstallLocation “K:\AosService\PackagesLocalDirectory” -Module ApplicationSuite –ReportName .Report

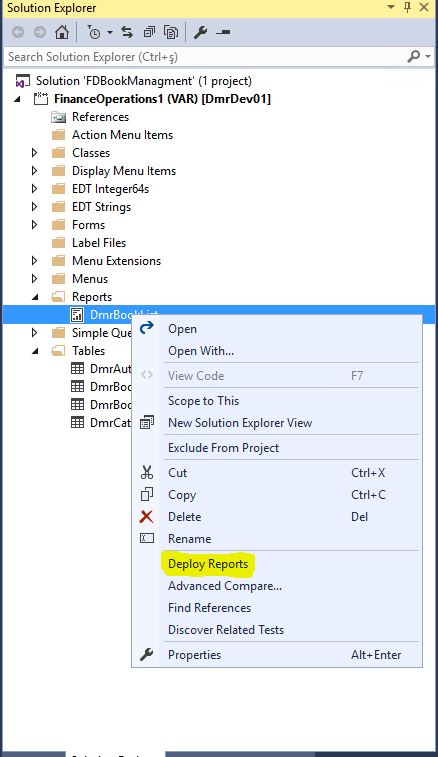
Finally, you can publish a newly created report via Visual Studio as shown in Image-3.

Image-3

In this article I explained how to publish SSRS reports. There are many topics related to reporting. In my following articles, I will talk mostly about reporting features.

Regards.

www.fatihdemirci.net

TAGs: Microsoft Life Cycle Services, LCS, Azure, Azure DevOps, SSRS, Deploy, Microsoft Dynamics 365, MsDyn365FO, MsDyn365CE, MsDyn365, Dynamics 365 Insights Power BI, Power Automate, Power Apss, Power Virtual Agents, what is Dynamics 365, Dynamics 365 ERP, Dynamics 365 CRM

X++ :21- ChangeCompany Nedir?

Bu yazıda X++ sorgu anahtar kelimelerinden changeCompany inceleyeceğim. Öncelikle uygulamanın şirket yönetimini anlamak gerekiyor.

Uygulamadan istediğiniz kadar şirket tanımlayabiliyorsunuz. Kullanıcılar uygulamaya girdiğinde bir şirkette işlem yapıyorlar. İstedikleri zaman şirket değiştirebiliyorlar. Tablolarda DataAreaId sayesinde verilerin hangi şirkete ait olduğu tutuluyor. Eğer bir tablonun verisi şirket bağımsız olsun diyorsanız ayarlayabiliyorsunuz. Ancak bu tip tabloların dışında yaptığınız bütün işlemler bulunduğunuz şirkette gerçekleşiyor. Bir sorgu yazıp verileri görmek istediğinizde siz Range olarak şirket vermezseniz bile sistem SQL’e giden koda otomatik bulunduğunuz şirketi ekliyor. Eğer faklı kodunuz farklı şirkette çalışsın istiyorsanız bunun için changeCompany kullanabilirsiniz. Bir örnek yapalım.

static void Dmr_FD_ChangeCompany(Args _args)

{

DmrAuthorTable  authorTable;

DmrBookTable    bookTable;

;

changeCompany(“USF”) // Şu anda USMF şirketindeyim ve çalıştırdığım kodlar burada çalışacak. Ancak changeCompany ile şirket değiştirip bu kod bloğunda USF’te çalışsın diyorum.

{

while select authorTable

notexists join  bookTable

where authorTable.AuthorId ==  bookTable.AuthorId

{

info(strFmt(“%1 %2 %3 %4″, bookTable.BookId , authorTable.AuthorId,

authorTable.FirstName ,  bookTable.Title));

}

}

}

changeCompany çok kullanılan hayat kurtaran bir özellik ancak genelde yanlış kullanıldığını görüyorum. Örnek 3 faklı şirkette 1000 satır veri aktarımına benzer bir kodunuz var diyelim. Arkadaş bu veriyi gruplamadan her bir satıra changeCompany yazıyor ve bunun hızlı çalışmasını bekliyor. Olmaz changeCompany zaman alan bir koddur ve mümkün olduğunca az kullanılmalıdır. changeCompany bloğunda yazılan her kod sanki değiştirdiğiniz şirkette çalışır sadece select değil Insert Update Delete işlemlerinde yapabilirsiniz.

Selamlar.

www.fatihdemirci.net

TAGs: X++, changeCompany, Azure, Azure DevOps, Microsoft Dynamics 365, MsDyn365FO, MsDyn365CE, MsDyn365

X++ :15- ValidateField Metodu Ne İşe Yarar?

Bu yazıda Dynamics 365 Finance and Operations tablo metotlarından validateField() metodunu anlatacağım. validateField() bir alanın verisi değiştirildiğinde doğrulamaların yapıldığı metottur. Metodun tetiklenmesi için alandan odağın çıkması gerekir. Bir örnek yapalım.

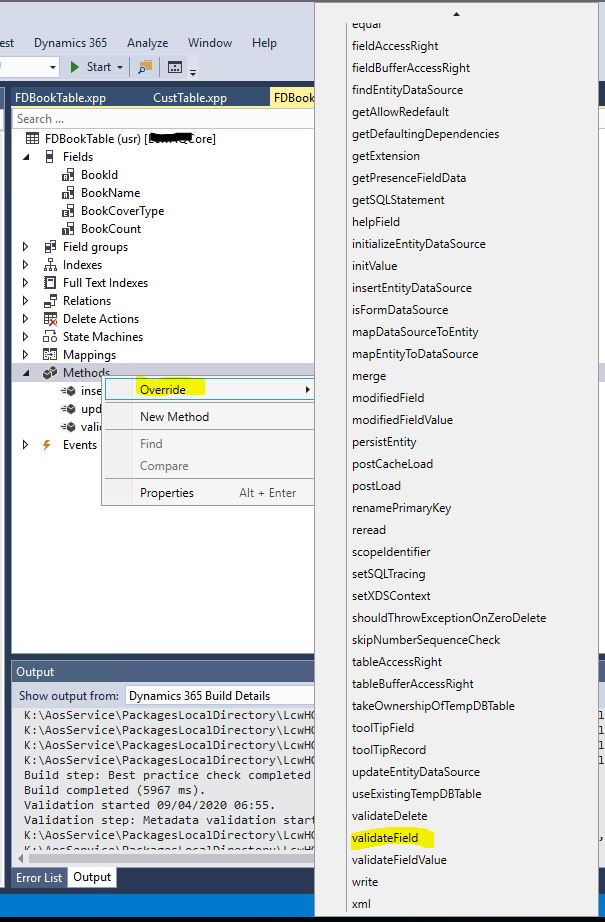
FDBookTable tablosunda metotlara sağ tıklayıp validateField () metodunu Override ettim.

Resim-1

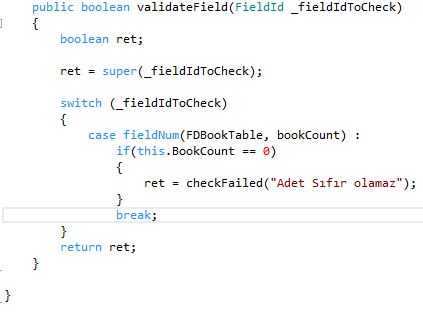
Metoda parametre olarak alan kodu geliyor ona bağlı bir Switch Case yazdım. BookCount Sıfır olarak güncellenmeye çalışıldığında hata verdin diye bir kod yazdım. Hata mesajı için CheckFailed() kullandım.

Resim-2

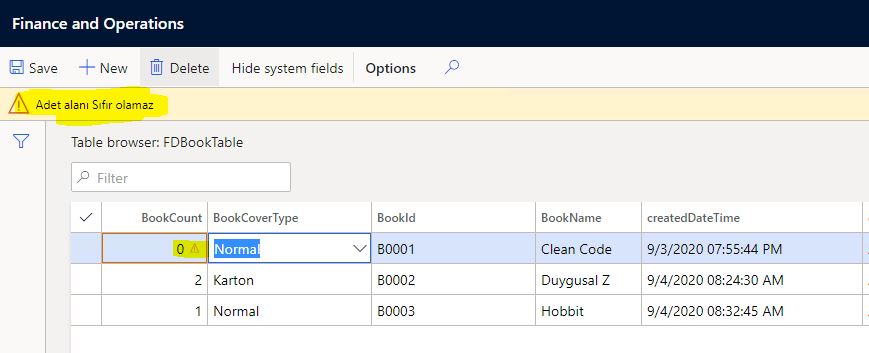
Tablo tarayıcısıyla açtım ve BookCount sıfır olarak güncellemeye çalıştım ve hata mesajını ekranda gördüm. Bu hatayı düzeltmeden kaydetme veya başka işlem yapamazsınız.

Resim-3

boolean validateField(FieldId p1)

{

boolean                     ret;

#isoCountryRegionCodes

int                         lengthAgencyLocationCode;

ret = super(p1);

if (ret)

{

switch (p1)

{

case fieldNum(CustTable, CreditMax) :

if (this.CreditMax < 0)

{

ret = checkFailed(“@SYS69970″);

}

break;

case fieldNum(CustTable, InventLocation) :

ret = this.InventStorageDimMap::validateField(fieldNum(InventStorageDimMap, InventLocationId));

break;

case fieldNum(CustTable, Rfc_MX) :

if (SysCountryRegionCode::isLegalEntityInCountryRegion([#isoMX]))

{

ret = taxRegistrationValidator.validateRFC(this.Rfc_MX, this.CompanyType_MX);

}

break;

case fieldNum(CustTable, MainContactWorker) :

if (this.MainContactWorker)

{

ret = smmUtility::isValidWorkerInCurrentCompany(this.MainContactWorker);

}

break;

case fieldNum(CustTable, Blocked) :

ret = this.validateBlocked(this.Blocked);

break;

case fieldNum(CustTable, EinvoiceEANNum):

if (SysCountryRegionCode::isLegalEntityInCountryRegion([#isoDK]))

{

ret = CustTable::checkEInvoiceEAN(this.EinvoiceEANNum);

}

break;

}

}

return ret;

}

CustTable  validateField () metodunu inceleyelim. Burada uzun validasyonların metotlara taşındığını ve genelde tek satırlı kontroller olduğunu görüyoruz. checkFailed direk veya metotların içinde kullanılıyor. validateField () metodu sadece girişi bitip başka bir nesneye odaklanmak istediğinizde çalışır. Genelde o nesneden ayrılmadan çalışması isteniz ancak bu mümkün değil.

Selamlar.

www.fatihdemirci.net

TAGs: X++, validateField, Azure, Azure DevOps, Microsoft Dynamics 365, MsDyn365FO, MsDyn365CE, MsDyn365

Dynamics 365 Finance and Operations Change-Based Alert Nedir?

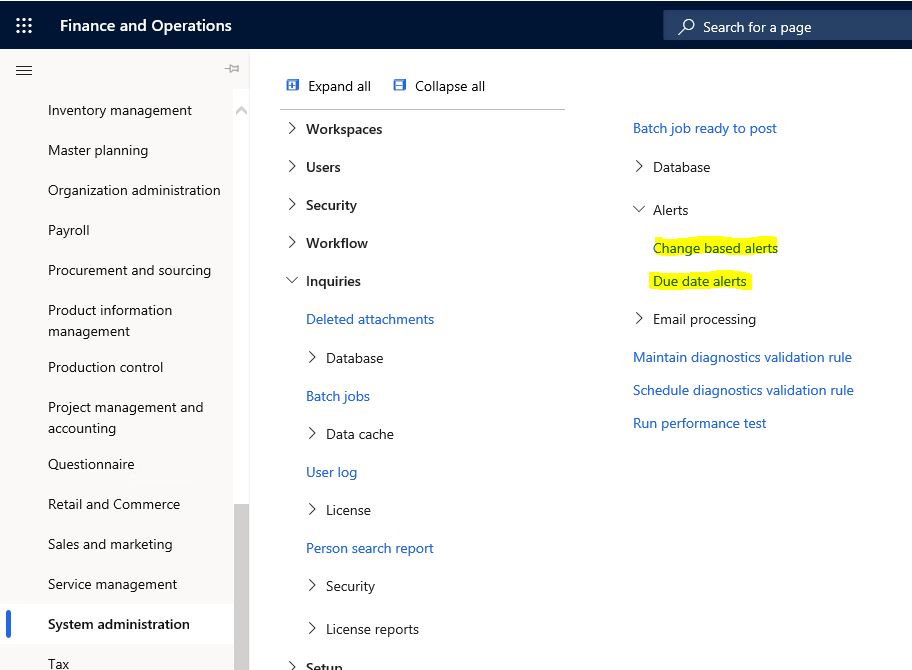
Bu yazıda Dynamics 365 Finance and Operations uygulamasının çok güzel bir özelliği olan Change-Based Alert’den bahsedeceğim. Nedir derseniz sistem içindeki herhangi bir tabloda yapılan herhangi bir işlemden sonra bildirim göndermedir. Bu bildirim ekranda da çıkabilir mail olarak ta alabilirsiniz. Bu özellik kullanıcının kendi ayarlarını yapabileceği bir yapıdadır. Kullanıcı bazlı oluşturulabilir. Şimdi bir örnekle uyarı kurulumu yapalım. Öncesinde Change-Based Alert toplu işini kurmamız gerekiyor.

Resim-1

Read more

How to Import and Update Data to Excel via Dynamics 365 Finance and Operations Forms?

In this article, I will explain how to import data from Dynamics 365 Finance and Operations forms into Excel and change them in Excel. Yes, you can change the data through Excel and enter new data. Of course, it may not work the way you want in all situations, but it is quite successful in general. One of the biggest advantages of Microsoft is that all of these systems are integrated.

Let’s have a look at our example. I open the VendGroup form, from which I transferred data in my previous articles.

Image-1

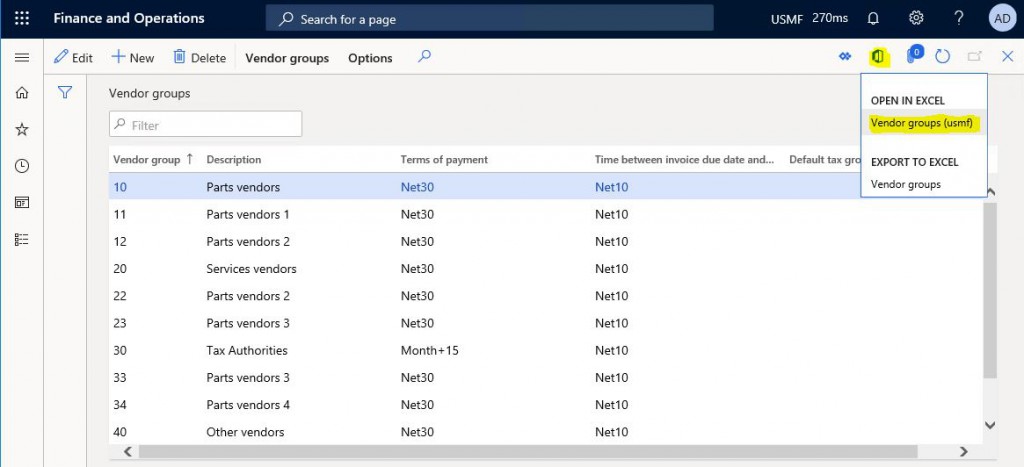
From the form that opens, I click the Office icon and click Vend Group (usmf). If your form has multiple data sources and different structures, you can see several different options here.

Image-2

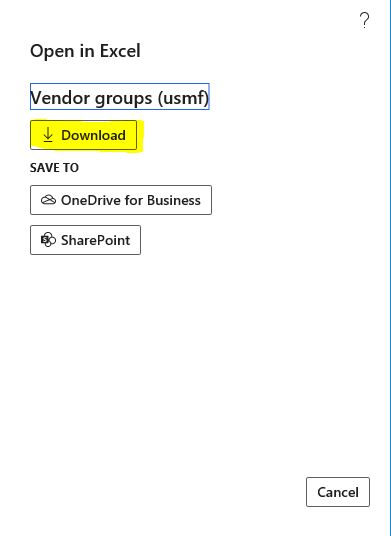
I click Download to download it to the local machine.

Image-3

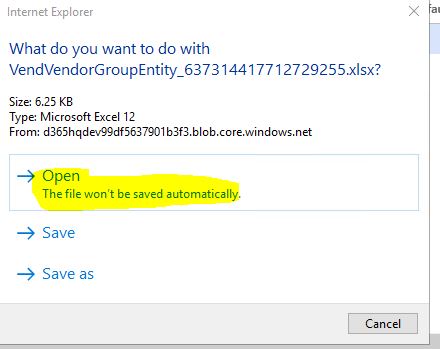
There may be warnings due to security settings, you can accept them and continue.

Image-4

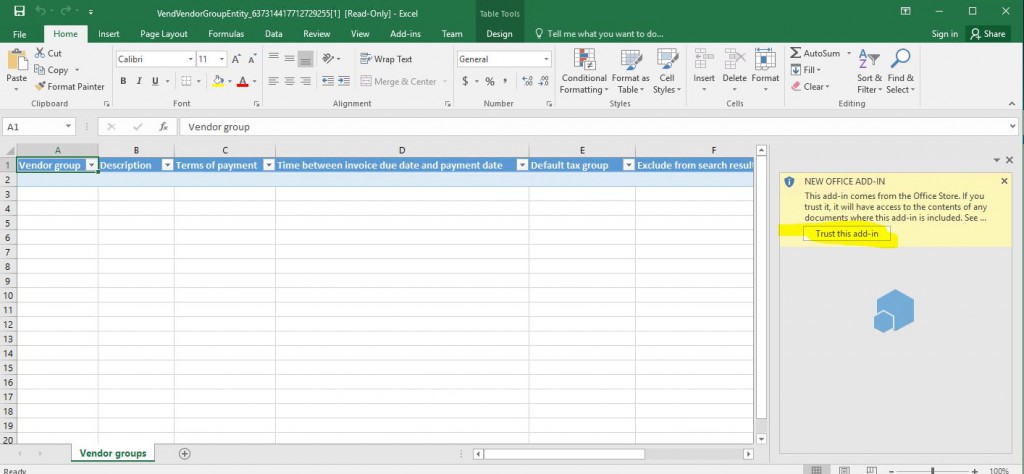
I click Trust this add-in, which will appear when you open it for the first time.

Image-5

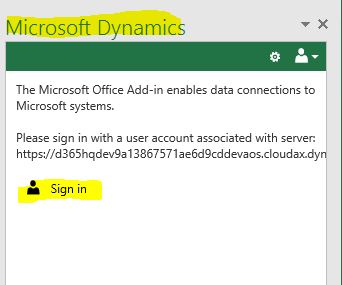
The home page is opened. Here you must log in as an authorized user.

Image-6

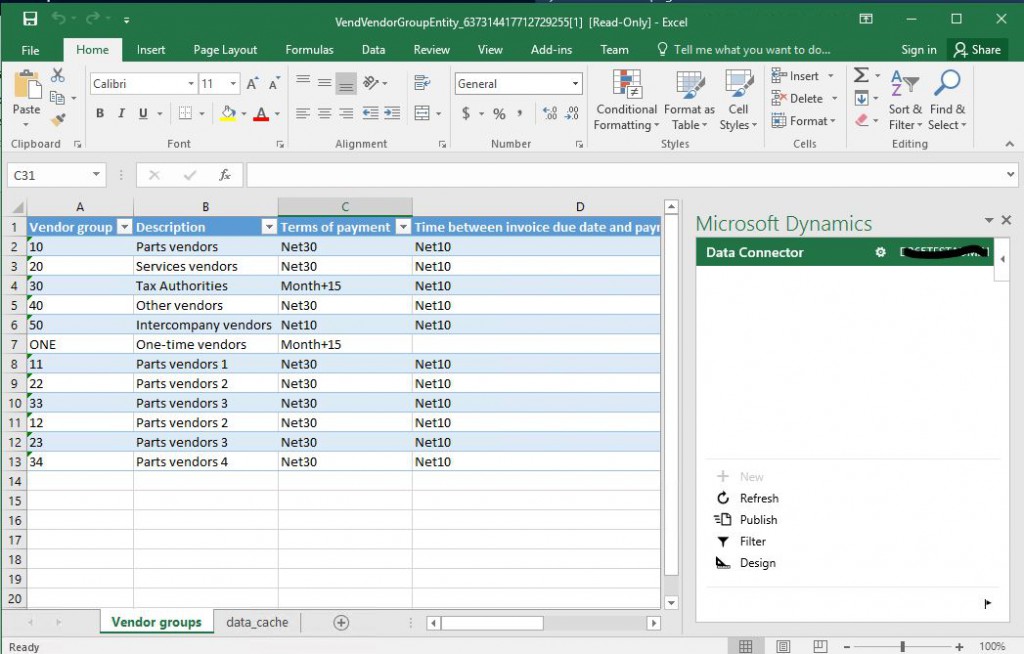
If there is no problem, the form will fill automatically and the menu will appear on the right.

Image-7

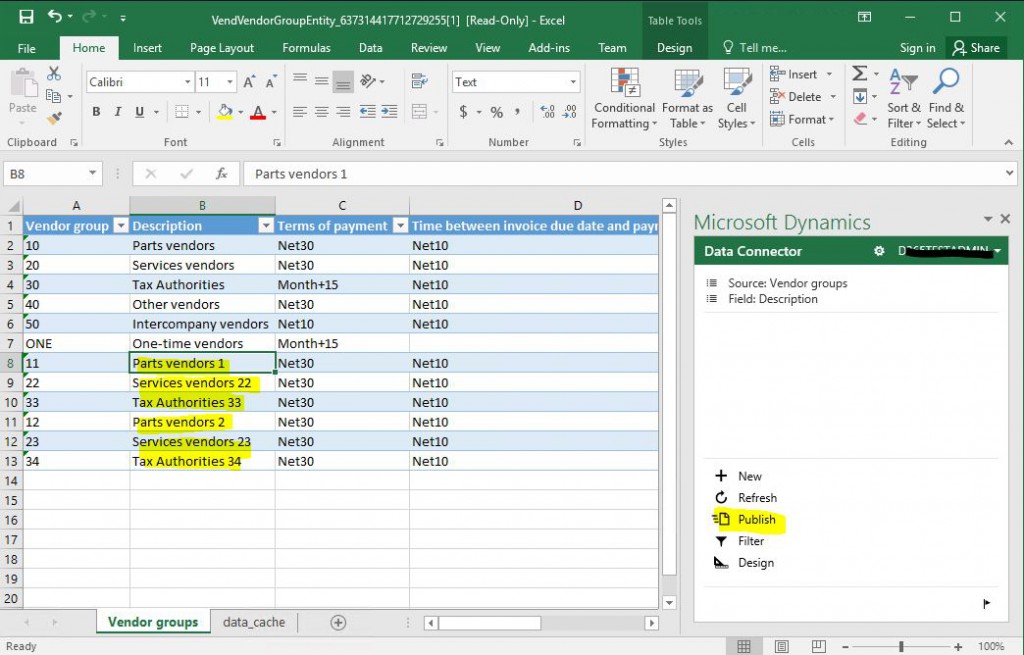
I did not correctly provide the Description information in data transfer, so I correct it and send it to the system by clicking Publish.

Image-8

When I refresh the VendGroup form, I see that the updates I made through Excel are applied.

In this article, I explained how you can transfer data to Excel via any form and upload your updates via Excel to the system. Of course, this does not work efficiently for very large data, you need to be careful. It is a feature that will facilitate the daily lives of the users at many points. It would not be wrong to say that the product is used very effectively with the Office applications. It was not that easy before.

Regards.

www.fatihdemirci.net

TAGs: Microsoft Life Cycle Services, LCS, Azure, Azure DevOps, Excel Export Import, Microsoft Dynamics 365, MsDyn365FO, MsDyn365CE, MsDyn365, Dynamics 365 Insights Power BI, Power Automate, Power Apss, Power Virtual Agents, what is Dynamics 365, Dynamics 365 ERP, Dynamics 365 CRM

How to Update the Version in Dynamics 365 Finance and Operations Environments?

In this article, I will try to explain how you can update the versions of your Dynamics 365 Finance and Operations environments. First of all, we should give credit where it is due. Microsoft made the ERP system update almost like the Windows 10 update with a very good solution. I think the One Version approach is a revolution in business software. All customers using ERP in the cloud have to receive updates published periodically. The good thing here is that Microsoft updates the system at will, thanks to the Extension approach. Your developments are rarely affected by this. In the old system, it was a process that took months to even upgrade to a higher update. Now you can get it done in days or even hours.

In this article, I will explain how to upgrade a demo environment from CU34 to CU35.  First, select your project.

Image-1

Select the environment you want to update.

Image-2

Your environment information appears. Go down and look at the update information.

Image-3

It says that there is an update. Click View Update.

Image-4

It shows all of the update packages. Click Save package.

Image-5

Here I have selected all the packages. You must do this for the version update. If you need different updates, you can choose the package directly from here. Then click Save package.

Image-6

Name the package and click Save package.

Image-7

This takes some time depending on the size of the package.

Image-8

If it completes without error, the following explanation will appear. Complete the process by clicking Done.

Image-9

Go to the Asset library and open the Software deployable package tab. Package has arrived but has not been approved yet. We have to wait for a while.

Image-10

After approval, open your environment again and click Apply updates.

Image-11

Select your package from the page that opens and click Apply.

Image-12

The confirmation screen will appear. Click Yes and continue.

Image-13

It says our version will be updated. Click Yes.

Image-14

After that, the update process starts. You can track the status of the environment here. If there is no problem within 1 hour, the process will be completed. If there is a problem, you can refer to the log to see the origination.

Image-15

When the update is complete, if there was a problem, there are options such as undo and retry.

Image-16

In this article, I explained how an environment is updated to the new version. It’s a very simple process. If you need to update multiple environments, you don’t need to create packages for all of them. You can use the same package for all your environments. Make sure your environment is open before starting the update. If you turn off the machine from Azure side, LCS doesn’t see it. After the update is complete, it is useful to start a synchronization via VS for demo environments like this.

Regards.

www.fatihdemirci.net

TAGs: Microsoft Life Cycle Services, LCS, Azure, Azure DevOps, Update, Microsoft Dynamics 365, MsDyn365FO, MsDyn365CE, MsDyn365, Dynamics 365 Insights Power BI, Power Automate, Power Apps, Power Virtual Agents, what is Dynamics 365, Dynamics 365 ERP, Dynamics 365 CRM

Page 12 of 17« First...1011121314...Last »