Posts Tagged ‘ LCS

Dynamics 365 Cloud Hosted makineleriniz için Azure Auto-shutdown nasıl kurulur?

Dynamics 365 ile hayatımıza Developer VM’ler girdi ve bunlar kullandıkça öde mantığında çalıştığı için çalışmadığımız zamanlarda kapatılması gerekiyor. Özellikle birden çok yazılımcının çalıştığı projelerde maliyet ve zaman yönetimi açısından sorun olmaması için sanal makine açılış ve kapanışını belli bir düzene sokmakta fayda var. Bu yazıda Azure ile gelen Auto-Shutdown özelliğini anlatacağım. Arıca daha ileri seviye ayarlamalar için kullanabileceğiniz bir üründen bahsedeceğim.

Öncelikle Azure Auto-shutdown nedir ona değinelim. Bu özellik size sanal makinelerinizi her gün belli saate otomatik kapatma imkânı verir. Ayrıca bildirim mailleri ile de özel aksiyon almanıza olanak sağlar. Nasıl kurulur ve bildirimler nasıl gelir hızlıca bakalım.

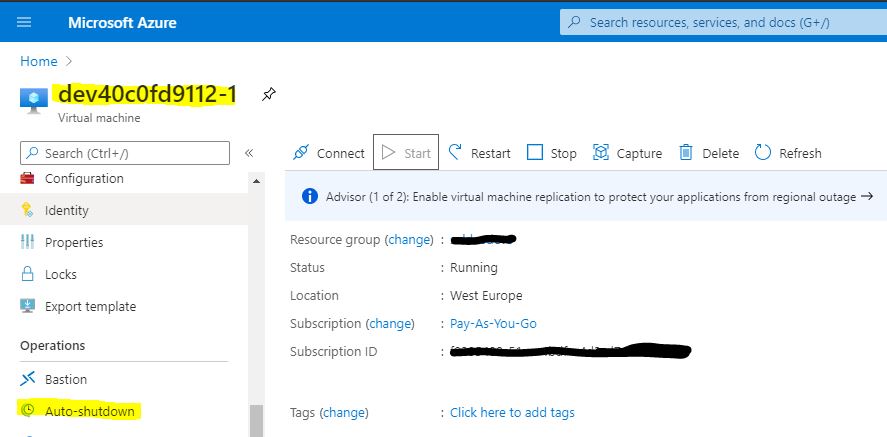
Azure Portal’e girip sanal makinemizi seçiyoruz. Menüden Auto-shutdown’a tıklıyoruz.

Resim-1

Read more

Dynamics 365 Finance and Operations için yeni bir Build ortamı nasıl ayağa kaldırılır?

Bu yazıda Dynamics 365 Finance and Operations için yeni Build tipinde bir sanal makine nasıl ayağa kaldırılır adım adım anlatmaya çalışacağım.

Başlamadan önce eğer bir müşteri uyarlama projeniz varsa burada gelen SandBox Develop And Test ortamını Build olarak ayarlamanız öneriliyor. Çünkü bu ortama yakın zamanda admin giriş yetkisi kalkacak ve geliştirme için kullanmak pek mümkün olmayacak. Dolayısıyla Build olarak ayarlamakta fayda var. Ayrıca yine yakın zamanda çıkacak bir Agent sayesinde bütün bir VM ayırmadan Build yapabileceğiz.

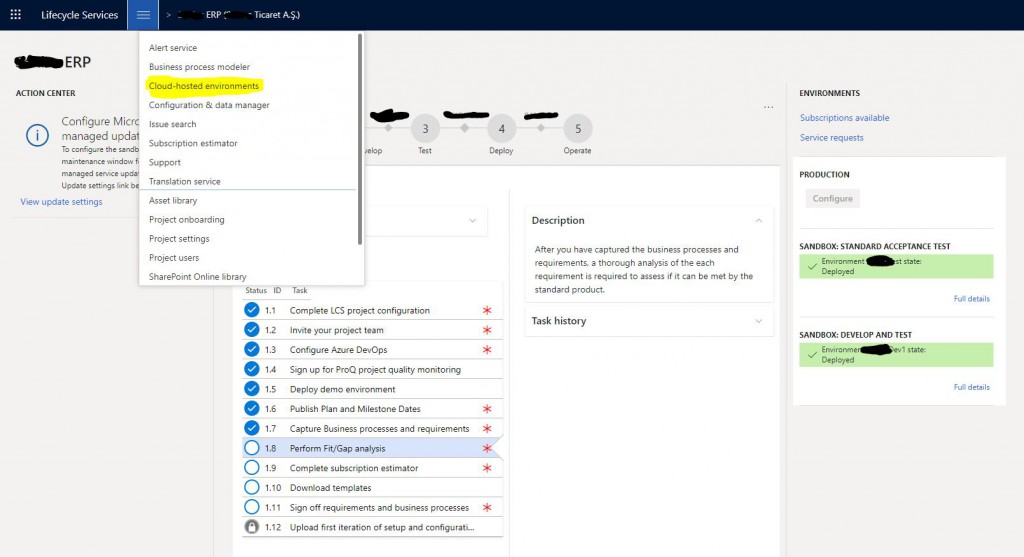
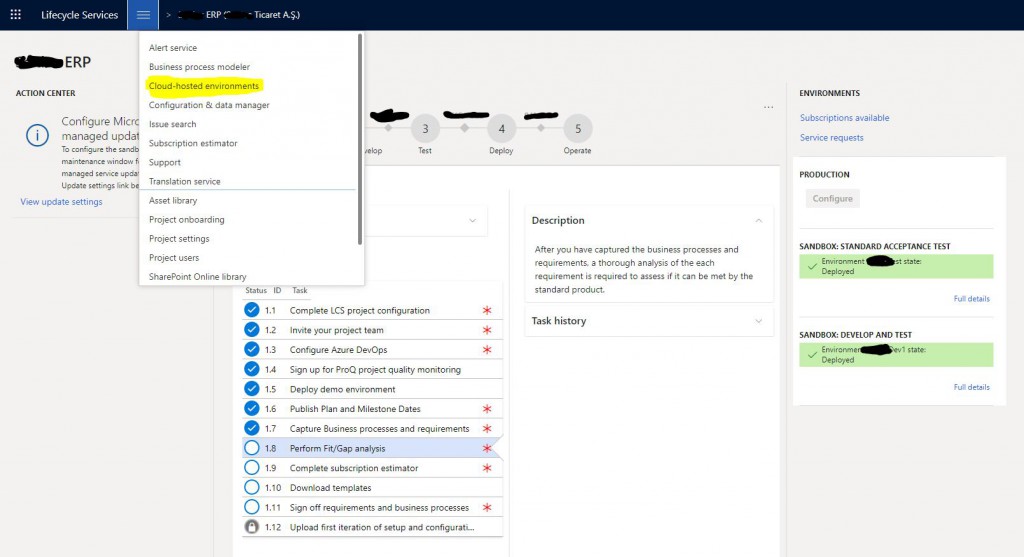
Biz bu örnekte Cloud-hosted environment üzerinden yeni bir Build makine oluşturmayı göreceğiz. Sandbox ile aynı adımlara sahip dolayısıyla ikisini de kapsayacak bir yazı olacak. Öncelikle Lifecycle Services’a giriş yapıyoruz. Projemizi seçip hamburger menüden Cloud-hosted environments’ı seçiyoruz.

Resim-1

Read more

Yeni bir Azure Devops hesabı nasıl oluşturulur ve Lifecycle Services (LCS) Dynamics 365 Finance and Operations projesine nasıl bağlanır.

Bu yazıda yeni bir Azure DevOps hesabı oluşturup yeni bir proje başlatıp bunu Lifecycle Services’e nasıl bağlıyoruz anlatmaya çalışacağım. Bu yazıyı hazırlarken sıfır bir hesabım olmadığı için bazı resimleri eski projelerden aldım. Ancak maksadımı anlatmaya yeteceğini düşünüyorum.

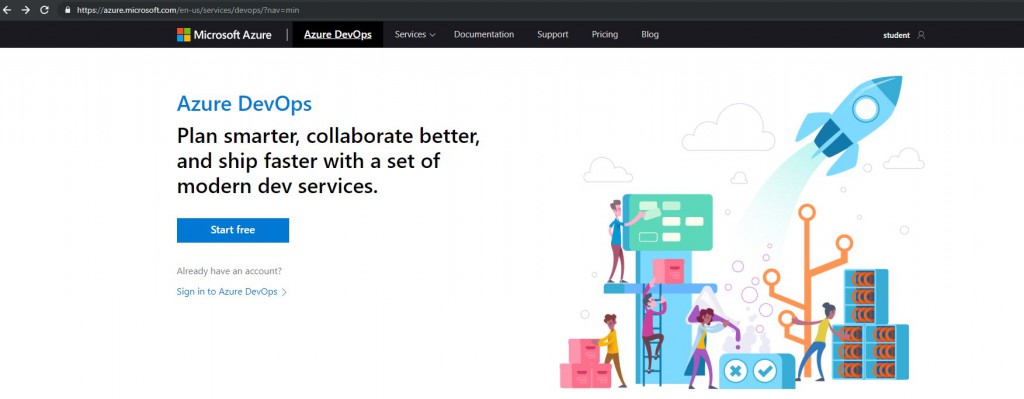
Eğer hali hazırda bir hesabınız varsa onu kullanabilirsiniz. Yoksa yeni bir mail ile aşağıdaki ekrandan Start free butonunu kullanarak yeni Azure DevOps hesabı oluşturmayı başlatabilirsiniz.

Resim-1

Read more

Lifecycle Services için Azure Connector kurulumu nasıl yapılır?

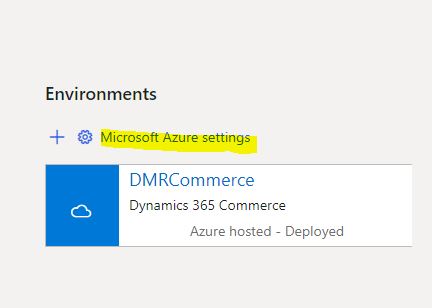
Bu yazıda Dynamics 365 For Finance and Operations Deploy edebilmek için gerekli olan Azure bağlantısı Lifecycle Services üzerinden nasıl ayarlanır anlatmaya çalışacağım. Öncelikle Lifecycle Services içinden projemizi açıyoruz. Environments altında Microsoft Azure settings’e tıklıyoruz.

Resim-1

Read more

Microsoft Azure Subscription’a Dynamics 365 Finance and Operations deploy edebilmek için Dynamics Deployment Services Account yetkisi nasıl verilir?

Bu yazıda LCS üzerinden yeni bir ortam ayağa kaldırmak gerekli olan Dynamics Deployment Services Account yetkisi nasıl verilir adım adım tarif edeceğim. Öncelikle Admin hesabıyla Azure Portale giriş yapıyoruz. Cost Management +Billing > Subscriptions kısmını açıyoruz.

Resim-1

Read more

How to Create a Batch Job with SysOperation Framework?

In this article, I will try to explain how to create a new Batch Job for Dynamics 365 Finance and Operations using SysOperation.  We can say that SysOperation is a more advanced version of RunBaseBatch. It has many different uses. In this example I will explain its usage as a normal batch job. As for its structure, SysOperation uses the MVC (Model – View – Controller) design pattern. The basic classes of this structure are:

Service: The service class is derived from the SysOperationServiceBase class. It is the class in which the process is done. Our codes should be in this class.

Data Contract: It is the model class for which we define attributes. The DataContractAttribute attribute is used to get data from the dialog.

Controller: The control class is derived from the SysOperationServiceController class. Stores information about the batch job. Such as dialog and progress bar.

UI Builder: The UI Builder class is derived from the SysOperationAutomaticUIBuilder class and is used to provide more advanced interfaces to dialogs.

In this example I will do the same as we did with RunBaseBatch using the first 3 classes. First I create a new project.
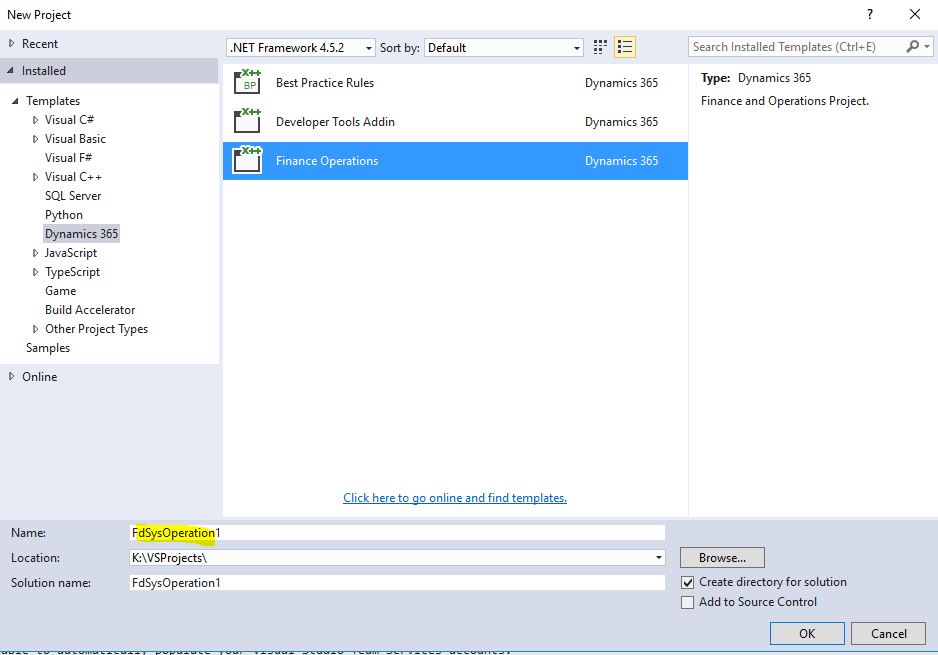
Image-1

I add a new class.
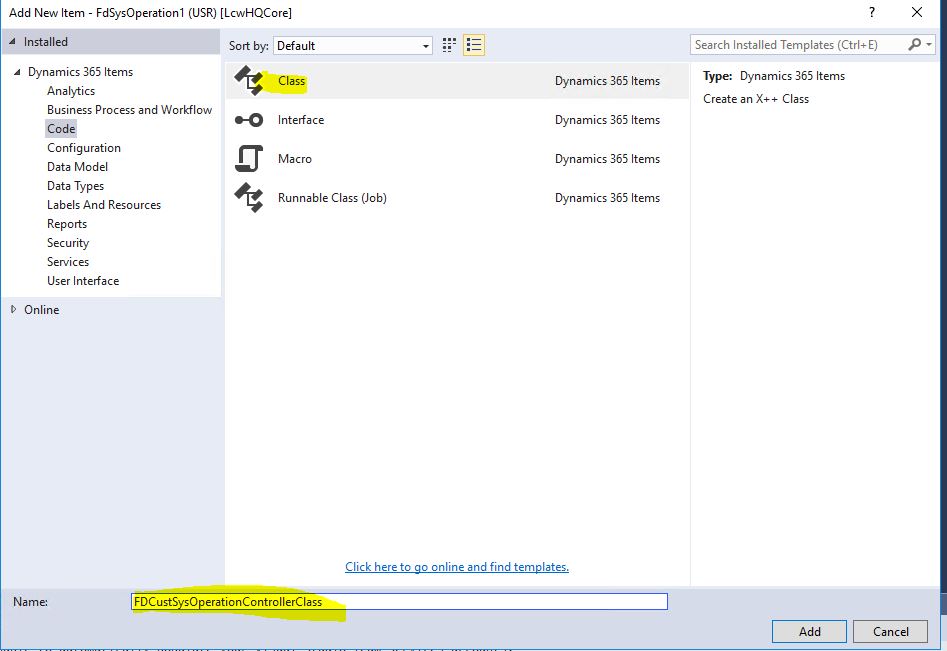
Image-2

The first class is the control class. We haven’t created the service class yet, but I identified and typed its name.
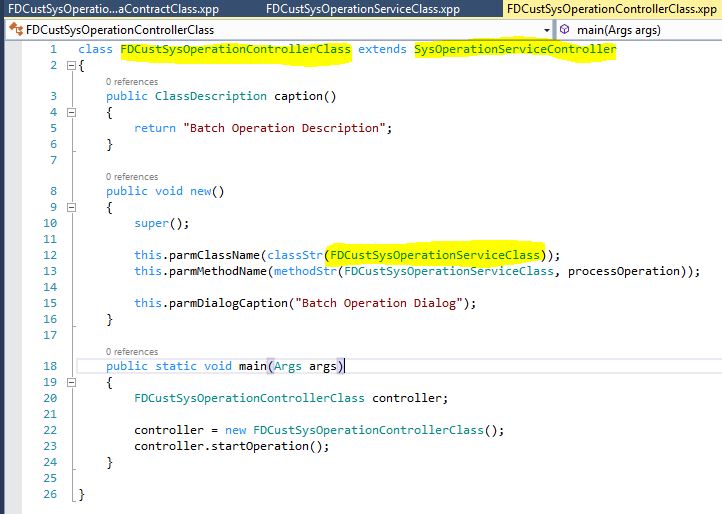
Image-3

Let’s create the service class now.
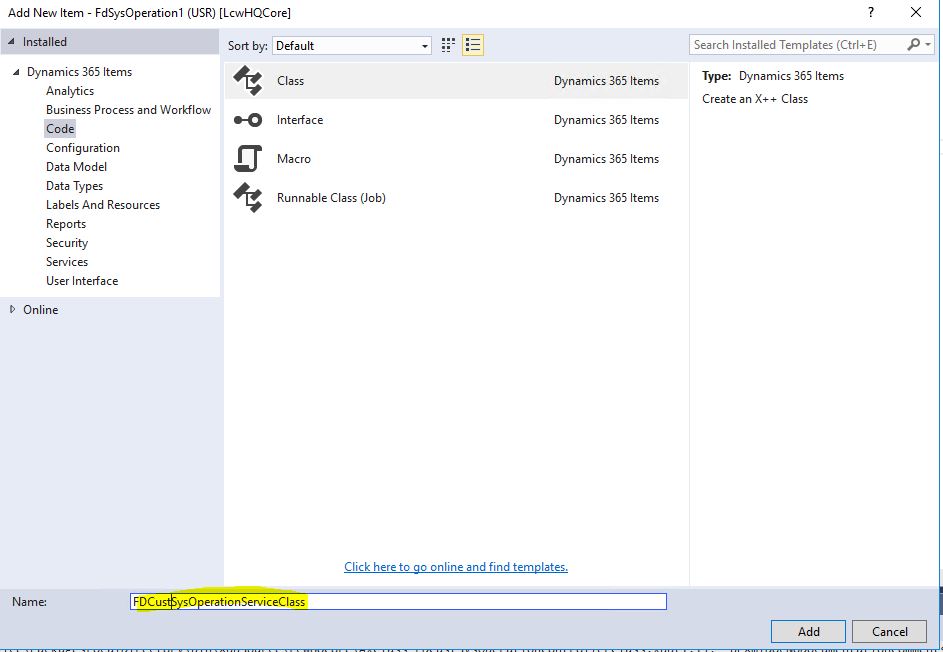
Image-4

I write the code below. Actually I need the Contract class here. Let’s create it.

Image-5

I create the Contract class. Usually this class should be created first. But if your design is clear, it doesn’t matter which one you start with. You won’t be typing these codes over and over every time, you will use them from a template.
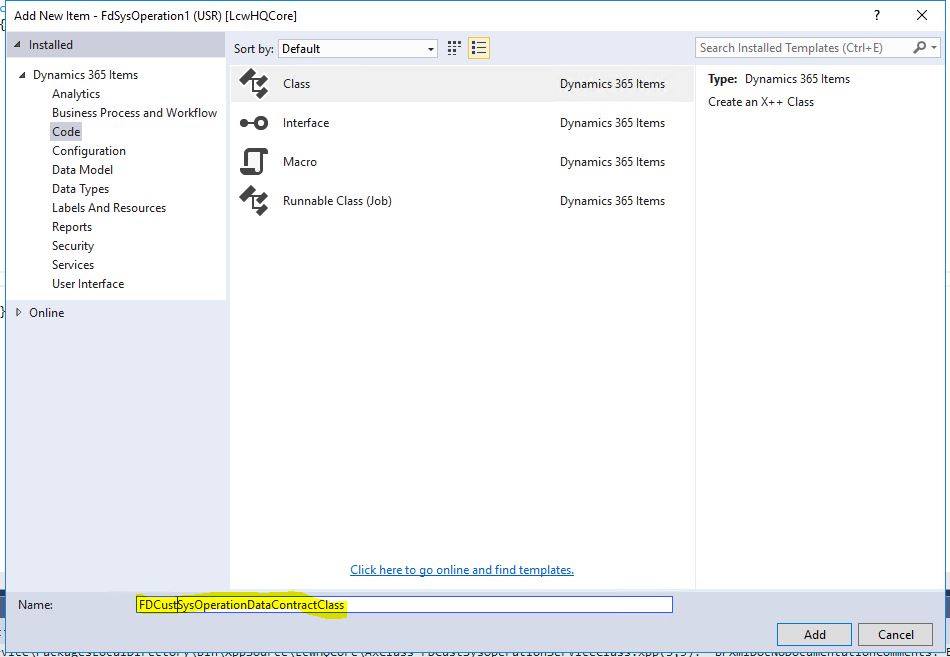
Image-6

I want to get two variables here and edit my class accordingly.
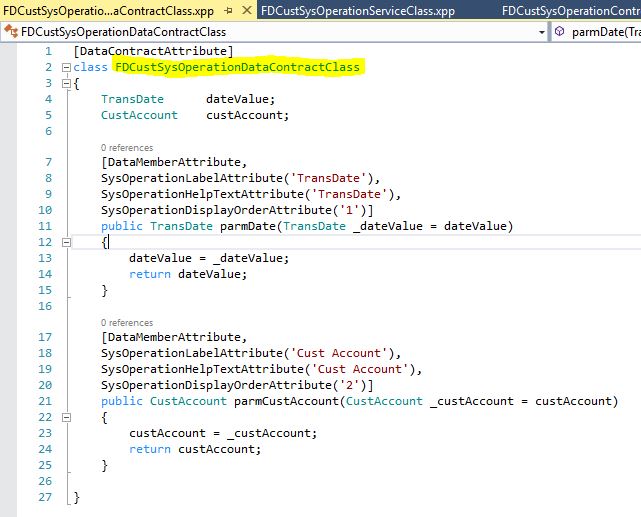
Image-7

I create a MenuItem.
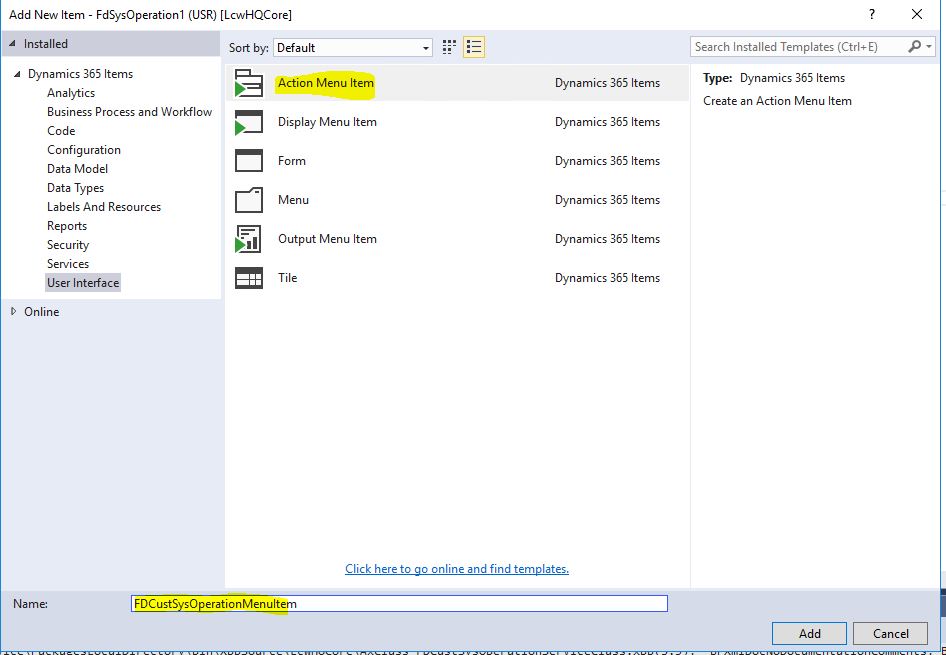
Image-8

I link my control class to the MenuItem.
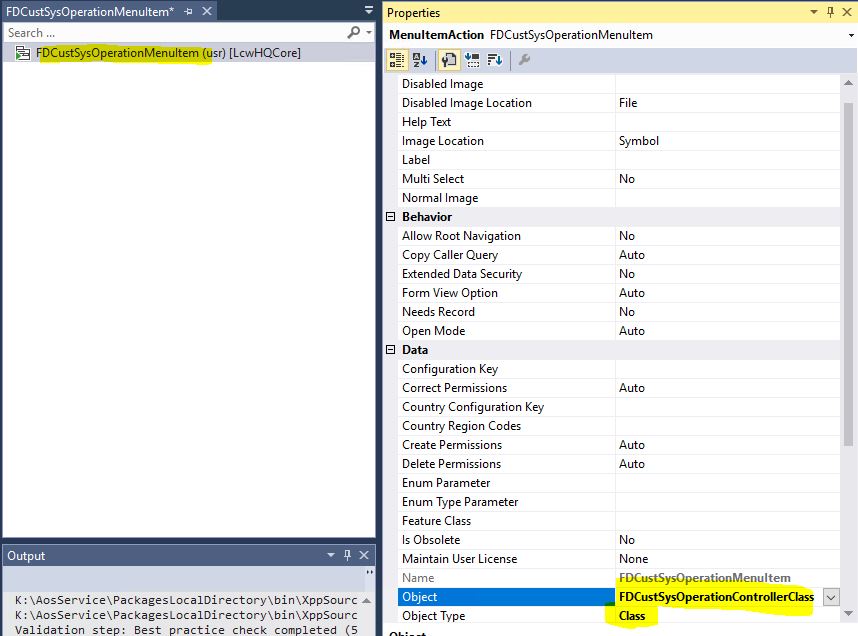
Image-9

After this stage, compilation is required. It’s not enought to just compile the project. Therefore I click Build models.
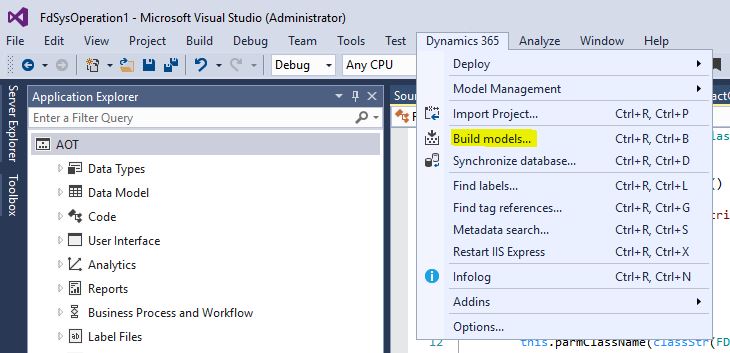
Image-10

Click Select all on the screen that opens and start a Build operation.
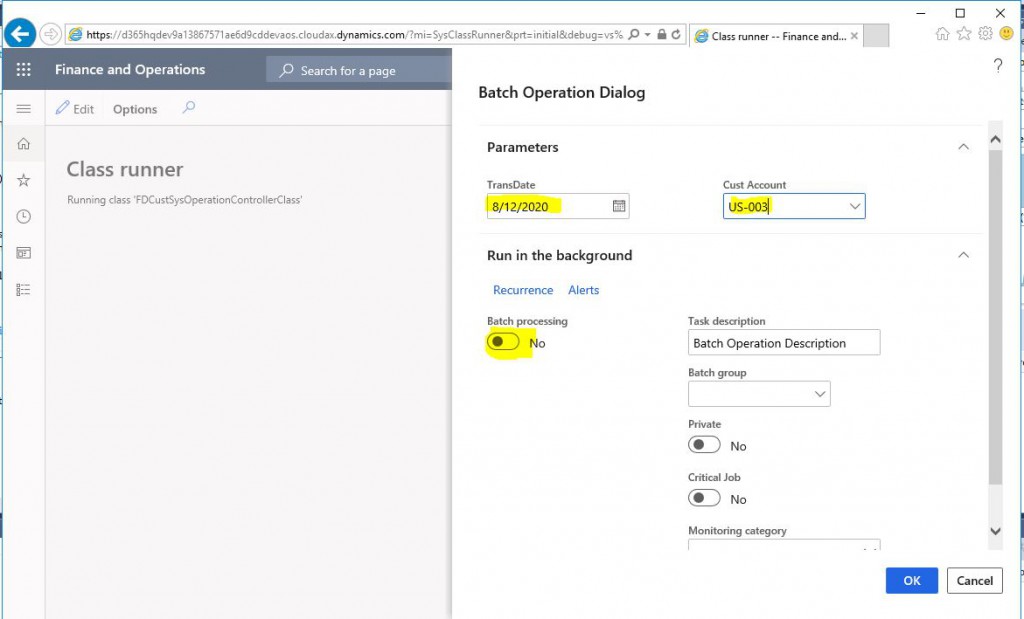
Image-11

After the Build operation is completed, mark your MenuItem as the starting object and run the project. Our class worked. You can run it directly just like you did with RunBaseBatch.
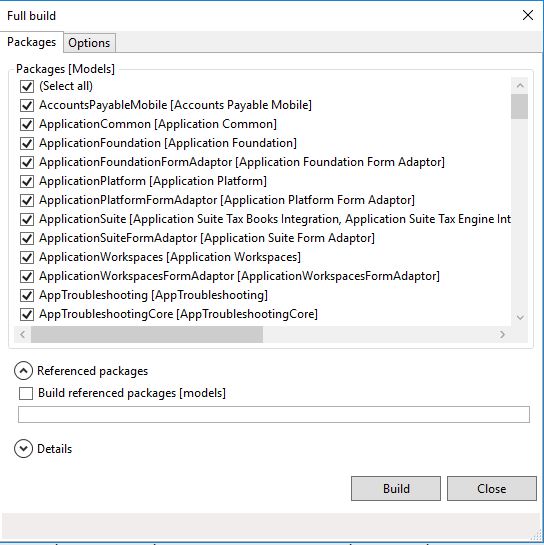
Image-12

You can add it to a batch job if you want. I added it to a batch and set it to run one time.
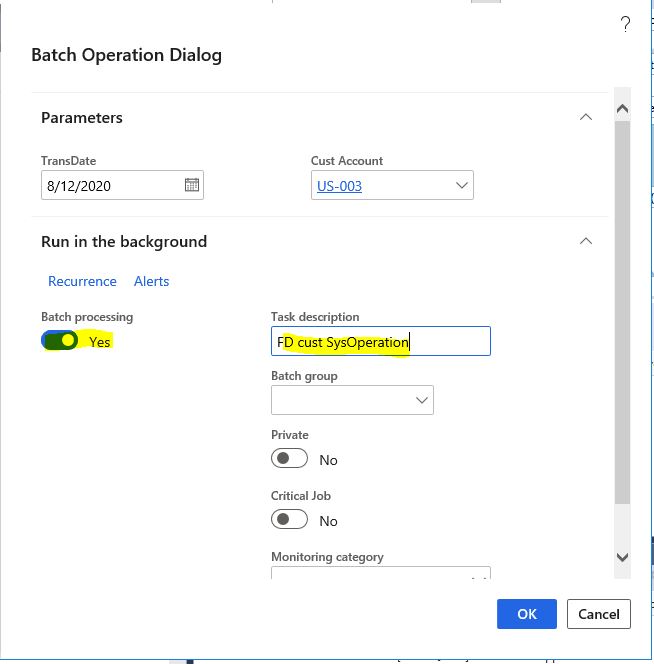
Image-13

Now let’s open the Batch Jobs form. Let’s find our own batch job and take a look at the progress. It is Ended, which means it worked and finished. If it was a recurring job, it would be in Waiting state. I click on Batch job History to check what our batch job has done and whether it worked correctly.
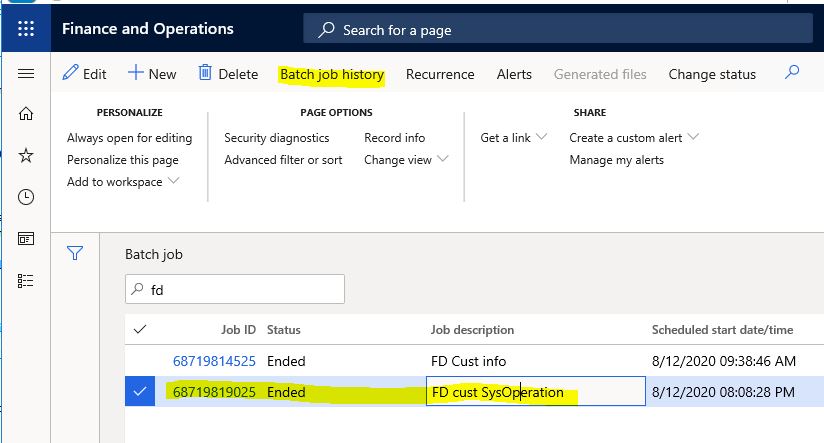
Image-14

I click Log from the details of the job and it shows the output of the batch. It worked without any problems.
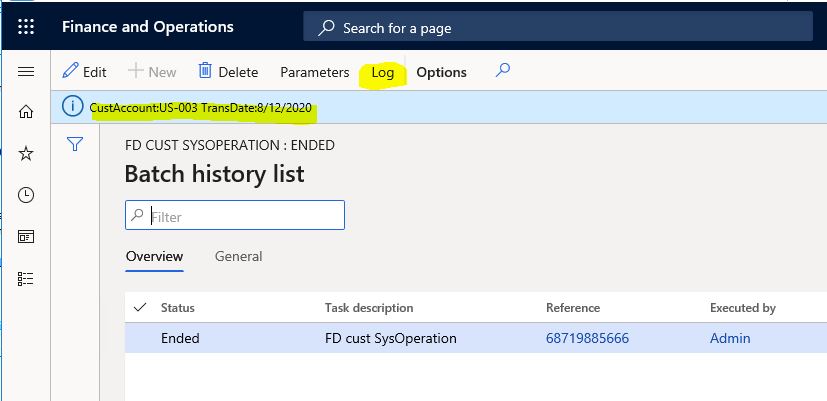
Image-15

In this article, I tried to explain how to create a new batch job using SysOperation. SysOperation is a very extensive topic. I will continue to explain it with different viewpoints. Especially Parallel processing works very well in terms of performance. I’ll explain how to use it in an example.

Regards.

www.fatihdemirci.net

TAGs: Microsoft Life Cycle Services, LCS, Azure, Azure DevOps, Batch Jobs, SysOperation, Microsoft Dynamics 365, MsDyn365FO, MsDyn365CE, MsDyn365, Dynamics 365 Insights Power BI, Power Automate, Power Apps, Power Virtual Agents, what is Dynamics 365, Dynamics 365 ERP, Dynamics 365 CRM
Dynamics 365 Finance and Operations için yeni bir X++ geliştirme sanal makinesi nasıl ayağa kaldırılır?

Bu yazıda yeni bir X++ geliştirmeleri için yeni bir sanal makine nasıl ayağa kaldırılır adım adım anlatmaya çalışacağım. Bu örnekte bir müşteri ortamında bunu asıl yapacağınızı anlatacağım. Partner veya eğitim amaçlı sanal makinelerde benzer bir mantığa sahip.

Öncelikle Lifecycle Services’a giriş yapıyoruz. Projemizi seçip hamburger menüden Cloud-hosted environments’ı seçiyoruz.

Resim-1

Read more

Dynamics 365 Finance and Operations Data Entity nedir ve nasıl oluşturulur?

Bu yazıda X++ ile yeni bir Data Entity nedir ve nasıl oluşturulur anlatmaya çalışacağım. Öncelikle Data Entity nedir ondan bahsedelim.

Data Entity: Manalı veri kümesi diye özetleyebiliriz. Özellikle Ax2012 ile veri yapısı Normalizasyon mantığına uygun olarak çok fazla tabloya bölündü. Bu sebepten belli bir veriyi görmek ve işlem yapmak için birçok tablonun bir araya gelmesi gerekiyor. Data Entity bizim için bu veri kaynaklarını bir araya getirip anlamlı bir veri kümesi üzerinden işlemleri yapabilmemize olanak sağlıyor. Bizim örneğimizde olduğu gibi kitap ile ilgili 3 tablomuz var ve bunlar aslında birbiriyle ilişkili bir Data Entity ile bu tabloları tek yapıda görüp işlem yapabiliyoruz.

Çok fazla kullanım alanı var. Bunları zamanla anlatmaya çalışacağım. Şimdi yeni bir Data Entity Visual Studio üzerinden nasıl oluşturulur onu görelim.  Benim YouTube kanalım için yaptığım örnek bir kütüphane projem var. Onun üzerinden devam edeceğim.

  1. Projeye sağ tıklayıp AddNew item ile yeni Add New Item diyaloğunu açalım.
  2. Data Model > Data Entity, seçip Data Entity adını tanımlayalım.
  3. Add’e tıklayıp Data entity wizard’ı açalım.

Resim-1

Read more

RunBaseBatch Framework İle Toplu İş Nasıl Oluşturulur?

Bu yazıda Dynamics 365 Finance and Operations için yeni bir toplu iş (Batch Job) nasıl oluşturulur anlatmaya çalışacağım. RunBaseBatch kullanarak bir örnek oluşturacağım. İleriki yazılarımda SysOperation ile de örnekler vereceğim. Toplu iş nedir ona bakalım. Bir işi farklı sunucuda ve belli zamanda istersek tekrarlayan şekilde çalıştırmaya yarayan bir alt yapı diyebiliriz. En basit örneği vereyim. Merkez bankası her gün kurları belli saatte açıklıyor. Sizin bu değerleri alıp sisteme kaydetmeniz gerekiyor. Bunun için bir sınıf yazdınız ve bu sınıf servise bağlanıyor ve değerleri alıyor. Ancak bunun her gün aynı saatte tetiklenmesi lazım. İşte burada toplu iş devreye giriyor ve size bu ayarları yapma imkânı veriyor.

Bu örnekte çok basit bir sınıf oluşturup çalıştıracağız. Öncelikle yeni bir proje oluşturuyorum.

Resim-1

Read more

How to Define Authorization from Dynamics 365 Finance and Operations Development Environment?

In this article, I will try to explain how to create authorization objects from Visual Studio through the Dynamics 365 Finance and Operations development environment. In my article named How to Define Authorization from Dynamics 365 Finance and Operations Interface? I explained how the authorization objects are created from the interface. As I said in that article, my preference is to create the authorization from the development environment. There are several reasons. Most importantly, objects created from the development environment can be included in version control. In this way, they will be directly in your package and the transfer to the desired environment will be made with your development. I think it’s easier to manage.

I will now do the same example that I did in my previous article through Visual Studio. My test user only has the System user role.

Image-1

My test user can only see two modules in these roles.

Image-2

I want to authorize the All customers form.

Image-3

I find the relevant MenuItem on VS. This will be my entry point (EntryPoint) and all authorization assignments will be done through this entry point.

Image-4

I go to my project and add a new object.

Image-5

First, we will create a Privilege. I select and name it, and click add.

Image-6

Drag and drop the CustTableListPage MenuItem to the Entry Points tab of the Privilege created. Entry point is created. From its properties, select delete as the Access Level. Delete means full authorization. You can choose the level you want from here. Update and Correct might be confusing for you. Update is the data update authorization. Correct is used in tables with Valid Time State property.  Valid Time State is a mechanism that allows you to perform automatic date checks. I will prepare an article about this later.

Image-7

Now create a Duty.

Image-8

Drag and drop the Privilege to the Duty you created.

Image-9

Next step is creating a role.

Image-10

If you want, you can grant Privilege directly to the role you created, but it’s best to follow the steps. That’s why we used Duty. You can drag and drop it. The new role is created.

Image-11

In some cases, it may be necessary to clear the Caches. You can call the SysFlusData class as shown in Image-12.

Image-12

Objects you create via VS will not appear directly in the application. I’m not so sure why but they are visible after DB sync. This is actually data. I don’t know why it needs that.

Image-13

After these operations, you will see the objects you have created when you open the application.

Image-14

You assign roles to our test user.

Image-15

When you log in to the application, you can see the All Customers form.

Image-16

In this article, I tried to explain how to create security objects via VS. You must take the security and authorization very seriously. If not set up correctly, it can get messy. Try to manage it from the highest level possible. If you go deep into details, it becomes very difficult to manage. Do it if the new role is really required. Use Duty to get things done as much as possible. Do not assign more than 3-5 roles to a user. Too many roles can lead to performance issues.

Regards.

www.fatihdemirci.net

TAGs: Microsoft Life Cycle Services, LCS, Azure, Azure DevOps, Security , Microsoft Dynamics 365, MsDyn365FO, MsDyn365CE, MsDyn365, Dynamics 365 Insights Power BI, Power Automate, Power Apss, Power Virtual Agents, what is Dynamics 365, Dynamics 365 ERP, Dynamics 365 CRM
Page 9 of 14« First...7891011...Last »