Posts Tagged ‘ LCS

How to Move Developments to Dynamics 365 Finance and Operations Test and Live Environments? 3- Build

How to Move Developments to Dynamics 365 Finance and Operations Test and Live Environments? 3- Build

In this article, I will talk about how to perform the Build operation required to move the developments we made from Visual Studio for Dynamics 365 Finance and Operations to Test and Live environments. Build needs to be performed on a certain Branch. When Build is complete, if there is no error, it will generate a Deployable Package for us. We need this package for code migration.

You have to perform Build through Azure DevOps, not from Visual Studio. After logging in as a user with admin rights, open the Pipelines tab. Unified Operations platform – Build Main will be created automatically when you set Azure DevOps settings via LCS. We will take this as basis. Since our environment is only Main Branch, I continue without making any changes in the basic settings.  First let’s see how we can run it, then we will examine the other settings.
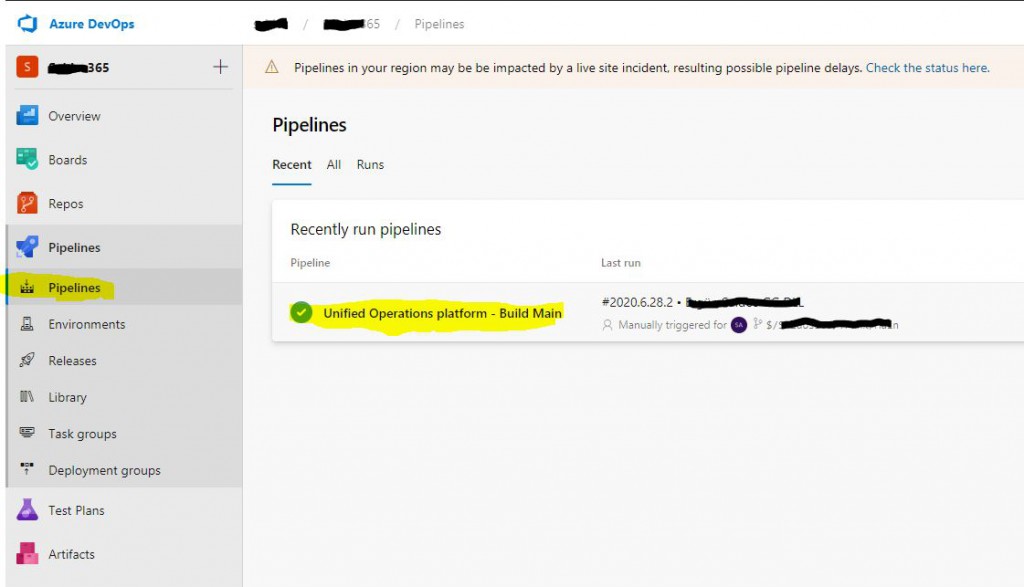
Image-1

Click the Edit button from the ellipsis menu.
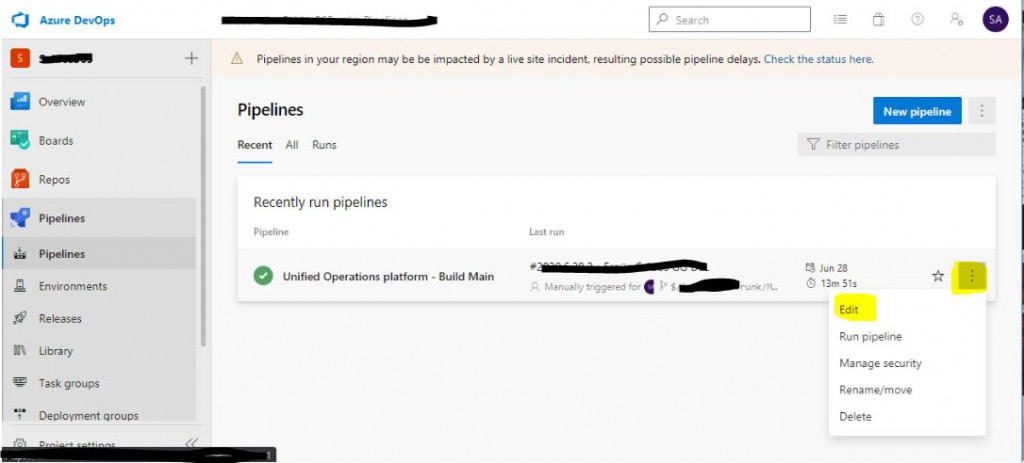
Image-2

Build steps are listed.
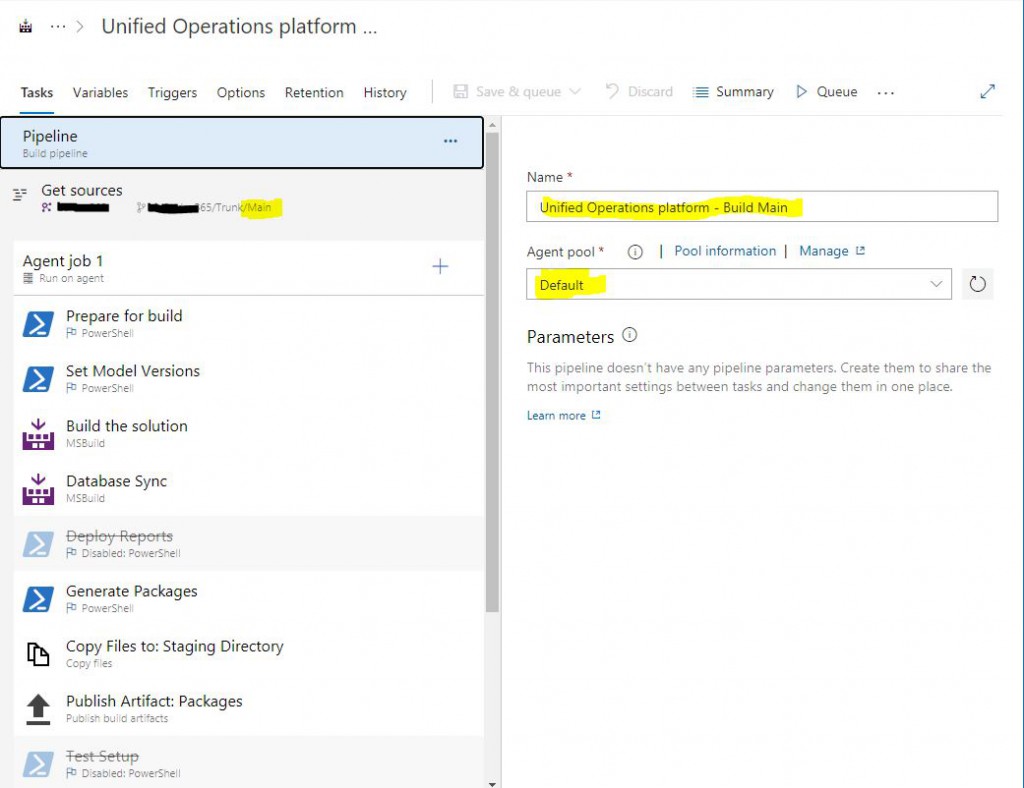
Image-3

If you want to build a different Branch, you need to change the Server path. We are making a change here.
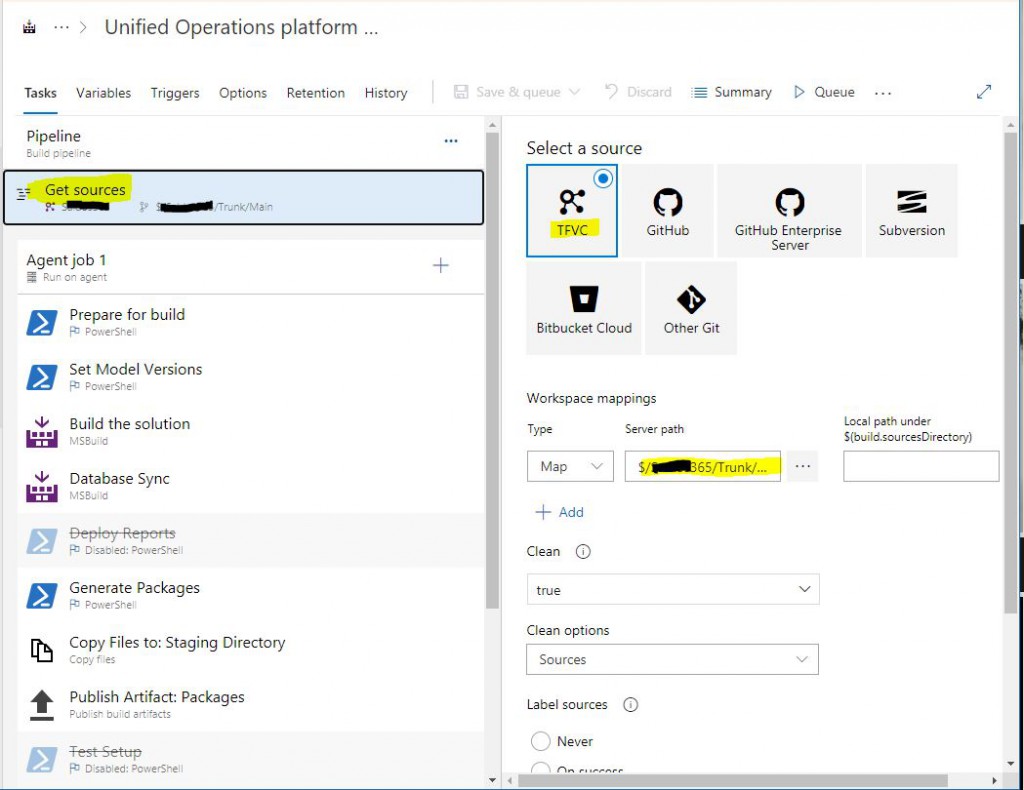
Image-4

You can right click and Disable steps that are not required at this time. I disabled the Deploy Reports step because I do not have a report development.
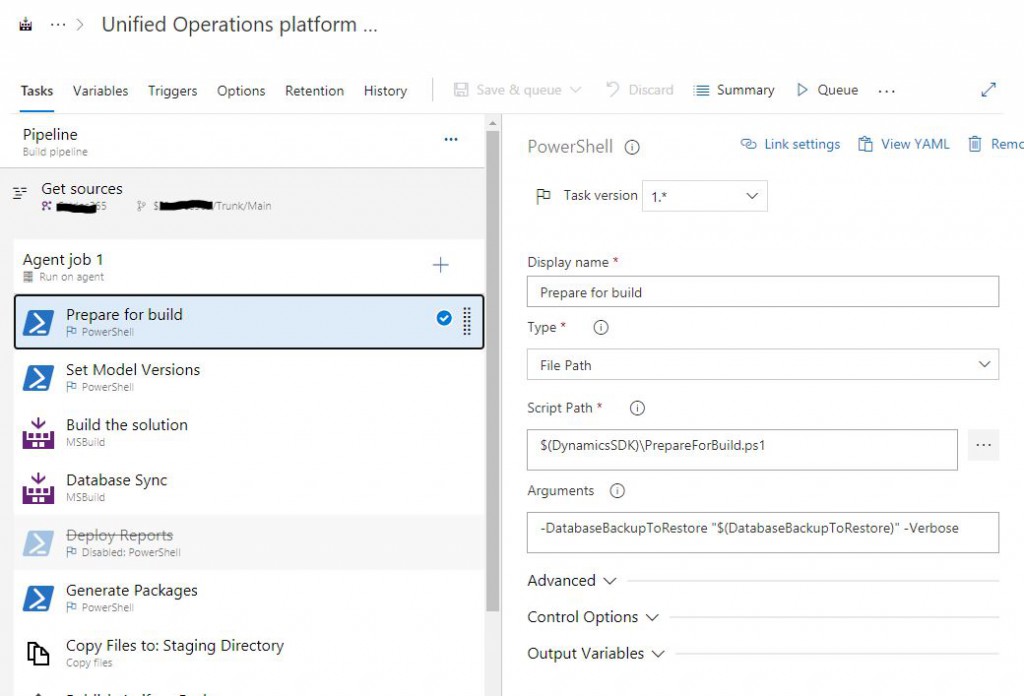
Image-5

The main step is Build the solution. Our Branch path is here again. If you want to build a different Branch, you should change this as well.
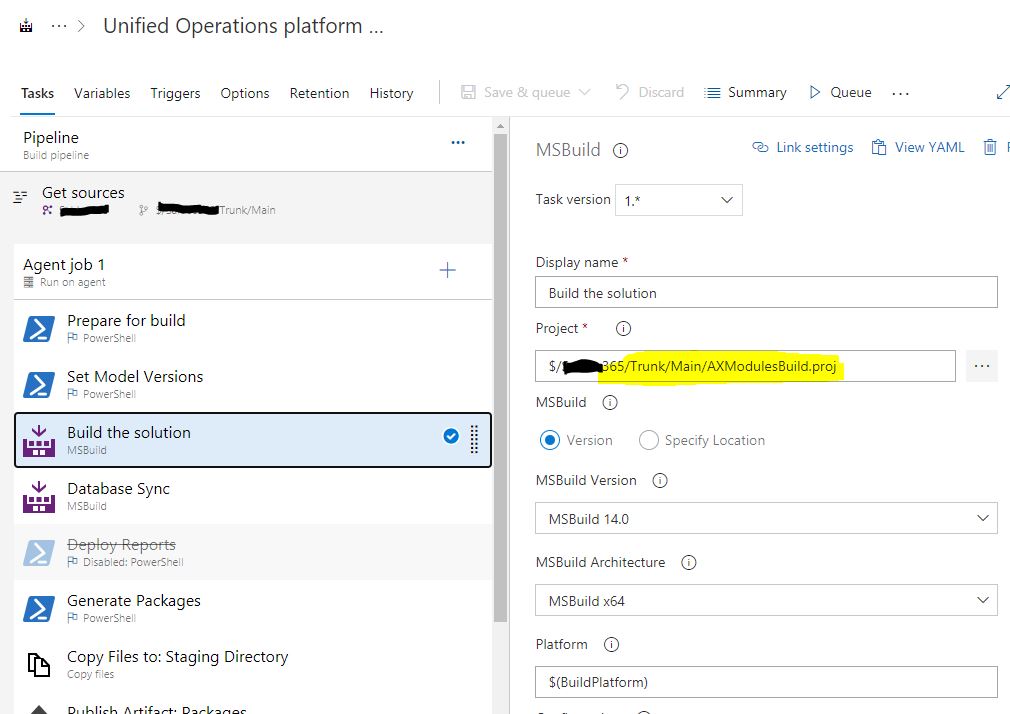
Image-6

Click Queue. Whn you click Run in the popup window, Build operation starts.
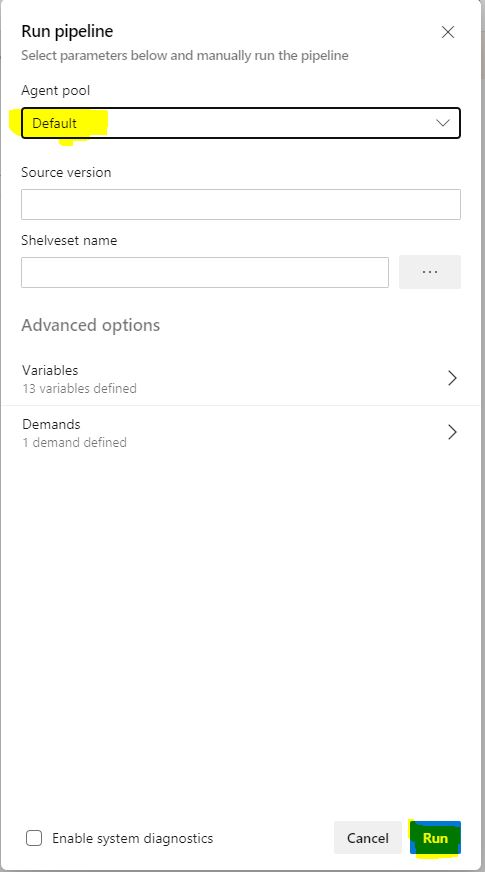
Image-7

You can follow the Build steps.
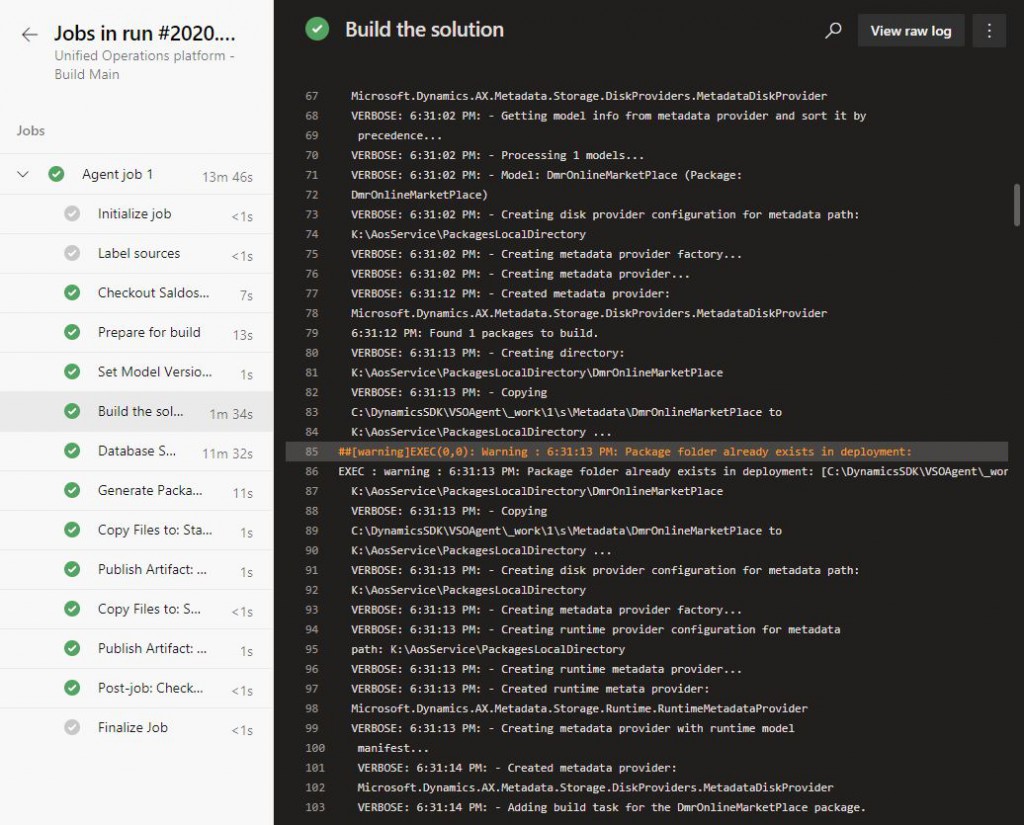
Image-8

If it completes with no errors, it will look like the following. If it gives errors, it is necessary to examine the logs and errors. Generally there are not very complex problems. There are cases such as missing reference, incorrect Check-in, but there may be situations that need to be further examined. You can open it by clicking on the record.

Image-9

When you enter, all your previous Builds will be listed. You can view their status and information. The first record is our last Build, completed without error. Click to open it.
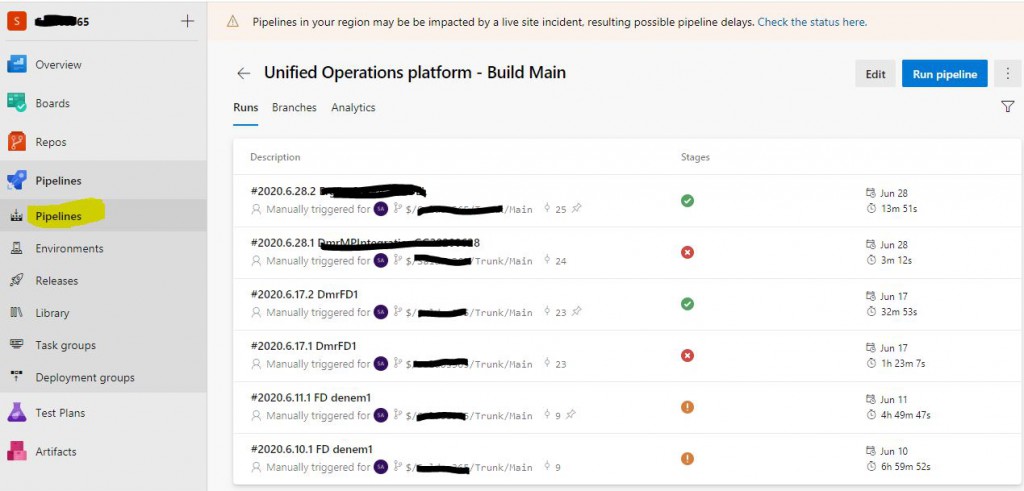
Image-10

You can see details about the Build here. Click and open the relevant part (3 published).

Image-11

Under Packages, Deployable Package starting with AxDeployableRuntime is created. We need to download it from here and upload it to the LCS. I will explain this in my next article.  At this stage, the Build operation is done. Now let’s look at how you can create a new Pipeline.

Image-12

Main Pipelines are created by default. If you want to create them in other Branches, you either make all the definitions manually, which is very demanding, or you can use the Clone or Export features. For both cases, do not forget to change the path settings for the new Pipeline.

Image-13

You can Import the Exported file from the following path again. Generally code is transferred to live environment from Main or Release Branch, and to test environment from Dev Branch. Of course, these are approaches that vary depending on the project and the team.

Image-14

In this article, I tried to explain how Build is triggered through Azure DevOps. A machine is required for Build right now, but we will soon be able to do this thanks to an agent. It will be a faster and inexpensive solution. By completing this stage, we have reached the final stage in code migration. In my next article, I will explain how we deploy code over LCS.

Regards.

www.fatihdemirci.net

Microsoft Life Cycle Services, LCS, Azure, Azure DevOps, Build, Microsoft Dynamics 365, MsDyn365FO, MsDyn365CE, MsDyn365, Dynamics 365 Insights Power BI, Power Automate, Power Apps, Power Virtual Agents, what is Dynamics 365, Dynamics 365 ERP, Dynamics 365 CRM
How to Add a User to Dynamics 365 Finance and Operations?

In this article, I will try to explain how to define new users for Dynamics 365 Finance and Operations. If you want to add users to the test and live systems, you usually use import from Azure Active Directory. If you want to create a test user for your development machine, you can create a new user. Let’s take a look at both now.

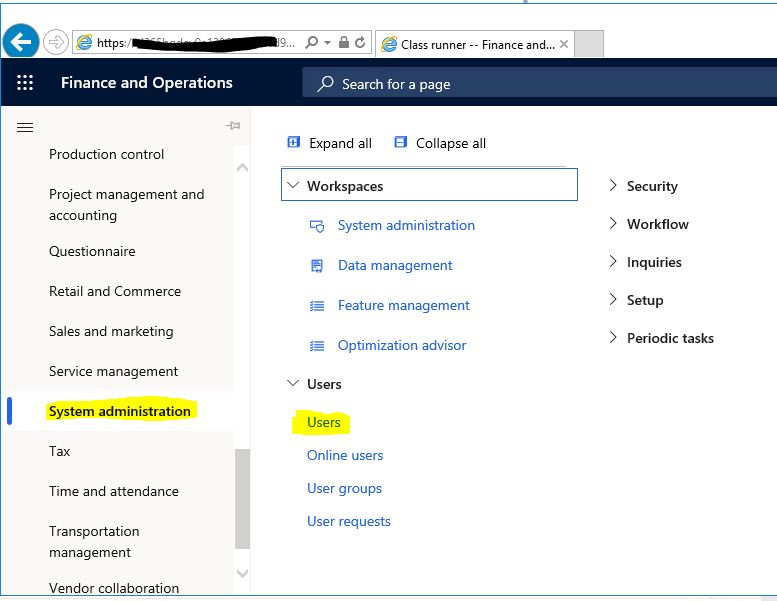
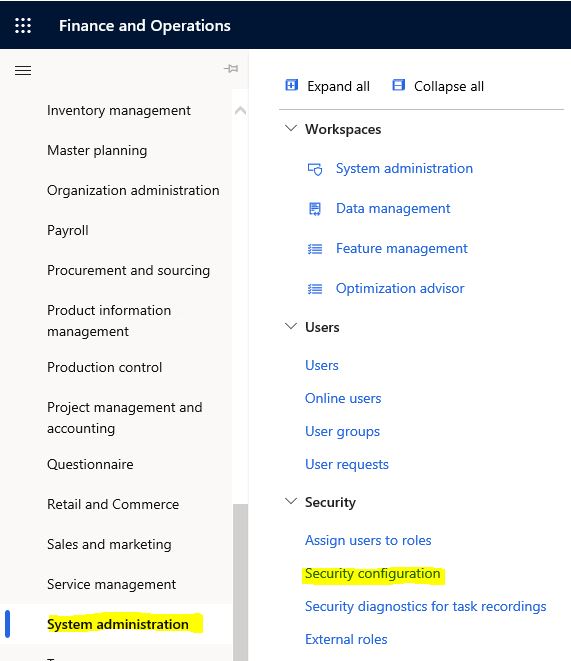
First, open the System Administration->Users form. You must login as a user with the Admin right. If this is a development environment, the account you used for installation already has this right. I explained it in my previous articles.

Image-1

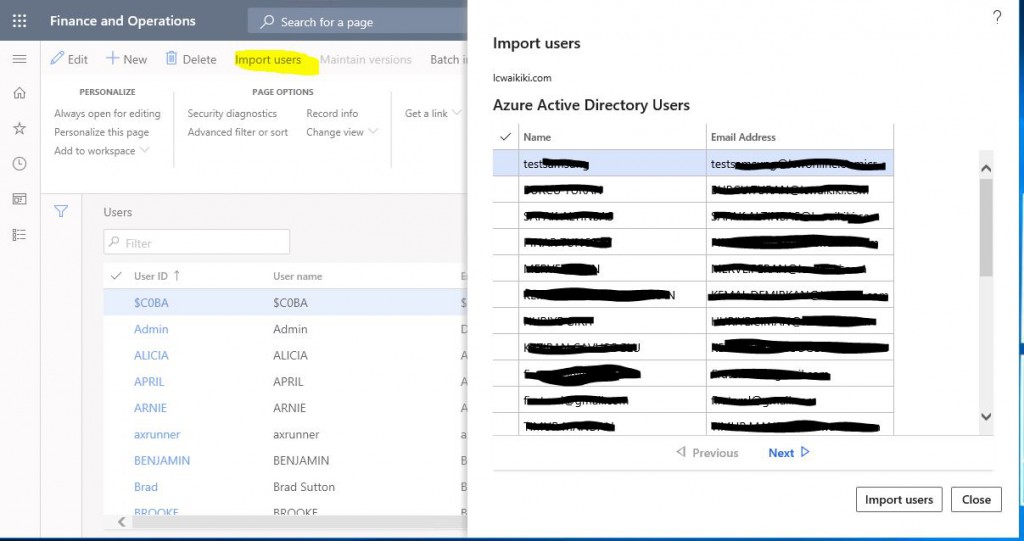
Click Import users, and the page that opens lists the users we can import. You can import the users you want.

Image-2

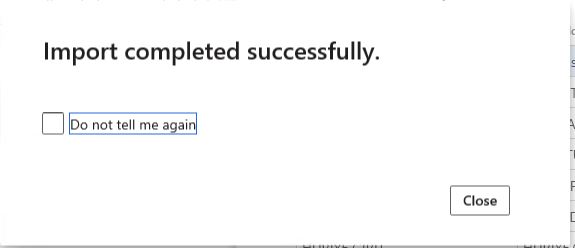
An information message appears. Then you need to grant the users the necessary roles. In the old version, there was a role assignment tab during Import. The new version does not have it. I think it was a nice feature. It gets messy especially when I transfer multiple users.

Image-3

Now let’s add a user that is not in Azure Active Directory. For example, I need to do some tests on my own development machine, or consultants need to do the initial tests in VM. Of course, security should be involved in these tests because when I open the application via VS, it opens as Admin and does not have any security restrictions. I need a user to assign the required roles. So I need to create a new user.

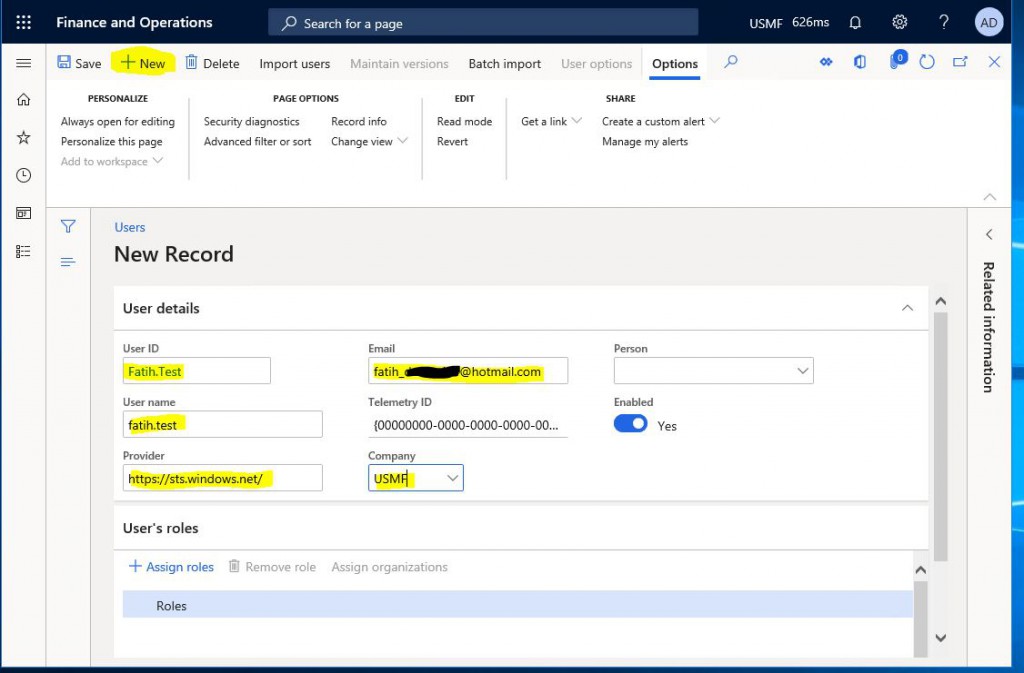
I click New and start creating. I enter the user information. I used a Hotmail account. You need to change the Provider according to the account you use.

  1. If it’s an account that’s in its own AAD Domain: https://sts.windows.net
  2. If it’s an account that’s in a different AAD Domain: https://sts.windows.net/XXXXX.XXX, (https://sts.windows.net/emiralfg.com)
  3. If it’s a Microsoft account: https://sts.windows.net/hotmail.com

Image-4

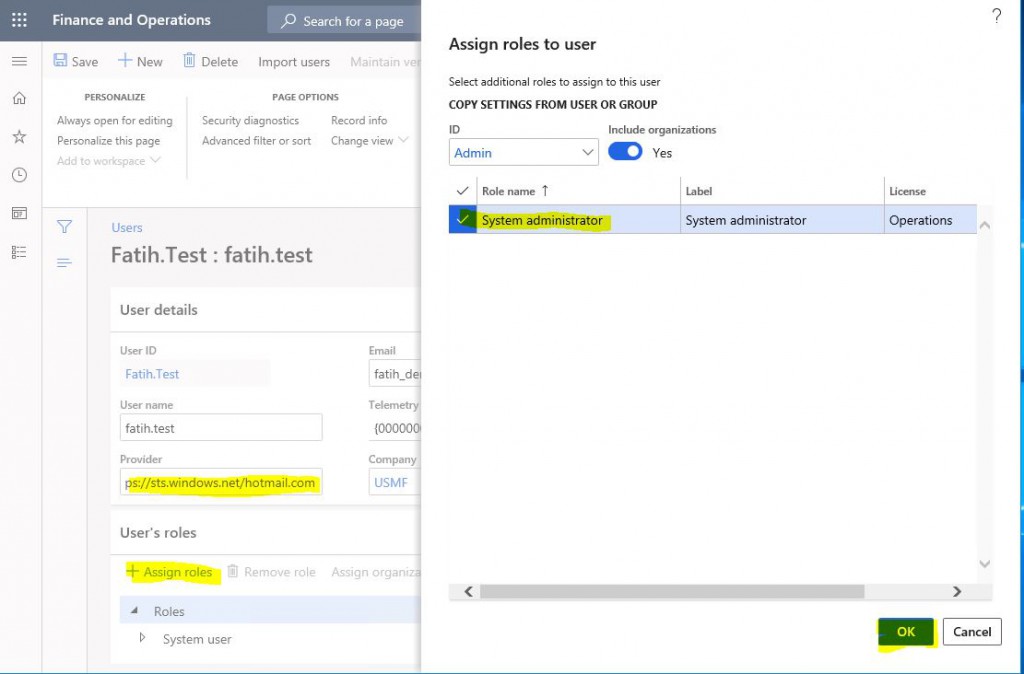
User is created after saving. In Image-4 the Provider is missing. It should be as in Image-5. Add new role by clicking Assign Role. Here you can assign any role you want. You can also have your own roles created for testing. Since I want to use it like Admin, I assigned the role of Admin.

Image-5

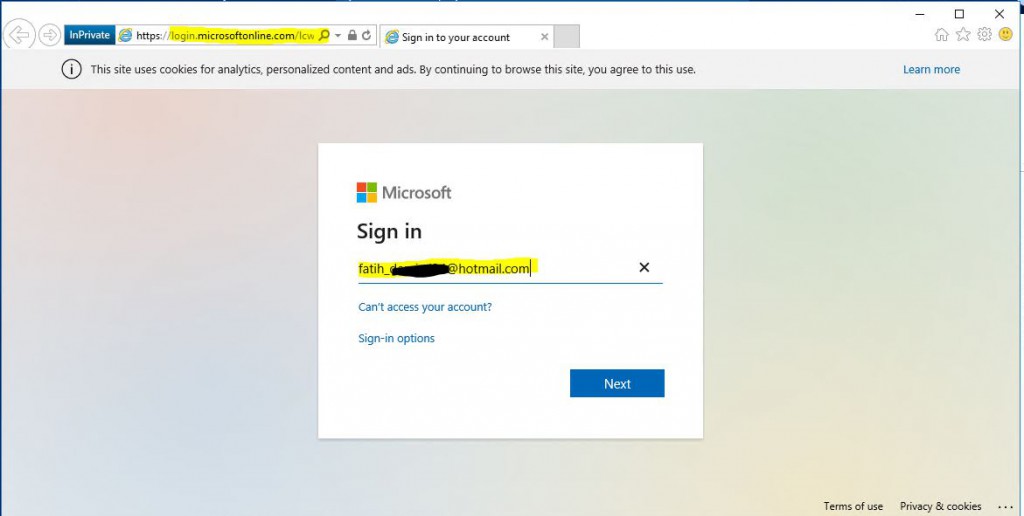
I try to open an InPrivate browser, paste the address of the environment, and login with my user.

Image-6

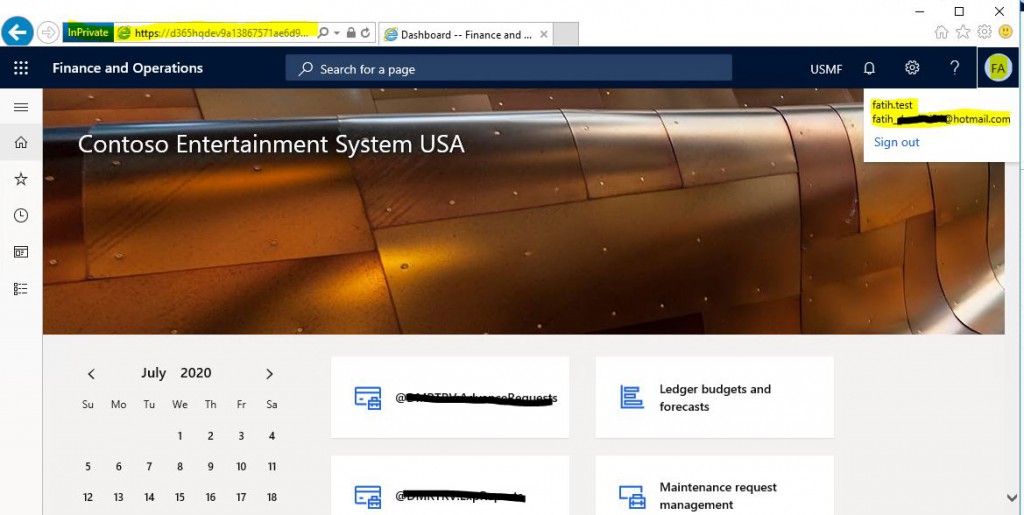
I entered the environment without any problems. Since I logged in from a different environment, a few security steps were required, but it didn’t cause any problems.

Image-7

In this article, I tried to explain how to add users to different environments of Dynamics 365. Security and user management is very important. Many details are available and I plan to mention them in the following articles.

Regards.

www.fatihdemirci.net

TAGs: Microsoft Life Cycle Services, LCS, Azure, Azure DevOps, Import User, Microsoft Dynamics 365, MsDyn365FO, MsDyn365CE, MsDyn365, Dynamics 365 Insights Power BI, Power Automate, Power Apps, Power Virtual Agents, what is Dynamics 365, Dynamics 365 ERP, Dynamics 365 CRM
How to Publish Dynamics 365 Finance and Operations SSRS Reports?

In this article, I will explain how you can publish SSRS reports (Deploy) for Dynamics 365 Finance and Operations application. It is one of the basic reporting tools of SSRS. You can use it in the reports you want to produce output. After the initial installation or after creating a new report, you need to publish it to see it in the app.

First, open Power Shell as Admin.

Run the following code for your Azure environments. Folder paths may change with updates.

K:\AosService\PackagesLocalDirectory\Plugins\AxReportVmRoleStartupTask\DeployAllReportsToSSRS.ps1 -PackageInstallLocation “K:\AosService\PackagesLocalDirectory”

Run the following code for local environments.

C:\AOSService\PackagesLocalDirectory\Plugins\AxReportVmRoleStartupTask\DeployAllReportsToSSRS.ps1

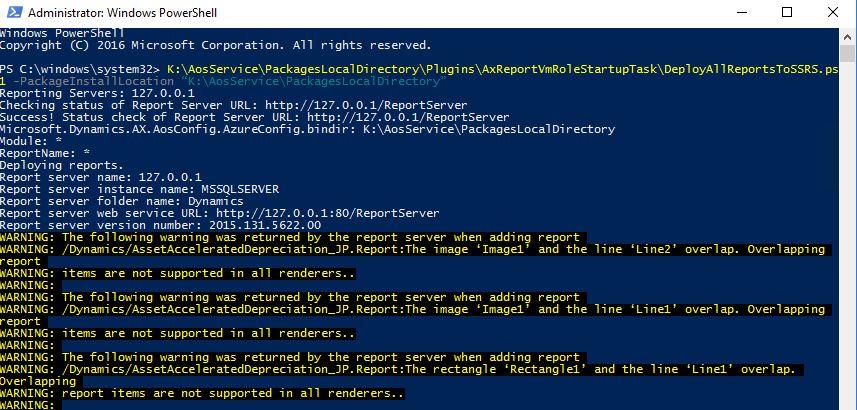
There may be some warnings, but you can ignore them while waiting for the result.

Image-1

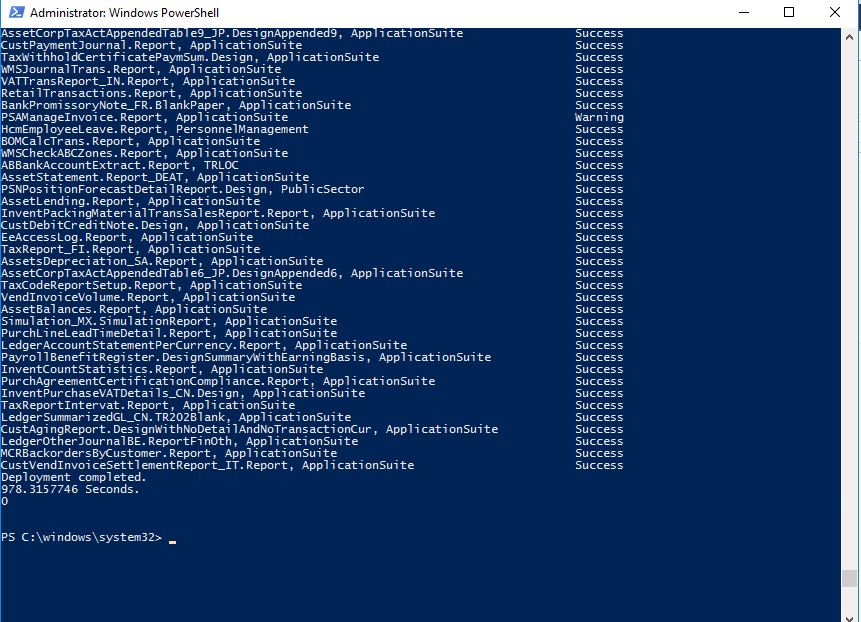
All reports published without any errors.

Image-2

If you want to publish a certain report with Power Shell, you can use the code below.

K:\AosService\PackagesLocalDirectory\Plugins\AxReportVmRoleStartupTask\DeployAllReportsToSSRS.ps1-PackageInstallLocation “K:\AosService\PackagesLocalDirectory” -Module ApplicationSuite –ReportName .Report

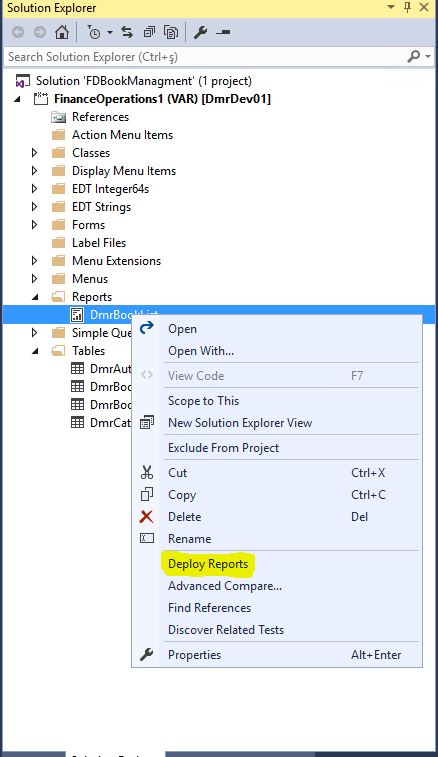
Finally, you can publish a newly created report via Visual Studio as shown in Image-3.

Image-3

In this article I explained how to publish SSRS reports. There are many topics related to reporting. In my following articles, I will talk mostly about reporting features.

Regards.

www.fatihdemirci.net

TAGs: Microsoft Life Cycle Services, LCS, Azure, Azure DevOps, SSRS, Deploy, Microsoft Dynamics 365, MsDyn365FO, MsDyn365CE, MsDyn365, Dynamics 365 Insights Power BI, Power Automate, Power Apss, Power Virtual Agents, what is Dynamics 365, Dynamics 365 ERP, Dynamics 365 CRM

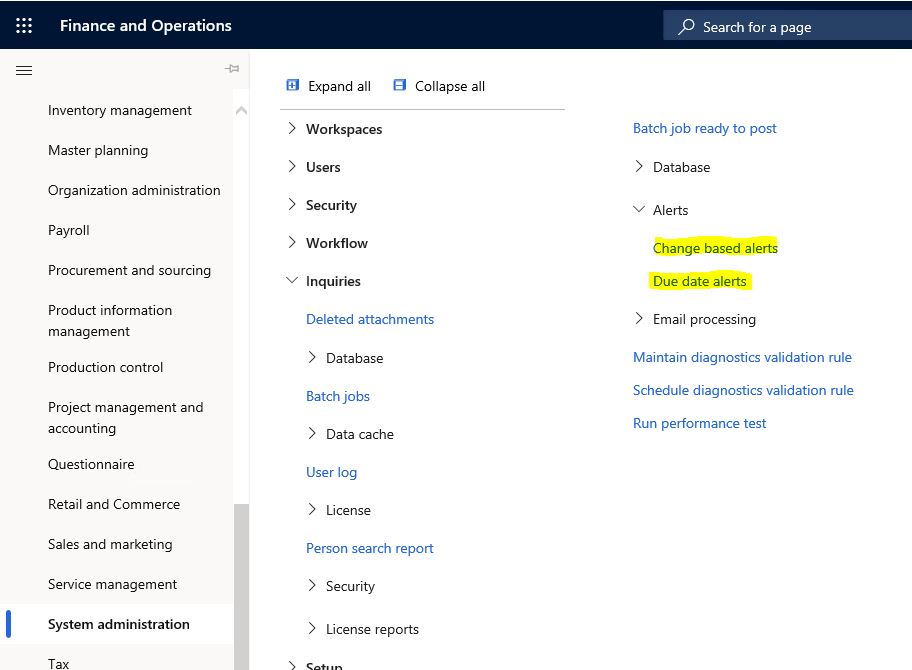
Dynamics 365 Finance and Operations Change-Based Alert Nedir?

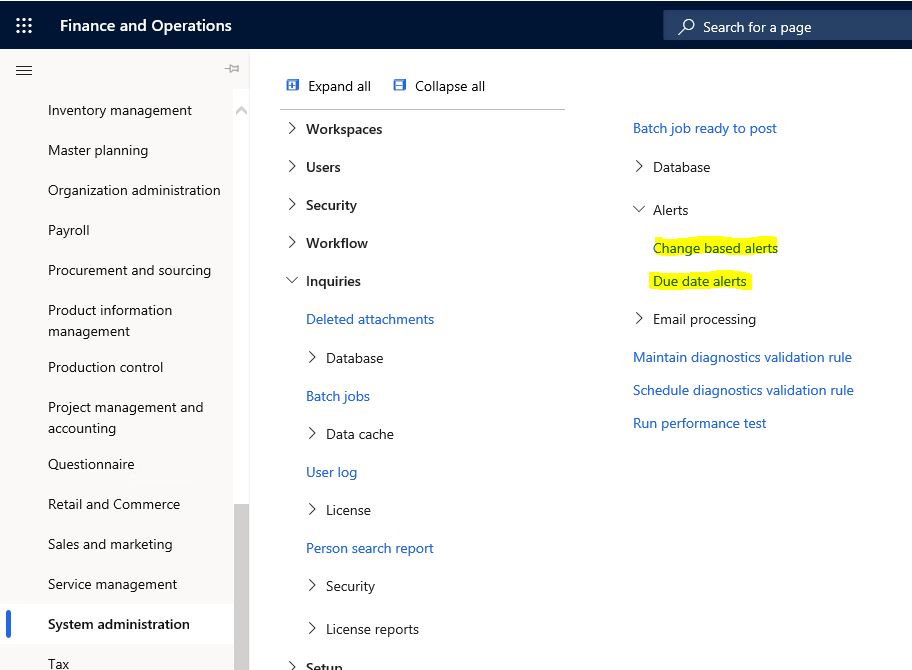
Bu yazıda Dynamics 365 Finance and Operations uygulamasının çok güzel bir özelliği olan Change-Based Alert’den bahsedeceğim. Nedir derseniz sistem içindeki herhangi bir tabloda yapılan herhangi bir işlemden sonra bildirim göndermedir. Bu bildirim ekranda da çıkabilir mail olarak ta alabilirsiniz. Bu özellik kullanıcının kendi ayarlarını yapabileceği bir yapıdadır. Kullanıcı bazlı oluşturulabilir. Şimdi bir örnekle uyarı kurulumu yapalım. Öncesinde Change-Based Alert toplu işini kurmamız gerekiyor.

Resim-1

Read more

How to Import and Update Data to Excel via Dynamics 365 Finance and Operations Forms?

In this article, I will explain how to import data from Dynamics 365 Finance and Operations forms into Excel and change them in Excel. Yes, you can change the data through Excel and enter new data. Of course, it may not work the way you want in all situations, but it is quite successful in general. One of the biggest advantages of Microsoft is that all of these systems are integrated.

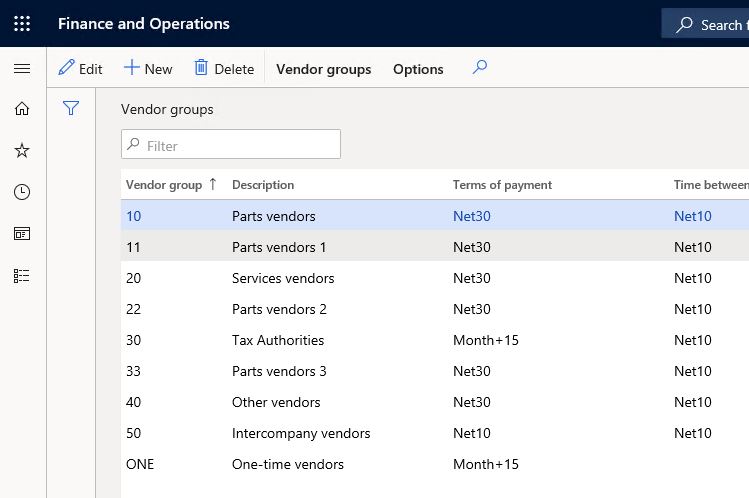
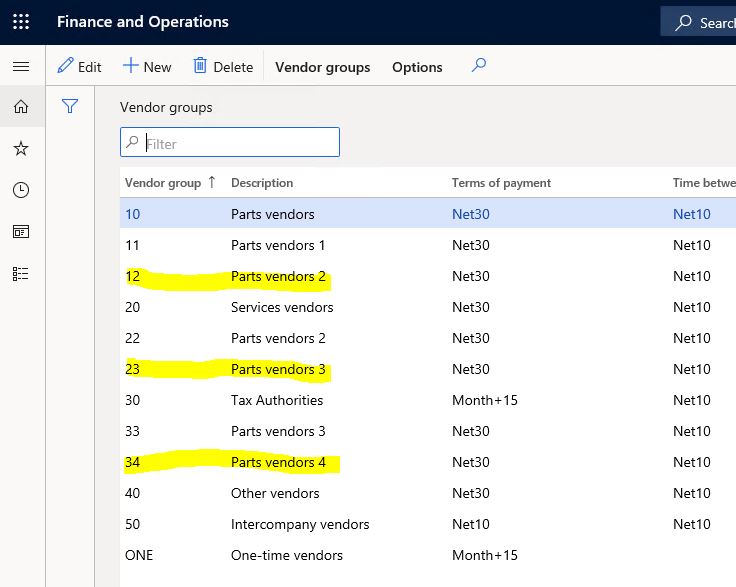
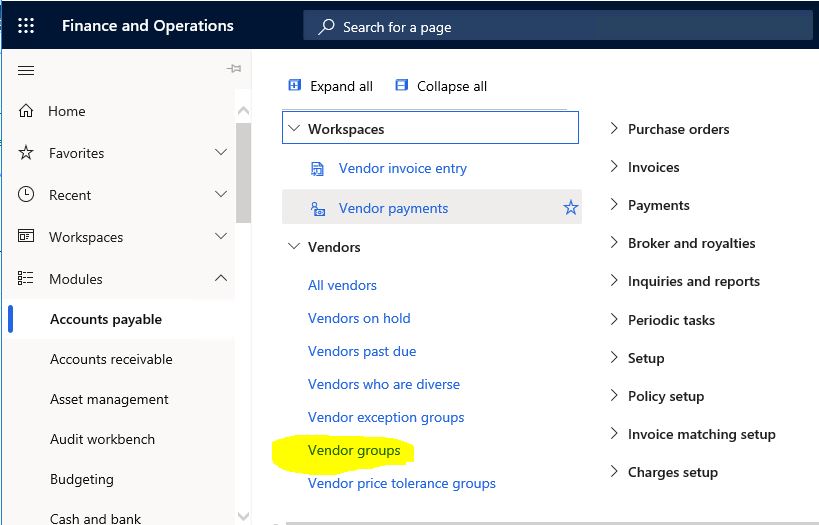
Let’s have a look at our example. I open the VendGroup form, from which I transferred data in my previous articles.

Image-1

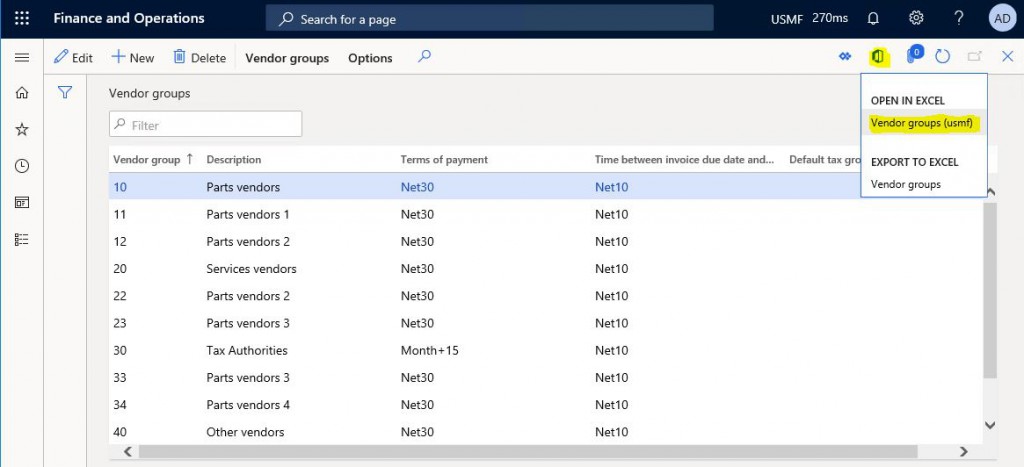
From the form that opens, I click the Office icon and click Vend Group (usmf). If your form has multiple data sources and different structures, you can see several different options here.

Image-2

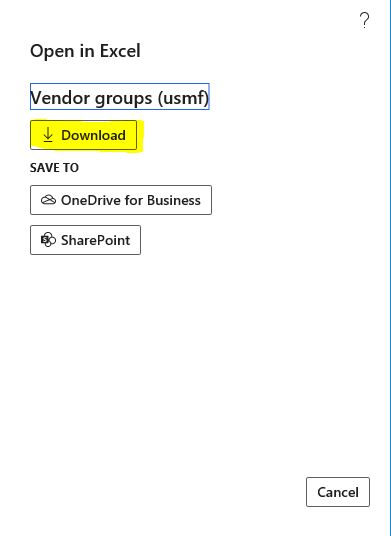
I click Download to download it to the local machine.

Image-3

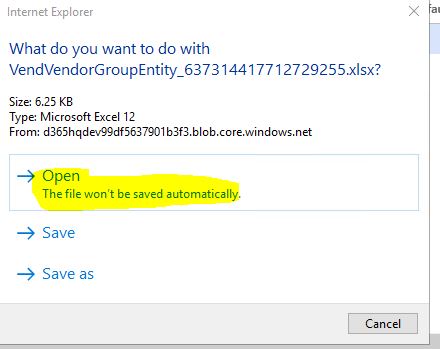
There may be warnings due to security settings, you can accept them and continue.

Image-4

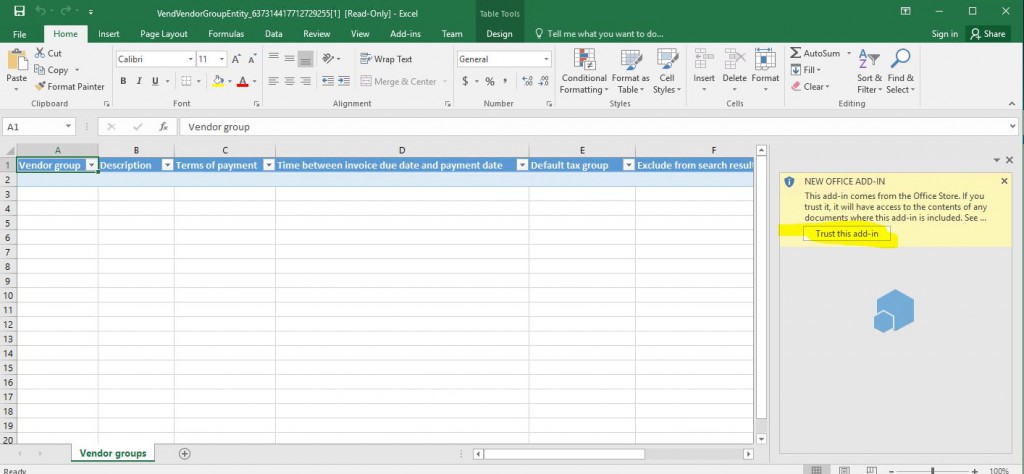
I click Trust this add-in, which will appear when you open it for the first time.

Image-5

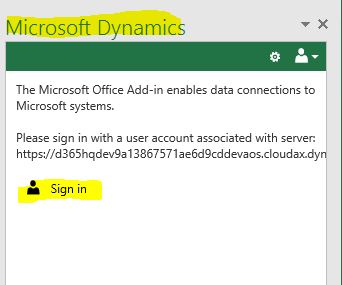
The home page is opened. Here you must log in as an authorized user.

Image-6

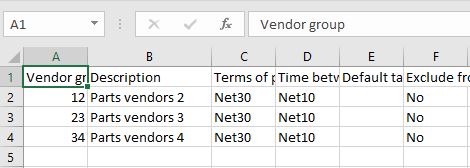
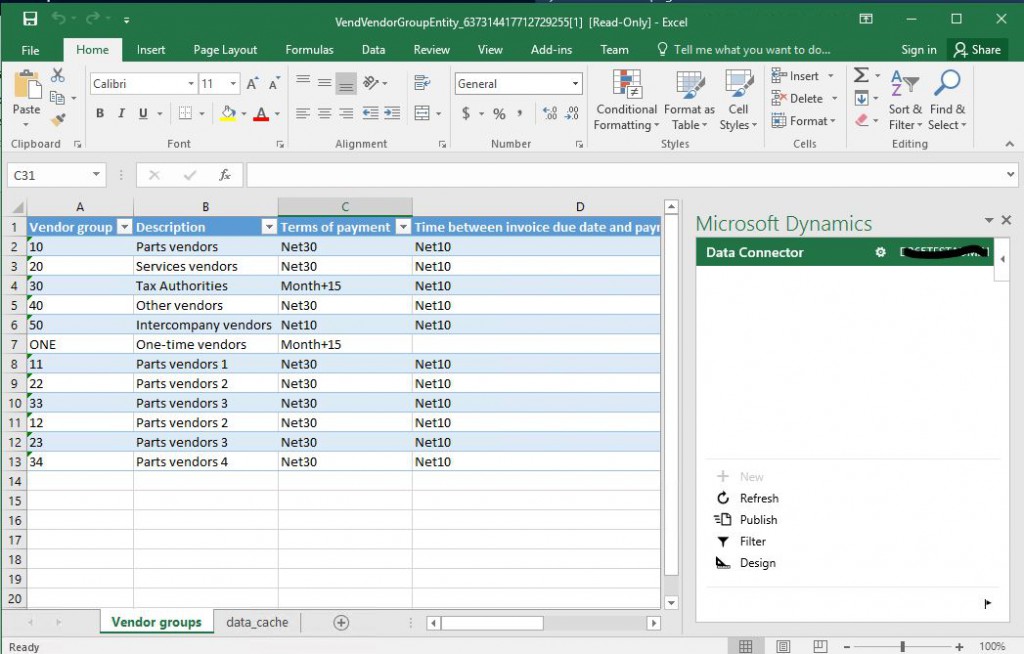
If there is no problem, the form will fill automatically and the menu will appear on the right.

Image-7

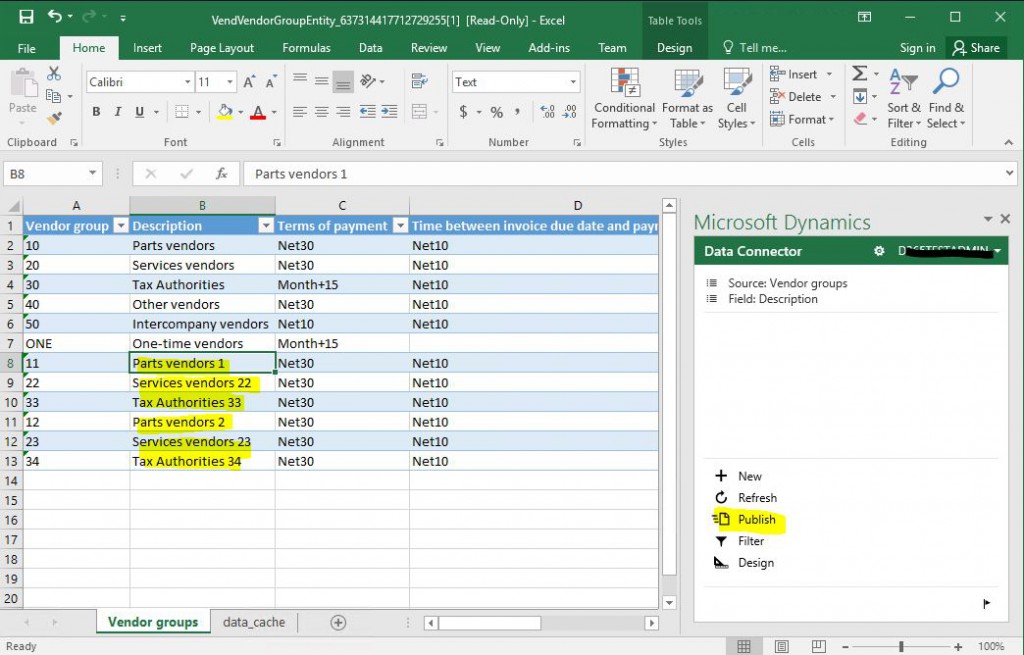
I did not correctly provide the Description information in data transfer, so I correct it and send it to the system by clicking Publish.

Image-8

When I refresh the VendGroup form, I see that the updates I made through Excel are applied.

In this article, I explained how you can transfer data to Excel via any form and upload your updates via Excel to the system. Of course, this does not work efficiently for very large data, you need to be careful. It is a feature that will facilitate the daily lives of the users at many points. It would not be wrong to say that the product is used very effectively with the Office applications. It was not that easy before.

Regards.

www.fatihdemirci.net

TAGs: Microsoft Life Cycle Services, LCS, Azure, Azure DevOps, Excel Export Import, Microsoft Dynamics 365, MsDyn365FO, MsDyn365CE, MsDyn365, Dynamics 365 Insights Power BI, Power Automate, Power Apss, Power Virtual Agents, what is Dynamics 365, Dynamics 365 ERP, Dynamics 365 CRM

How to Update the Version in Dynamics 365 Finance and Operations Environments?

In this article, I will try to explain how you can update the versions of your Dynamics 365 Finance and Operations environments. First of all, we should give credit where it is due. Microsoft made the ERP system update almost like the Windows 10 update with a very good solution. I think the One Version approach is a revolution in business software. All customers using ERP in the cloud have to receive updates published periodically. The good thing here is that Microsoft updates the system at will, thanks to the Extension approach. Your developments are rarely affected by this. In the old system, it was a process that took months to even upgrade to a higher update. Now you can get it done in days or even hours.

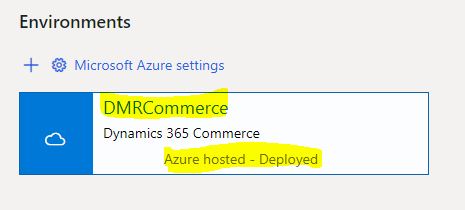
In this article, I will explain how to upgrade a demo environment from CU34 to CU35.  First, select your project.

Image-1

Select the environment you want to update.

Image-2

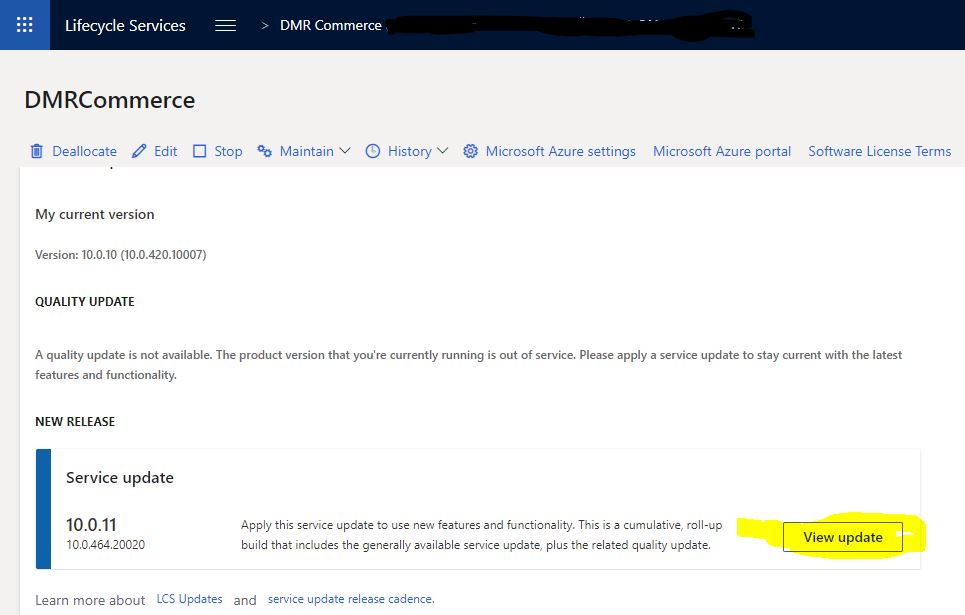
Your environment information appears. Go down and look at the update information.

Image-3

It says that there is an update. Click View Update.

Image-4

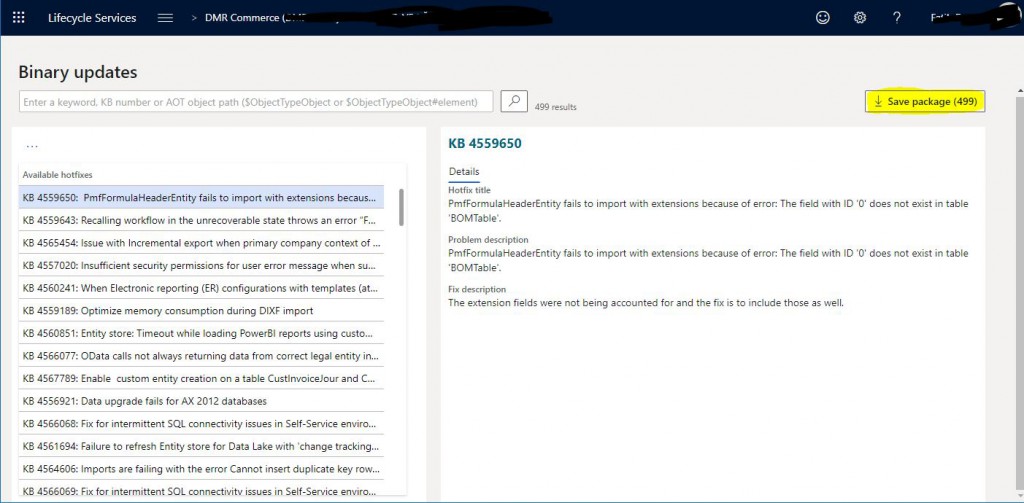
It shows all of the update packages. Click Save package.

Image-5

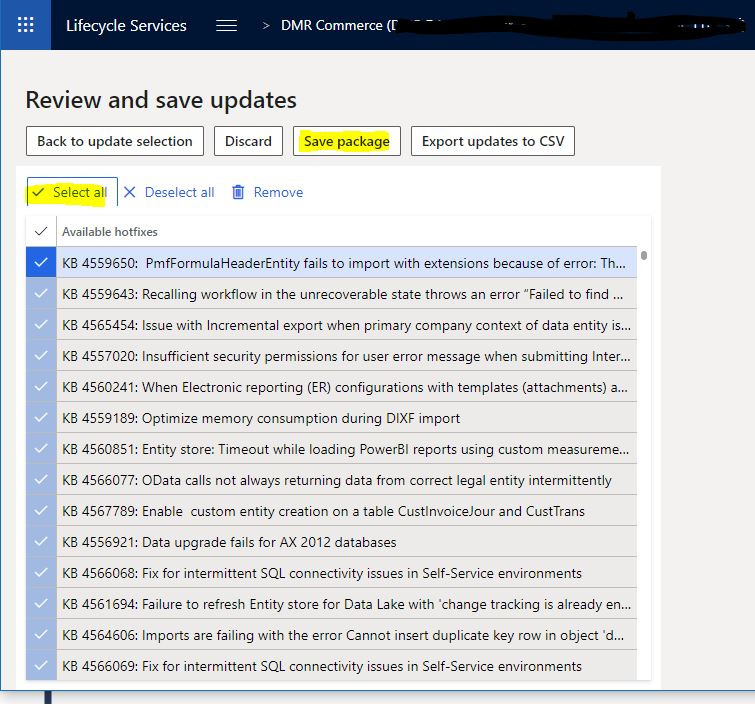
Here I have selected all the packages. You must do this for the version update. If you need different updates, you can choose the package directly from here. Then click Save package.

Image-6

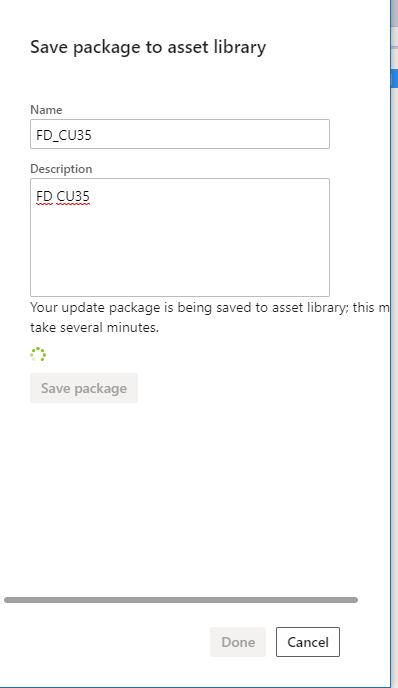
Name the package and click Save package.

Image-7

This takes some time depending on the size of the package.

Image-8

If it completes without error, the following explanation will appear. Complete the process by clicking Done.

Image-9

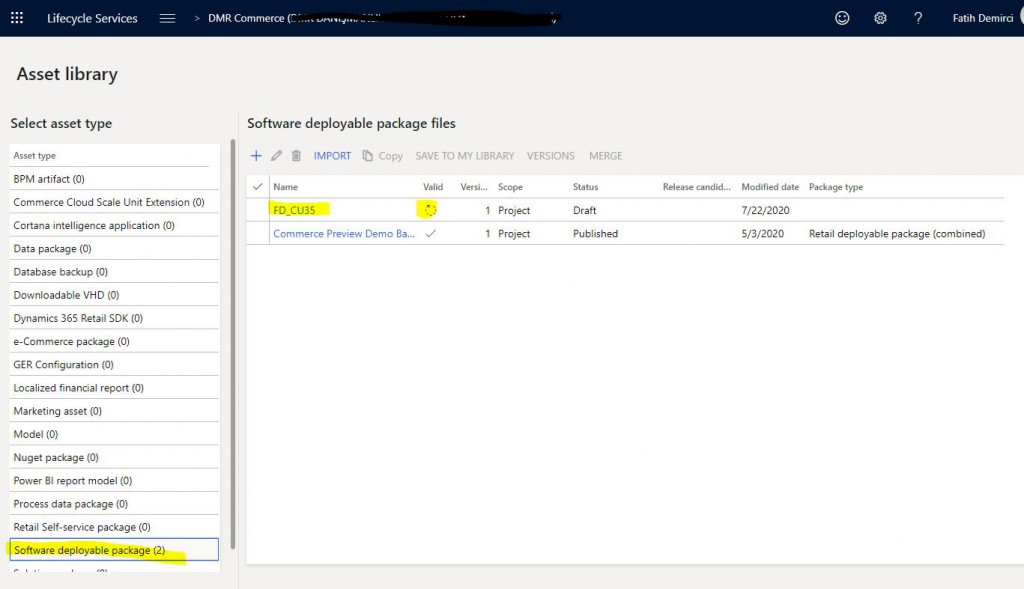
Go to the Asset library and open the Software deployable package tab. Package has arrived but has not been approved yet. We have to wait for a while.

Image-10

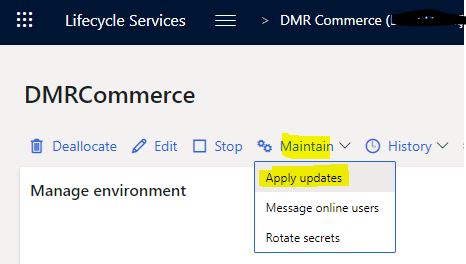
After approval, open your environment again and click Apply updates.

Image-11

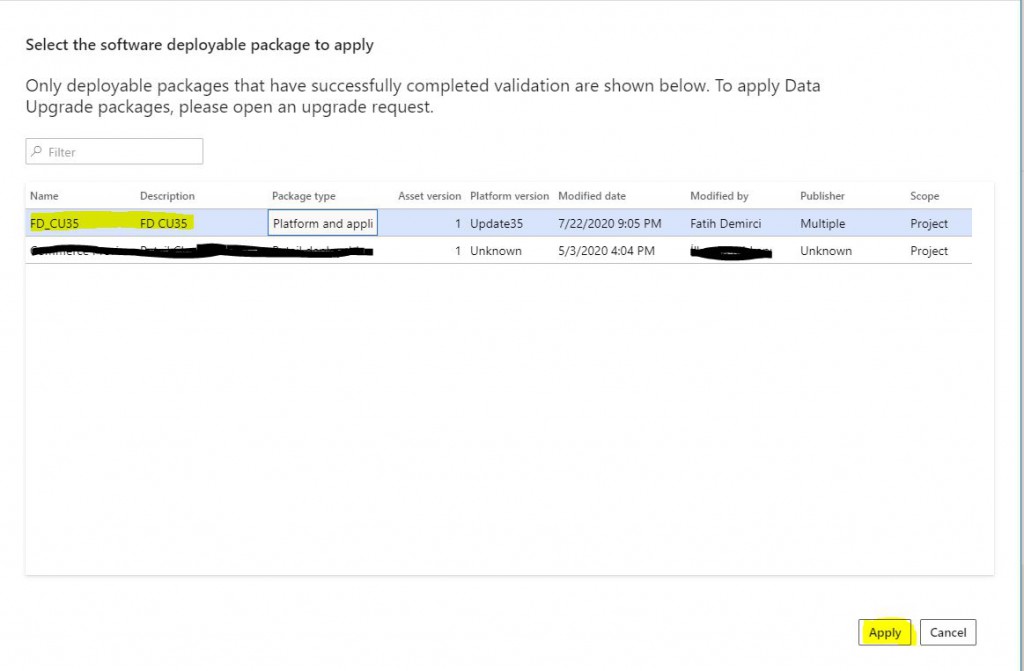
Select your package from the page that opens and click Apply.

Image-12

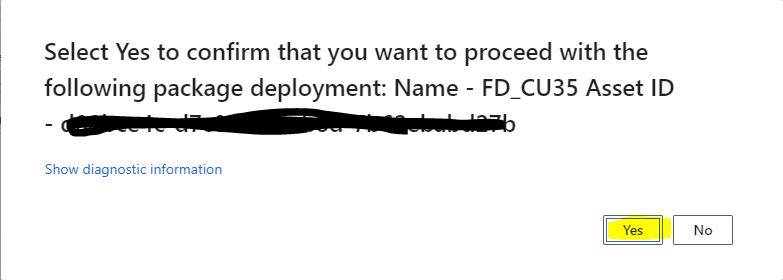
The confirmation screen will appear. Click Yes and continue.

Image-13

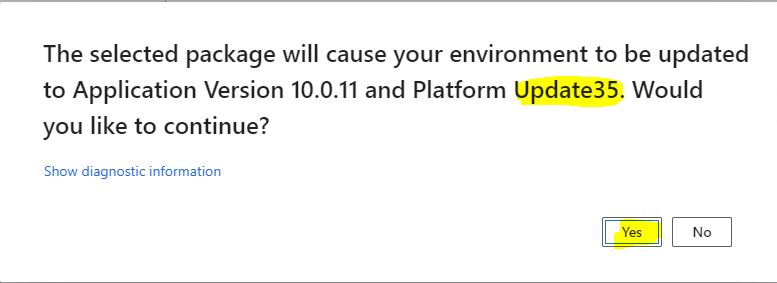
It says our version will be updated. Click Yes.

Image-14

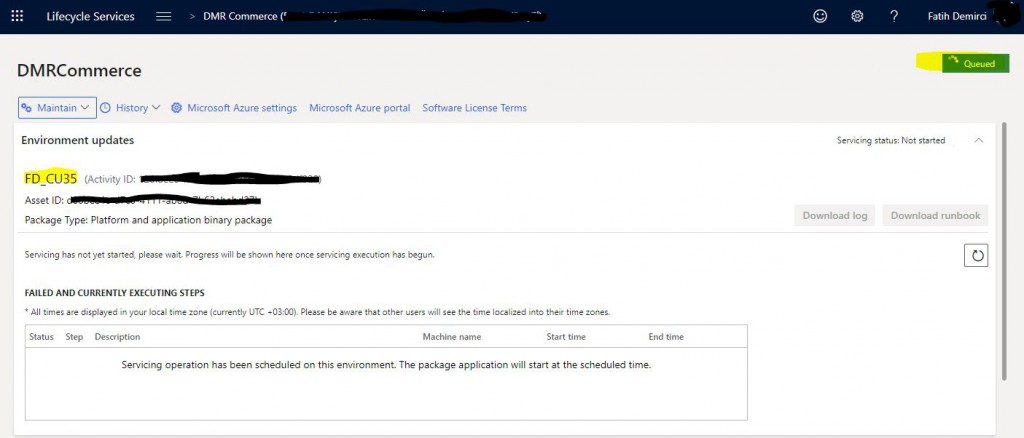
After that, the update process starts. You can track the status of the environment here. If there is no problem within 1 hour, the process will be completed. If there is a problem, you can refer to the log to see the origination.

Image-15

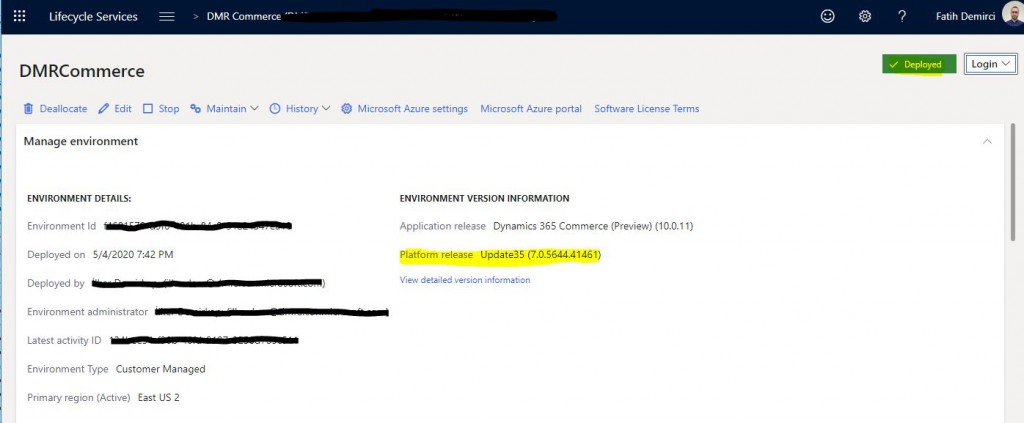
When the update is complete, if there was a problem, there are options such as undo and retry.

Image-16

In this article, I explained how an environment is updated to the new version. It’s a very simple process. If you need to update multiple environments, you don’t need to create packages for all of them. You can use the same package for all your environments. Make sure your environment is open before starting the update. If you turn off the machine from Azure side, LCS doesn’t see it. After the update is complete, it is useful to start a synchronization via VS for demo environments like this.

Regards.

www.fatihdemirci.net

TAGs: Microsoft Life Cycle Services, LCS, Azure, Azure DevOps, Update, Microsoft Dynamics 365, MsDyn365FO, MsDyn365CE, MsDyn365, Dynamics 365 Insights Power BI, Power Automate, Power Apps, Power Virtual Agents, what is Dynamics 365, Dynamics 365 ERP, Dynamics 365 CRM
How to Authorize Dynamics 365 Finance and Operations Lower Level Form Objects?

In this article, I will try to explain how to define an authorization for any object in Dynamics 365 Finance and Operation application. I do not recommend using this. The more details you go into, the more difficult it will be to manage security. However, in some cases, this will be needed. One mistake I see in these cases is to solve this with code, not with the security infrastructure. Never write code for security related work. It seems like a quick solution at first, but there will be a lot of trouble in the future. The support and subsequent requests become very difficult to meet. In this article, I will continue with the project I used in my previous articles. We had authorized a test user for the Customers form. Now they can open the form and see its data. Assume that the Customer group field was asked to appear on this user. Let’s see how we can do this.

Image-1

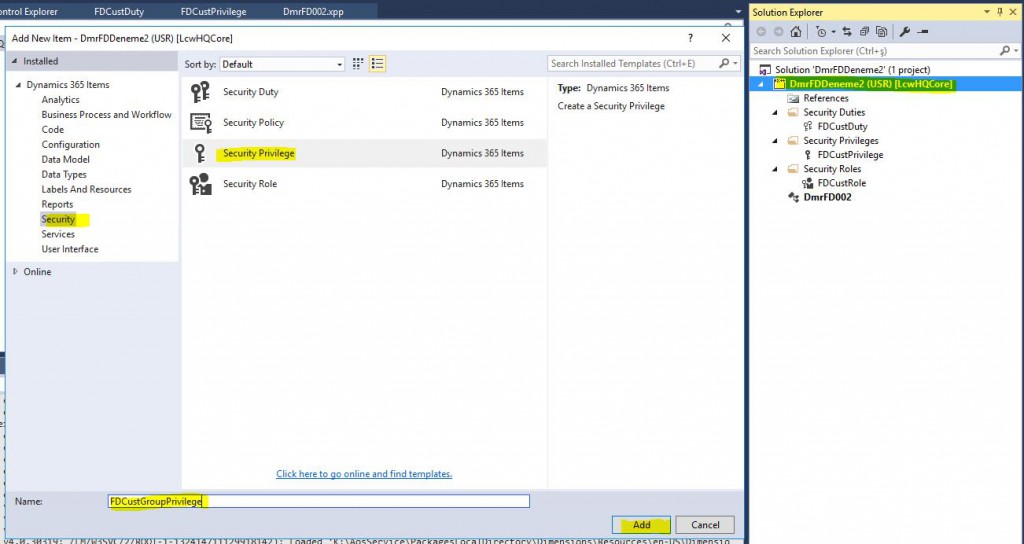
I add a new Privilege.

Image-2

Under Privilege, right click the Form Control Permissions section and click New Form.

Image-3

In the Name field, select CustTable form.

Image-4

Right click on CustTable to create a new object and type the name of the object you want to authorize. Grant is the key part. With No Access, we ensure that those who own this Privilege do not see this object. It may not appear in the lookup here. It doesn’t matter, you can directly write the name. These definitions will not be sufficient. We need to change a property of the object for which we will define the authorization.

Image-5

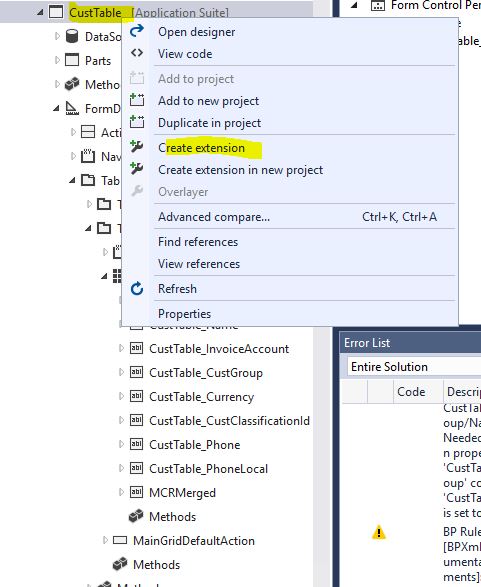
In order to make this change, we need to create an extension for our form at this stage.

Image-6

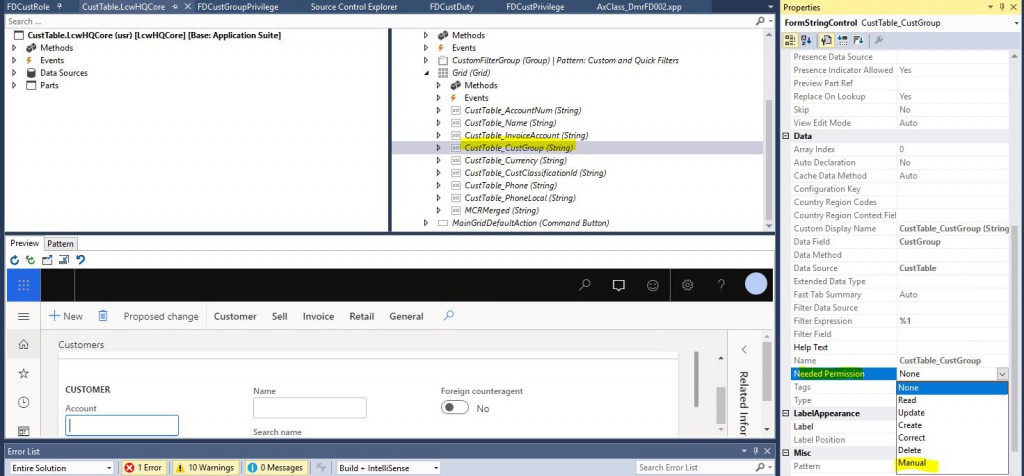
Open the Extension you created. Find the object you want to authorize and from its properties, change NeedPermission to Manual. It means that you will manage the authorization of this object. It’s better to use the Extension as the first step.

Image-7

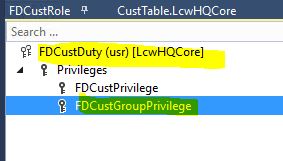
Then add the Privilege to Duty we used in our previous articles.

Image-8

Save and compile our project and run DB synchronization for our project only. After that, when you log in with the test user and open the Customers form, you will see that the Customer Group field does not appear.

Image-9

In this article, I tried to explain how a low-level object is authorized. It can be done very simply, but if you define too many low-level authorizations, it is very difficult to work it out. Try to authorize from the entry point as much as possible.

Regards.

www.fatihdemirci.net

TAGs: Microsoft Life Cycle Services, LCS, Azure, Azure DevOps, Security, Microsoft Dynamics 365, MsDyn365FO, MsDyn365CE, MsDyn365, Dynamics 365 Insights Power BI, Power Automate, Power Apss, Power Virtual Agents, what is Dynamics 365, Dynamics 365 ERP, Dynamics 365 CRM

How to Create a Batch Job with RunBaseBatch Framework?

In this article, I will try to explain how to create a new Batch Job for Dynamics 365 Finance and Operations. I will create an example using RunBaseBatch. I will give examples with SysOperation in my future articles. Let’s look at what batch job is. It is an infrastructure that is used to run a job on a different server and at a certain time, repeatedly. Let me give you the simplest example. The central bank announces the exchange rates at a certain time every day. You need to take these values and save them in the system. You have written a class for this and that class connects to the service and gets the values. However, this has to be triggered at the same time every day. This is where batch jobs come in and allow you to make these settings.

In this example we will create and run a very simple class. First I create a new project.

Image-1

After the project the class is required, but we will not create it from scratch. We will duplicate the Tutorial_RunBaseBatch class from the samples.

Image-2

Let’s give a name to the class we duplicated. There are a few things to consider. First of all, don’t change the structure of the class. It works smoothly as is. If you don’t need dialogs, you can clear them. It is essential to derive from RunBaseBatch. You must use Pack Unpack. Pack Unpack ensures that your parameters are stored in the system. It is such an extensive topic that needs a dedicated article.

Image-3

When a class is duplicated, the name of the old class remains in a few places. These need to be fixed. I changed the Main method to this.

Image-4

Similarly, I changed the construct method in this way.

Image-5

Run method is where the main work is done. In this sample class a dialog opens and asks for the date and client code. I print the values coming from this dialog in the run method.

Image-6

I create a new MenuItem to run the class.  I select the Object and ObjectType.

Image-7

I mark the MenuItem as the starting point.

Image-8

When I run my project, the dialog screen opens. I enter a date and select a client. I select No for Batch processing. When I click OK, the class will directly work.

Image-9

The class worked and displayed the output on the screen.

Image-10

Now let’s see what happens when I click Yes. Of course, this appears because we derived our class from the RunBaseBatch class. After I defining a few important areas, I click Recurrence.

Image-11

Here I can determine how often and when this job will run. I can get it running every 10 minutes if I want, but it’s enough for me to run it once, so I leave it like that.

Image-12

The class did not work when I closed the screens by clicking OK. Instead, it showed the message saying that it added to queue.

Image-13

Now let’s open the Batch Jobs form.

Image-14

Let’s find our own batch job and take a look at the progress. It is Ended, which means it worked and finished. If it was a recurring job, it would be in Waiting state.  I open the advanced form by using the Switch to enhanced form option.

Image-15

This form includes more details. I will not mention all of them. I click on Batch job History to check what our batch job has done and whether it worked correctly.

Image-16

When I click Log from the screen that opens, I see that the date and customer information I selected appear on the screen. So my class worked. If there was an error I could check it here.

Image-17

In this article, I tried to explain how to create a new batch job using RunBaseBatch. Batch job is a very extensive topic. I will continue to explain it with different viewpoints.

Regards.

www.fatihdemirci.net

TAGs: Microsoft Life Cycle Services, LCS, Azure, Azure DevOps, Batch Jobs, RunBaseBatch, Microsoft Dynamics 365, MsDyn365FO, MsDyn365CE, MsDyn365, Dynamics 365 Insights Power BI, Power Automate, Power Apps, Power Virtual Agents, what is Dynamics 365, Dynamics 365 ERP, Dynamics 365 CRM

What is Dynamics 365 Finance and Operations Optimization Advisor?

In this article, I will explain what Dynamics 365 Finance and Operations Optimization Advisor is and what it does. Optimization Advisor is a tool that allows business analysts and consultants to identify problems in module configuration and business data. Optimization Advisor recommends best practices for module configuration, and identifies outdated or incorrect setup and business data, and provides information to take action.

Open the workspace by using Modules > System administration > Workspaces > Optimization Advisor.

Image-1

My application is a dev environment with demo data, so many suggestions are listed. As I am a software developer, the suggestion that immediately caught my eye was the performance-related one. It is for using batch to improve posting performance. I click More Information.

Image-2

Here, there are details of the finding. If you decide to do it, click Take action.

Image-3

It opens the general ledger parameters form for you. From the Batch transfer rules tab, I select Scheduled batch for Transfer mode. Thus, I took action on an item of Optimization Advisor.

Image-4

In this article, I tried to explain what Optimization Advisor is and how to use it. It’s a nice feature, but the recommendations here should be tested first in test environment. Each parameter has different effects on the system. Some settings may be deliberately different in the project design. You shouldn’t change it just because you saw it here and considered it correct.

Regards.

www.fatihdemirci.net

TAGs: Microsoft Life Cycle Services, LCS, Azure, Azure DevOps, Optimization Advisor, Microsoft Dynamics 365, MsDyn365FO, MsDyn365CE, MsDyn365

Dynamics 365 Finance and Operations Data Management 1. How to Import Data?

In this article, I will introduce Dynamics 365 Finance and Operations data management infrastructure (Data Management Framework). The scope of data management is very large. I will try to talk about the basic principles in this series. Data is very important for every application, but the reason for the existence of ERP is to collect the data correctly and to create meaningful reports from the collected data. For this reason, the product has always had powerful tools for data management. With the cloud, these are now very advanced. Many different technologies such as CDS and Azure DataLake were involved. Of course, SQL and table structure remains, but with the added Data entities structure, we have a much more flexible and easily managed structure. In this section, I will try to explain how to manage Data Entity and Entity Packeges using the data management infrastructure.

The data management infrastructure consists of the following objects.

  • Data entities – They are meaningful data sets. It is a structure that consists of one or more data sources to view and process a certain data. Data Entity allows us to bring these data sources together and perform transactions over a meaningful data set. It is suitable for reuse. It is used for integration, data transfer and many other purposes.
  • Data project – A project record that holds edited Data Entity and relationships. It can be reused.
  • Data job – Includes run Data Projects, uploaded files and recurring processes.
  • Job history – Keeps the history of transactions.
  • Data package – It is a compressed structure with Data project manifest and Data files. It is created over the data job. It allows importing and exporting multiple files in one operation.

You can use this structure for three different scenarios:

  • Data migration
  • Set up and copy configurations
  • Integration

Let’s get to the topic of this article. We’ll start with a very simple data transfer. We will transfer the vendor group. (VendGroup). Log in to Dynamics 365 Finance and Operations and open Workspaces > Data management worksheet.

Image-1

Click Framework parameters Tile. Tile’ı nasıl çevirmek lazım emin olamadım. En iyi uygunu tuğla veya fayans gibi duruyor ama ben karo diyeceğim. J  You can make many settings from the screen that opens. Now just select the View defaults section as Enhanced view.

Image-2

This is now the advanced view. You can return to the old view by selecting Standard view.

Image-3

Click on the Import tile.

Image-4

Enter the basic information and click Add File.

Image-5

By the way, the data I will transfer is a csv as shown below.

Image-6

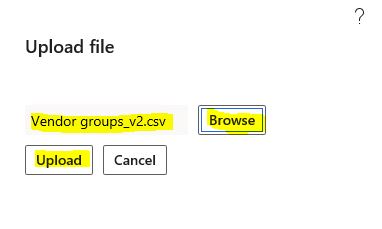
From the window that opens, I first select the Entity I want to transfer from. I determine the format. I select my file by clicking Upload and add.

Image-7

I click Yes.

Image-8

Here it says some relationships are missing between my file and the Entity. I can do it here if I want. I lick No for now.

Image-9

Transfer failed due to lack of relationships. However, the project was created. I click the icon under view map.

Image-10

It shows the links between my file and the Entity. Since the headings in my file are tags, it could not auto-match. I can do it manually from here.

Image-11

I have completed my mappings and I save.

Image-12

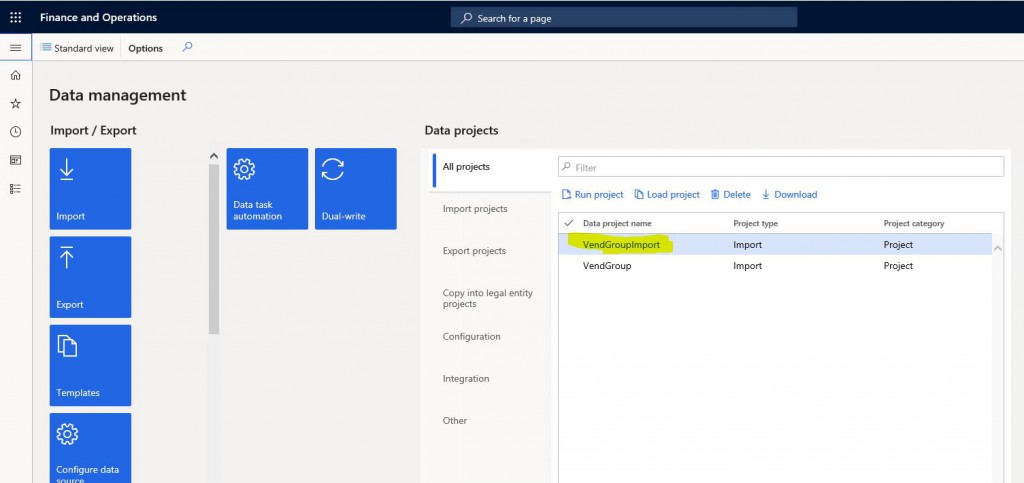
I go to my project and click Import.

Image-13

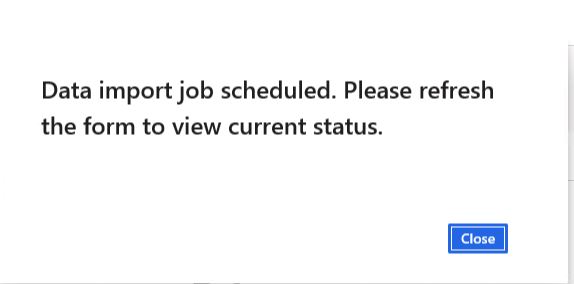
It adds the transfer to the working list.

Image-14

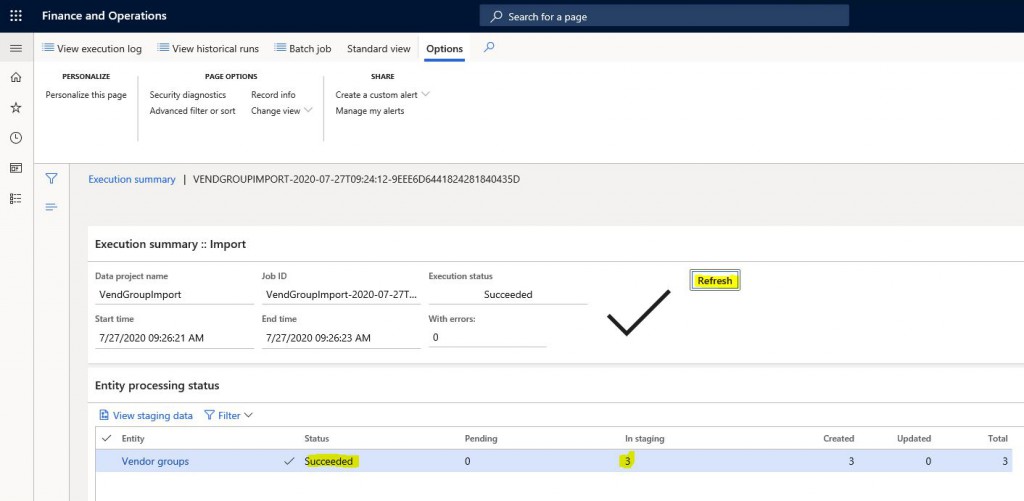
It quickly completed the transfer because my data was too little.

Image-15

Now I can open the VendGroup form and see the records I imported.

Image-16

In this article, I made an introduction to data management and performed a very simple data transfer. I will talk about very different uses of this structure in my following articles. Both consultants and software developers need to know the capabilities of this very well. There are many different uses. It is a structure that will save you a lot of time with proper use.

Regards.

www.fatihdemirci.net

TAGs: Microsoft Life Cycle Services, LCS, Azure, Azure DevOps, Data Management Framework, Microsoft Dynamics 365, MsDyn365FO, MsDyn365CE, MsDyn365, Dynamics 365 Insights Power BI, Power Automate, Power Apps, Power Virtual Agents, what is Dynamics 365, Dynamics 365 ERP, Dynamics 365 CRM
Page 11 of 14« First...910111213...Last »