Archive for the ‘ AX 2012 ’ Category

Ax 2012′de Fact box ve Preview Pane’leri sistemden kapatmak

Merhaba

Ax 2012 ile ilk karşılaştığımda eski versiyonlara göre yavaş olduğunu düşünmüştüm. Gerçekten de öyle, bir çok karşılaştırma örnekleriyle ispatlanmış. Ancak karşılaştırma yapmak çok doğru olmayabilir. Çünkü Ax 2012 tamamen farklı bir yapı. Arka planından tutun form yapısına, veri yapısına kadar bir çok değişiklik var. Bu yüzden karşılaştırma da doğru bir sonuç elde edemeyebiliriz.

İnternette performans ile ilgili bir çok kaynak mevcut. Özellikle Dynamics Ax Performance Team Blog‘u mutlaka takip etmek lazım.

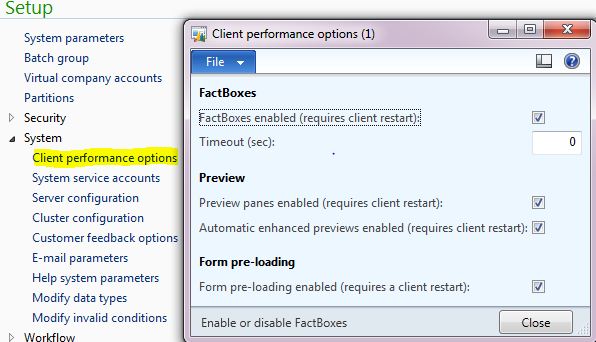
Gelelim yazının konusuna Fact box ve Preview pane‘lerin formlarda bir yavaşlığa sebep olduğu aşikar. Bu yüzden bunları kapatabileceğiniz bir kurulum sayfası yapılmış ancak canlı sistem için kapatmanız tavsiye edilmiyor. Burayı performans sorunlarının tespiti için kullanmalısınız.

System administation / Setup/ Client performance options menüsünden açtığınız formda açma kapatma zaman ayarı yapma gibi işlemleri yapabilirsiniz.

Selamlar.

Dynamics Ax 2012 Table Inheritance 2

Merhaba

Bu yazımda tablo kalıtımın da verilerin nasıl oluştuğundan ve Insert() , Delete() ve Update() işlemlerinden bahsedeceğim. Bir metotla türettiğimiz 3 tabloya da kayıt ekleyelim.

static void FD_InsertTableInheritance(Args _args)
{
    FDCarTable          carTable;
    FDTruckTable        truckTable;
    FDMotorcycleTable   mtcTable;
    ;

    carTable.clear();
    carTable.carType            = "Taxi";
    carTable.numberOfDoors      = 2;
    carTable.Plaque             = "34 TK 4422";
    carTable.Brand              = "Ford";
    carTable.Model              = "Focus";
    carTable.insert();

    truckTable.clear();
    truckTable.truckType        = "Trayler";
    truckTable.numberOfAxles    = 5;
    truckTable.Plaque           = "34 sdr 54";
    truckTable.Brand            = "Merecedes";
    truckTable.Model            = "Truckes";
    truckTable.insert();

    mtcTable.clear();
    mtcTable.motorcycleType     = "Mobilet";
    mtcTable.hasSidecar         = false ;
    mtcTable.Plaque             = "34 df 22";
    mtcTable.Brand              = "Hundai";
    mtcTable.Model              = "i345";
    mtcTable.insert();

}

FDCarTable

FD TruckTable

FDMotorcycleTable

FDVehicleTable

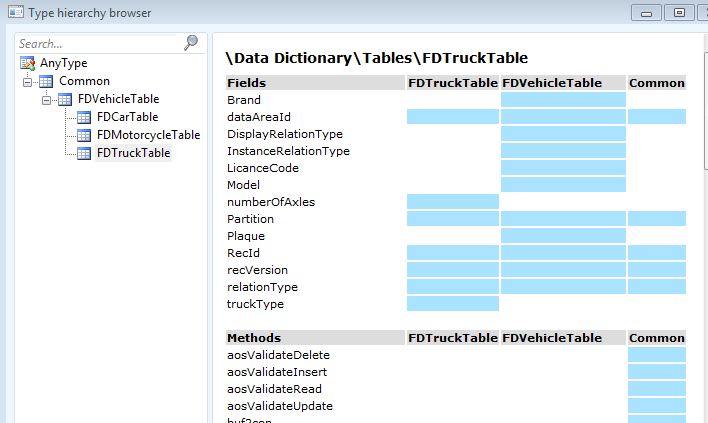
Gördüğünüz gibi biz alt tablolara kayıt ekledik temel tabloda da otomatik veri oluştu. Oluşan verinin hangi tablodan geldiğini InstanceRelationType alanından görebiliyoruz. Ayrıca isteğe göre eklenebilen DisplayRelationType alanından da görebiliyoruz. Türetilmiş tablo ile temel tablonun RecId’leri aynı oluştu. Tablo tarayıcısından türetilmiş tabloyu açtığınızda temel tablodaki alanları da görebiliyorsunuz. Zaten yukarıda yazdığımız metotta da temel tablonun alanlarını kullandık.

Update işleminde de aynı mantık geçerli , istediğiniz tablo değişkeni üzerinden güncelleme yapabilirsiniz. Basit bir örnek yapalım.

static void FD_UpdateTableInheritance(Args _args)
{
    FDCarTable          carTable;
    FDVehicleTable      vehicleTable;
    ;

    ttsBegin;
    while select forupdate   carTable
    {
        carTable.LicanceCode    = "LisansFromCar";
        carTable.numberOfDoors  = 4;
        carTable.update();
 // Hem temel tablo hemde türetilmiş tablo için güncelleme yapılabilir.
    }

    while select forUpdate  vehicleTable
        where vehicleTable.InstanceRelationType == tableNum(FDCarTable)
    {
        vehicleTable.LicanceCode = "LisansFromVehicle";
        vehicleTable.update();
 // Sadece temel tablo için güncelleme yapılabilir.
    }
    ttsCommit;
}

Delete işlemi de update işlemiyle aynı. Dikkat edilmesi gereken nokta temel tablodan bir satır silindiğinde türetilmiş tablodan da o satırın silineceğidir. Tablonun diğer metotlarında da sınıflarda bildiğimiz kalıtım mantığının aynısı çalışıyor.

Selamlar.

Dynamics Ax 2012 Table Inheritance 1

Merhaba

Bu yazımda ax 2012 ile hayatımıza giren tablolarda kalıtımdan bahsedeceğim. Bir çok eğitimimde ax tablolarının aslında birer sınıf olduğunu söylemiştim. Tabloların sınıf olması sebebiyle ezilebilen metotları vardı Insert() Update() gibi. Yeni metot yazılabiliyordu vs. Ancak biz tabloları birbirinden türetemiyorduk. Böyle bir desteği yoktu. Ax 2012 ile birlikte tablolar kalıtım özelliği gelmiş oldu böylece tablolar birbirinden türetebiliyoruz ve soyut (abstract) tablolar yapabiliyoruz. Türetilmiş tablolardan bahsederken Base Table ve Driven Table kullanılıyor. Bildiğiniz gibi Parent table ve Child table isimlendirmesi Foreign key ilişkilerinde kullanıyor. Tablolarda kalıtımın sistem tarafından desteklenmesi için bir çok temel yapıya eklemeler yapılmış, yeri geldikçe bahsedeceğim.

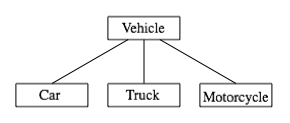
Klasik bir araç örneği ile tablolarda kalıtımı anlatmaya çalışacağım. Örnek yapımız şöyle olsun. Adım adım ilerleyelim.

  1. 4 tabloyu da öncelikle oluşturalım hiçbirine sütün eklemeyelim. Bütün tabloların SupportInheritance özelliğini Yes yapalım. FDVehicleTable tablosu hariç diğer tabloların Extends özelliğine FDVehicleTable yazalım. Böylece kalıtım yapısını kurmuş olduk.
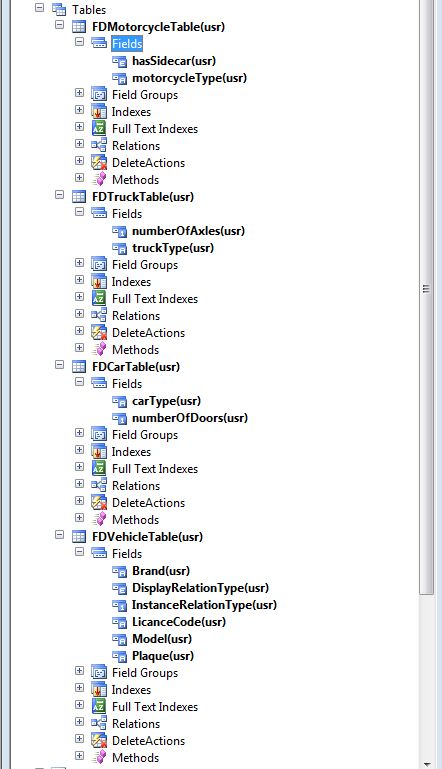
  2. Tablolarımıza gerekli sutünları açalım. Dikkat etmemiz gereken bu hiyerarşide hiçbir sutün ,Relation veya index aynı isimde olmamalı. Ayrıca alanların idlerinin de farklı olması gerekiyor.Ben resimdeki alanları açtım.
  3. Base tabloya (FDVehicleTable) Int64 tipinde ismi InstanceRelationType olan bir alan açalım.Tablonun özelliklerinden InstanceRelationType‘ ı InstanceRelationType olarak seçelim. Bu alan otomatik olarak sistem tarafından yönetilecektir ve FDVehicleTable‘da oluşan kayıtların hangi türetilmiş tablodan geldiğini göstermek için o tablonun tablo Id’sini tutacaktır.
  4. Son olarak eğer hangi tablodan bu kayıtların oluştuğunu raporda veye formda göstermek isterseniz bir BaseEnum yapmalısınız. Enum da Sıfır Id’li eleman unKnown olacak diğerleri de sizin tablo isimlerinizle aynı olacak.Oluşturduğumuz Enum’ı sürükleyip FDVehicleTable’a bırakalım ve oluşan sutünün ismin DisplayRelationType yapalım.
  5. Insert() metodunu şu şekilde güncelleyelim.
    public void insert()
    {
        dictenum enumtype = new dictenum(enumnum(fdvehicletype));
        int enumvalue;
        ;
        if (this.displayrelationtype != fdvehicletype::unknown)
        {
            return;
        }
        enumvalue = enumtype.symbol2value(this.getinstancerelationtype());
        if (enumvalue == 255) // symbol2value bu fonksiyon eğer çeviremezse 255 döndürür
        {
            throw error(strfmt('no %1 enum element found for enumvalue %2',
            enumstr(fdvehicletype),
            this.getinstancerelationtype()));
        }
        else
        {
            this.displayrelationtype = enumvalue;
        }
        super();
    }
    
  6. Bütün projeyi derleyin. FDVehicleTable tablosuna sağ tıklayıp Add-Ins menüsünden Type hierarchy browser’ ı açın.                             
  7. Bu tanımlardan sonra yapımız hazır oldu. Son olarak tabloların ilişkilerine(Relation) bakalım. Gördüğünüz gibi RecId üzerinden ilişki kurmuş yani iki tablonun recId leri aynı oluşacak. Bunu sistem yönetiyor. Örnek verilerle daha iyi anlaşılacaktır. İlişki isimlendirmede PK_Base Tablo_Derived Tablo yapısını kullanmak tavsiye ediliyor.

Yapıyı kurmuş olduk. Bir sonraki yazımda veri yönetimi ve tablo metotlarını inceleyeceğim.

Selamlar.

How to change grid row color in listpage form in Dynamics Ax 2012

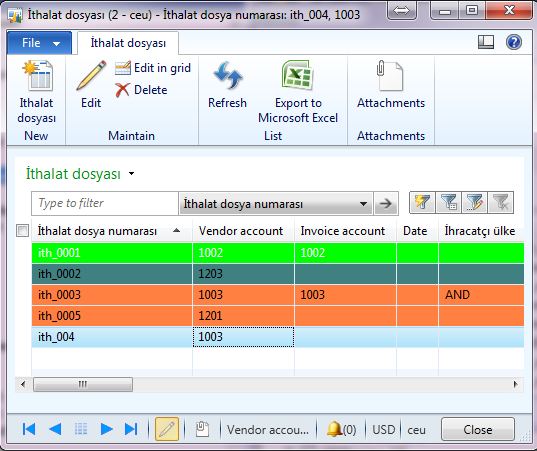
I need to change the grid row’s color in ax 2012 depend on the record status. The usual solution for this is to override the formdatasource method displayoption(). However, the form is listpage type and DataSource method can not be overiden. Customization works only in the interaction class for listpages. I try to do this modification in to the interaction class but i couldn’t . After some search i find a solution. Firts export listpage form to xpo file and change form’s FormTemplate property to the none. Now you can override the displayoption() method with this code.


public void displayOption(Common _record, FormRowDisplayOption _options)
{
    #define.Green(0, 255, 0)
    #define.Orange(255, 128, 64)
    #define.LightGreen(64, 128, 128)
    #define.White(255, 255, 255)

    FRTImportTable importTable;
    ;

    importTable = _record.data();

    if (importTable.Status == FRTImportStatus::PreInvoice)
    {
        _options.backColor(WinAPI::RGB2int(#Green));
        _options.textColor(WinAPI::RGB2int(#White));
    }
    else if (importTable.Status == FRTImportStatus::OpenInvoice)
    {
        _options.backColor(WinAPI::RGB2int(#Orange));
    }
    else
    {
        _options.backColor(WinAPI::RGB2int(#LightGreen));
    }

    super(_record, _options);
}

Export new form to another xpo file. Open each xpo file and find displayoption() method from second xpo file. Copy and paste below code to the first xpo file between METHODS and ENDMETHODS branches.


SOURCE #displayOption
#public void displayOption(Common _record, FormRowDisplayOption _options)
#{
#    #define.DarkGray(80, 80, 80)
#    #define.LightGray(200, 200, 200)
#    #define.LightGray2(20, 20, 20)
#    #define.White(255, 255, 255)
#
#    FRTImportTable importTable;
#    ;
#
#    importTable = _record.data();
#
#    if (importTable.Status == FRTImportStatus::PreInvoice)
#    {
#        _options.backColor(WinAPI::RGB2int(#DarkGray));
#        _options.textColor(WinAPI::RGB2int(#White));
#    }
#    else if (importTable.Status == FRTImportStatus::OpenInvoice)
#    {
#        _options.backColor(WinAPI::RGB2int(#LightGray));
#    }
#    else
#    {
#        _options.backColor(WinAPI::RGB2int(#LightGray2));
#    }
#
#
#    super(_record, _options);
#}
ENDSOURCE

Save the first xpo and import to the ax.

Open your listpage form now you see the colors.

This is not a proper solution but i couldn’t find any other if you do let me know.

Until next time.

How to display only one attribute value from LedgerDimension

In this post, I will explain how to display only one attribute value from LedgerDimension. I will use CostCenter attribute for my example. As you know LedgerDimension table are DimensionAttributeValueCombination , DimensionAttributeValueGroupCombination and DimensionAttributeLevelValue . This tables holds the related data. Instead of this tables I wil use only DimensionAttributeLevelValueAllView view. This view is very simple and useful.
I have a LedgerDimension’s RecId end i want to display only CostCenter value. I will join DimensionAttributeValue to DimensionAttributeLevelValueAllView and give the ranges.

Here is the method displays costCenter values.


// FD: Display CostCenter Value from LedgerDimension
display num dispFinancialDisplayValue()
{
    DimensionAttributeValue             dimAttrValue;
    DimensionAttributeLevelValueAllView dimAttrLevelValueAllView;
    ;

    select firstonly dimAttrLevelValueAllView
    where dimAttrLevelValueAllView.ValueCombinationRecId == this.LedgerDimension
    join dimAttrValue
        where dimAttrValue.RecId == dimAttrLevelValueAllView.AttributeValueRecId
        &&    dimAttrValue.DimensionAttribute   == 5637144851;
        // CostCenter RecId. Must be parametric.

    return dimAttrLevelValueAllView.DisplayValue;
}

I wrote this method to a table that have LedgerDimension field.

Until next time.

How to display only one attribute value from DefaultDimension

In this post, I will explain how to display only one attribute value from DefaultDimension. I will use CostCenter attribute for my example. As you know DefaultDimension tables are DimensionAttributeValueSet and DimensionAttributeValueSetItem . This tables holds the related data. I wil use only DimensionAttributeValueSetItem table.
I have a DafaultDimension’s RecId end i want to display only CostCenter value. I will join DimensionAttributeValue to DimensionAttributeValueSetItem and give the ranges.

Here is the method displays costCenter values.


// FD: Display CostCenter Value from DefaultDimension
display num dispDefaultDisplayValue()
{
    DimensionAttributeValue            dimAttrValue;
    DimensionAttributeValueSetItem dimAttrValueSetItem;
    ;

    select firstonly dimAttrValueSetItem
    where dimAttrValueSetItem.DimensionAttributeValueSet == this.DimensionDefault
    join dimAttrValue
        where dimAttrValue.RecId == dimAttrValueSetItem.DimensionAttributeValue
        &&    dimAttrValue.DimensionAttribute   == 5637144851;
        // CostCenter RecId. Must be parametric.

    return dimAttrValueSetItem.DisplayValue;

}

I wrote this method to a table that have DimensionDefault field.

Until next time.

How to modify MainAccount Lookup in Segmented Entry Control

Hi

One of my friend asked me  “How can i modify MainAccount lookup in Segmented entry control?”. I did not know how to do that. After some research i found LedgerDimensionAccountController class which controls Segmented Entry Control.  After some working i found a method named restrictQueryForMainAccounts() .


public static void restrictQueryForMainAccounts(QueryBuildDataSource
                                             _queryBuildDataSource)
{
    QueryBuildRange qbr;
    //--> FD
    QueryBuildRange qbrFD;
    // <-- FD

    str evalCriteria = strFmt('(%1.Type != %2)',
        _queryBuildDataSource.name(),
        queryValue(enum2int(DimensionLedgerAccountType::Reporting)));
    ;

    qbr = _queryBuildDataSource.addRange(fieldNum(DimAttributeMainAccount, Type));
    qbr.value(evalCriteria);
    qbr.status(RangeStatus::Hidden);

    //--> FD
    qbrFD = _queryBuildDataSource.addRange(fieldNum(DimAttributeMainAccount, value));
    qbrFD.value("3*");
    // <-- FD
}

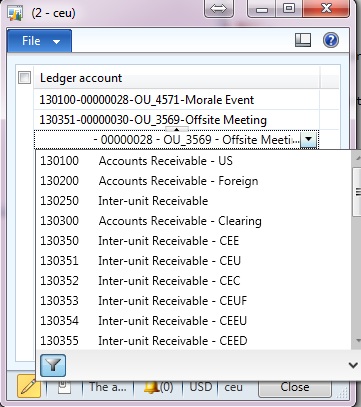
If you open segmented entry control and lookup mainAccount before modification of this method you can see all MainAccounts .

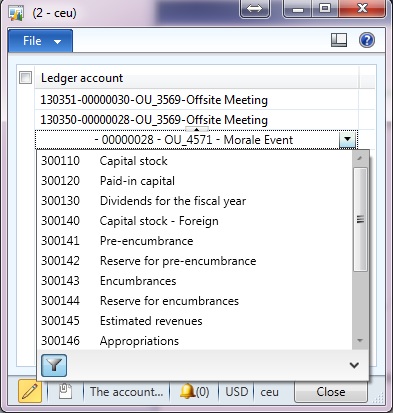
If you modify the method you can see only data starts with “3″ as you can see blow image.

It may not be the correct way to do this but it works. I dont recommend to do such a modification at framework classes. If you have to, be very careful.

Until next time.

Dynamics Ax 2012 Event Handling

Merhaba

Ax 2012 ile gelen yeniliklerden biride event teknolojisi. .Net’te kullanılan bu teknoloji x++’a da uyarlanmış. Bu konuyla ilgili bir çok dokuman mevcut. White Paper buradan indirebilirsiniz.

Ben bu yazımda basit bir örnekle standart bir tabloda event teknolojisini nasıl kullanabileceğimizi anlatmaya çalışacağım.

Adım adım ilerleyelim.

  1. FDCustTableEventHandler adında bir class oluşturalım.
  2. customerCreated adında bir metod ekleyelim ve aşağıdaki kodu kopyalayalım.
    public static void customerCreated(XppPrePostArgs _args)
    {
        CustTable custTable;
        ;
        custTable = _args.getThis();
    
        info(strFmt("%1 nolu müşteri oluşturuldu. (EventHandler)",
           custTable.AccountNum));
    }
    
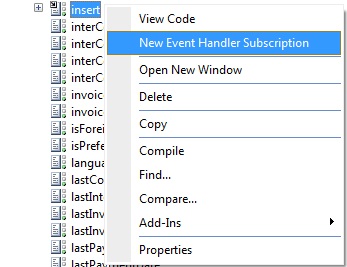
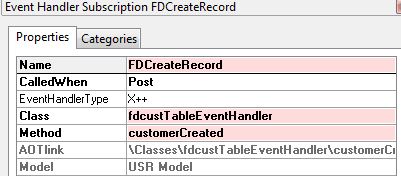
  3. CustTable tablosuna gidip Insert() Metoduna sağ tıklayın. Yeni bir Event handler subsciption tanımlayalım. İsim olarak FDCreateRecord diyelim özelliklerinden resimdeki tanımları yapalım.                                                 

    Buradaki CalledWhen özelliğinde iki şık var. Pre ve Post. Pre insert işleminden önce event’i tetikler. Post ise insert işleminden sonra tetikler.

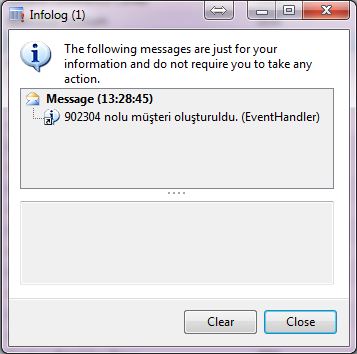
  4. Yeni bir müşteri girişi yaptığımızda yazdığımız kodun çalıştığını göreceksiniz.

Selamlar.

Dynamics Ax ile bir adresin enlem boylamını nasıl bulunur

Merhaba

Yeni başlayan projemde bir çok müşteri adresi olacak. Benim bu adreslerin enlem ve boylamlarını bilmem gerekiyor. Google Apps ta girilen adresin değerlerini veren bir servis var. XML ve JSON tipte veri veriyor.
Buradan bakabilirsiniz. Bu servisi Ax içinden çağırıp enlem ve boylamını xml dosyasından bulan bir kod yazdım.


static void FD_EnlemBoylamBul(Args _args)
{
XMLDocument         doc;
XMLNode             rootNode;
XMLNode             location, geometry, result , lat, lng;
XMLParseError       xmlError;
str                 address;
str                 xmladd;
str                 xmlfile ;
System.Net.WebClient webClient = new System.Net.WebClient();
;
address = "Rüzgarlıbahçe M.Kavak S. No:31/1 34805 Beykoz İstanbul";
xmladd=strFmt("http://maps.googleapis.com/maps/api/geocode/xml?address=%1&sensor=false",
                        address);

xmlfile = webClient.DownloadString(xmladd);

doc = new XmlDocument();
doc.loadXml(xmlfile);
xmlError = doc.parseError();
rootNode = doc.documentElement();
result   = rootNode.selectSingleNode("result");
geometry = result.selectSingleNode("geometry");
location = geometry.selectSingleNode("location");

lat = location.selectSingleNode("lat");
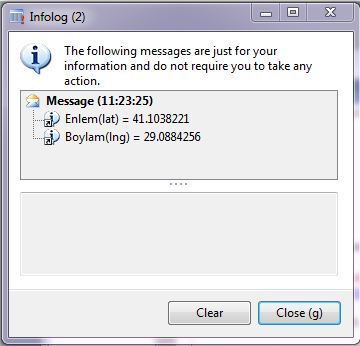
info(strFmt("Enlem(lat) = %1" ,lat.text()));

lng = location.selectSingleNode("lng");
info(strFmt("Boylam(lng) = %1" ,lng.text()));

}

Selamlar.

Dynamics Ax 2012 Valid Time State 2

Merhaba

Önceki yazımda  tarih kontrollü yapının nasıl kurulacağını anlatmıştım. Bu yazımda framework ile gelen sorgu özelliklerinden bahsedeceğim. Resimdeki gibi bir örnek verimiz olsun.
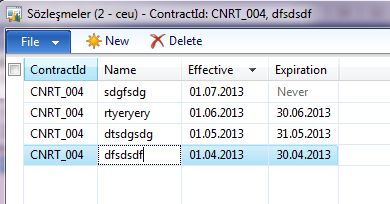
Birinci örneğimiz bu gün için geçerli olan sözleşme kaydını bize verir.

Select ile;

static void FD_ValidTimeState1(Args _args)
{
    FDcontractTable   FDcontractTable;
    TransDate         contractStartDate = systemDateGet() ;
    ;

    while select validTimeState(contractStartDate) FDcontractTable
        where FDcontractTable.ContractId == 'CNRT_004'
    {
        info(strFmt("%1: %2 - %3",
            FDcontractTable.ContractId,
            FDcontractTable.ValidFrom,
            FDcontractTable.ValidTo));
    }
}

Query ile;

static void FD_ValidTimeState3(Args _args)
{
    Query               query;
    QueryRun            queryRun;
    FDcontractTable     FDcontractTable;
    TransDate           contractStartDate = systemDateGet() ;
    ;
    query = new Query();
    query.addDataSource(tableNum(FDcontractTable)).addRange(fieldNum(FDcontractTable,
            ContractId)).value(queryValue('CNRT_004'));

    query.validTimeStateAsOfDate(contractStartDate);

    queryRun = new QueryRun(query);

    if(queryRun.prompt())
    {
        while(queryRun.next())
        {
            FDcontractTable = queryRun.getNo(1);
            info(strFmt("%1: %2 - %3",
                FDcontractTable.ContractId,
                FDcontractTable.ValidFrom,
                FDcontractTable.ValidTo));
        }
    }
}

İkinci örnekte ise 30 günlük aralıkta kalan bütün sözleşmeleri  verir.

Select ile;

static void FD_ValidTimeState2(Args _args)
{
    FDcontractTable   FDcontractTable;
    TransDate         contractStartDate = systemDateGet() ;
    TransDate         contractEndDate   = systemDateGet() + 30;
    ;

    while select validTimeState(contractStartDate ,  contractEndDate)
        FDcontractTable
        where FDcontractTable.ContractId == 'CNRT_004'
    {
        info(strFmt("%1: %2 - %3",
            FDcontractTable.ContractId,
            FDcontractTable.ValidFrom,
            FDcontractTable.ValidTo));
    }
}

Query ile;

static void FD_ValidTimeState4(Args _args)
{
    Query               query;
    QueryRun            queryRun;
    FDcontractTable     FDcontractTable;
    TransDate           contractStartDate = systemDateGet() ;
    TransDate           contractEndDate   = systemDateGet() + 30;

    query = new Query();
    query.addDataSource(tableNum(FDcontractTable)).addRange(fieldNum(FDcontractTable,
            ContractId)).value(queryValue('CNRT_004'));

    query.validTimeStateDateRange(contractStartDate, contractEndDate);

    queryRun = new QueryRun(query);

    if(queryRun.prompt())
    {
        while(queryRun.next())
        {
            FDcontractTable = queryRun.getNo(1);
            info(strFmt("%1: %2 - %3",
                FDcontractTable.ContractId,
                FDcontractTable.ValidFrom,
                FDcontractTable.ValidTo));
        }
    }
}

4. örneği çalıştırdığınızda Query ekranında yeni bir özellik olan Date options ile karşılaşacaksınız. Bu sekmeden 3 tip var. İsimlerinden de anlaşılacağı üzere birincisi şu andaki aktif kaydı verir. İkincisi girilen tarihteki aktif kaydı verir. Üçüncüsü ise aralıktaki aktif kayıtları verir.
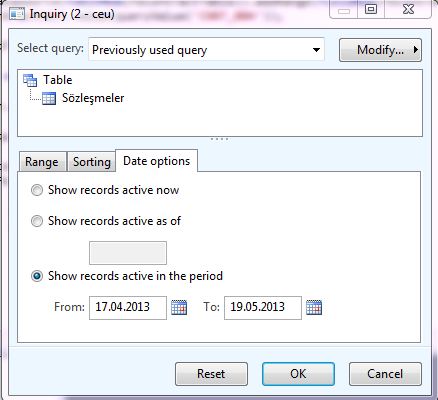
Kodda kullanımı gayet güzel olmuş.

Selamlar.
Page 4 of 7« First...23456...Last »