Archive for Haziran, 2020

Dynamics 365 Finance and Operations için yeni bir X++ geliştirme sanal makinesi nasıl ayağa kaldırılır?

Bu yazıda yeni bir X++ geliştirmeleri için yeni bir sanal makine nasıl ayağa kaldırılır adım adım anlatmaya çalışacağım. Bu örnekte bir müşteri ortamında bunu asıl yapacağınızı anlatacağım. Partner veya eğitim amaçlı sanal makinelerde benzer bir mantığa sahip.

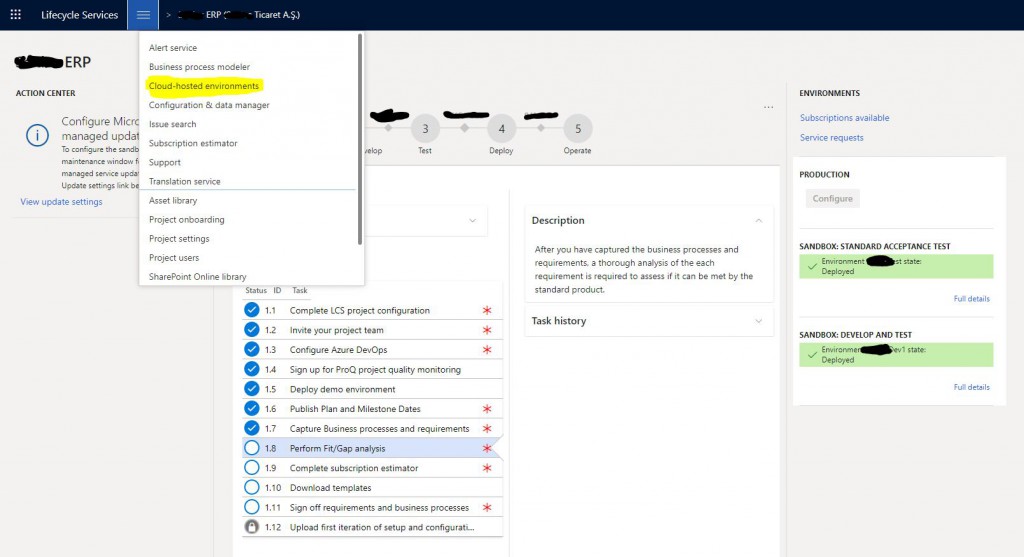
Öncelikle Lifecycle Services’a giriş yapıyoruz. Projemizi seçip hamburger menüden Cloud-hosted environments’ı seçiyoruz.

Resim-1

Read more

X++ :18- Select Nasıl Yazılır?

Bu yazıda X++ ile sorgu nasıl yazılır anlatmaya çalışacağım. X++ sorguları SQL sorgularına çok benzer ama temelde birkaç fark var öncelikle TableBuffer denen bir kavram var. SQL de bir sorgu yazdığınızda direk veriyi görürsünüz ama X++ da bunun görselleştirilebilmesi için bir TableBuffer‘a ihtiyaç vardır. Temel bir sorguda kullanılan anahtar kelimeler bunlardır. Birkaç örnek yaparak açıklamaya çalışacağım.

[while] select [reverse] [firstfast]

[firstonly] [firstOnly10] [firstOnly100] [firstOnly1000]

[forupdate] [nofetch] [crosscompany]

[forcelitterals | forceplaceholders] [forcenestedloop]

[forceselectorder]

[repeatableRead] [validTimeState]

[ * | <fieldlist> from] <tablebuffer>

[ index [hint] <indexname> ]

[ group by {<field>} ]

[ order by {<field> [asc][desc]} ]

[ where <expression> ]

[ outer | exists | notexists ] join [reverse]

[ * | <fieldlist> from] <tablebuffer>

[ index <indexname> ]

[sum] [avg] [minof] [maxof] [count]

[ group by {<field>} ]

[ order by {<field> [asc][desc]} ]

[ where <expression> ]

]

<fieldlist> ::= <field> | <fieldlist> , <field>

<field> ::= fieldname | <function>(<field>)

Bir Job ile temel birkaç sorgu yazalım.

class FDDataAccess1

{

public static void main(Args _args)

{

CustTable custTable;

;

select * from custTable; // Müşteri tablosundaki tüm kayıtları seçer

info(strFmt(“1- %1 %2″, custTable.AccountNum, custTable.Currency));

select custTable; // // Müşteri tablosundaki tüm kayıtları seçer. * From a ihtiyaç duymaz

info(strFmt(“2- %1 %2″, custTable.AccountNum, custTable.Currency));

select Currency from custTable; // Müşteri tablosundaki sadece Currency  alanını seçer

info(strFmt(“3- %1 %2″, custTable.AccountNum, custTable.Currency));

select reverse custTable; //  Müşteri tablosundaki tüm kayıtları ters sırada seçer

info(strFmt(“4- %1 %2″, custTable.AccountNum, custTable.Currency));

select firstonly custTable; // Müşteri tablosundaki tek satır veriyi seçer

info(strFmt(“5- %1 %2″, custTable.AccountNum, custTable.Currency));

select firstonly custTable

where custTable.Currency != “TRY”; // TRY den faklı olan ilk satırı seçer.

info(strFmt(“6- %1 %2″, custTable.AccountNum, custTable.Currency));

select firstonly custTable

where custTable.Currency != “TRY” &&

custTable.CustGroup == “PROJE”;

info(strFmt(“7- %1 %2″, custTable.AccountNum, custTable.Currency));

select firstonly custTable

where custTable.Currency == “TRY” ||

custTable.CustGroup == “PROJE”;

info(strFmt(“8- %1 %2″, custTable.AccountNum, custTable.Currency));    }

}

Çalıştırdığımda bu çıktıyı veriyor.
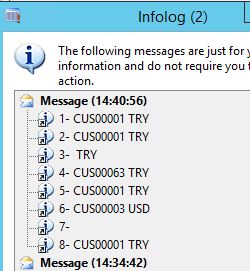
Resim-1

Farklı bir örnek yapalım. Bu job benim eğitimlerde kullandığım bir örnek.

static void FDDataAccess2(Args _args)

{

InventTable inventTable;

InventTrans inventTrans;

;

//1. sistemimde tanımlı bütün stok kartlar (InventTable)

setprefix(“Sistemimde tanımlı bütün stok kartlar”);

while select inventTable

{

info(strFmt(“%1 %2″, inventTable.ItemId, inventTable.ItemName()));

}

//2. kaç stok kartım var

setPrefix(“kaç stok kartım var”);

select count(recId) from inventTable;

info(strFmt(“%1″, inventTable.recId));

// 3. Hareket gören stok kartlarım hangileri (sadece stok kartlarım)

setPrefix(“Hareket gören stok kartlarım”);

while select inventTable

exists join inventTrans

where inventTable.ItemId == inventTrans.ItemId

{

info(strFmt(“%1 %2 %3″, inventTable.ItemId,

inventTrans.Qty,

inventTrans.DatePhysical));

}

//4. stok kartı hareket bilgisi

setPrefix(“stok kartı hareket bilgisi”);

while select inventTable

join inventTrans

where inventTable.ItemId == inventTrans.ItemId

{

info(strFmt(“%1 %2 %3″, inventTable.ItemId,

inventTrans.Qty,

inventTrans.DatePhysical));

}

//5. Hiç hareket görmeyen stok kartlarım hangileri ve adedi

setPrefix(“Hiç hareket görmeyen stok kartlarım”);

while select inventTable

notexists join inventTrans

where inventTable.ItemId == inventTrans.ItemId

{

info(strFmt(“%1 %2 %3″, inventTable.ItemId,

inventTrans.Qty,

inventTrans.DatePhysical));

}

setPrefix(“Hiç hareket görmeyen stok kartlarımın adedi”);

select count(recId) from inventTable

notexists join inventTrans

where inventTable.ItemId == inventTrans.ItemId;

info(strFmt(“Hiç hareket görmeyen stok kartlarım : %1 adettir.”, inventTable.recId));

//6. Her bir stok kartı için en yüksek stok hareket miktarını içeren bilgi

setPrefix(“Her bir stok kartı için en yüksek stok hareket miktarını içeren bilgi”);

while select maxof(Qty)

from inventTrans

group by inventTrans.ItemId

{

info(strFmt(“%1 %2″, inventTrans.ItemId,

inventTrans.Qty));

}

}

Bu yazıda sorgu nasıl yazılır temel örneklerle anlatmaya çalıştım. Çok geniş bir konu ve çok ayrıntısı mevcut. Bunu iyi bilmek için veri tabanı yapısına ve temel SQL komutlarına hâkim olmak gerekiyor. SQL yazan birisi burada zorlanmaz. İleriki yazılarımda sorgunun diğer ayrıntılarına değinmeye devam edeceğim.

Selamlar.

www.fatihdemirci.net

TAGs: X++,Select, Azure, Azure DevOps, Microsoft Dynamics 365, MsDyn365FO, MsDyn365CE, MsDyn365
Dynamics 365 Finance and Operations Data Entity nedir ve nasıl oluşturulur?

Bu yazıda X++ ile yeni bir Data Entity nedir ve nasıl oluşturulur anlatmaya çalışacağım. Öncelikle Data Entity nedir ondan bahsedelim.

Data Entity: Manalı veri kümesi diye özetleyebiliriz. Özellikle Ax2012 ile veri yapısı Normalizasyon mantığına uygun olarak çok fazla tabloya bölündü. Bu sebepten belli bir veriyi görmek ve işlem yapmak için birçok tablonun bir araya gelmesi gerekiyor. Data Entity bizim için bu veri kaynaklarını bir araya getirip anlamlı bir veri kümesi üzerinden işlemleri yapabilmemize olanak sağlıyor. Bizim örneğimizde olduğu gibi kitap ile ilgili 3 tablomuz var ve bunlar aslında birbiriyle ilişkili bir Data Entity ile bu tabloları tek yapıda görüp işlem yapabiliyoruz.

Çok fazla kullanım alanı var. Bunları zamanla anlatmaya çalışacağım. Şimdi yeni bir Data Entity Visual Studio üzerinden nasıl oluşturulur onu görelim.  Benim YouTube kanalım için yaptığım örnek bir kütüphane projem var. Onun üzerinden devam edeceğim.

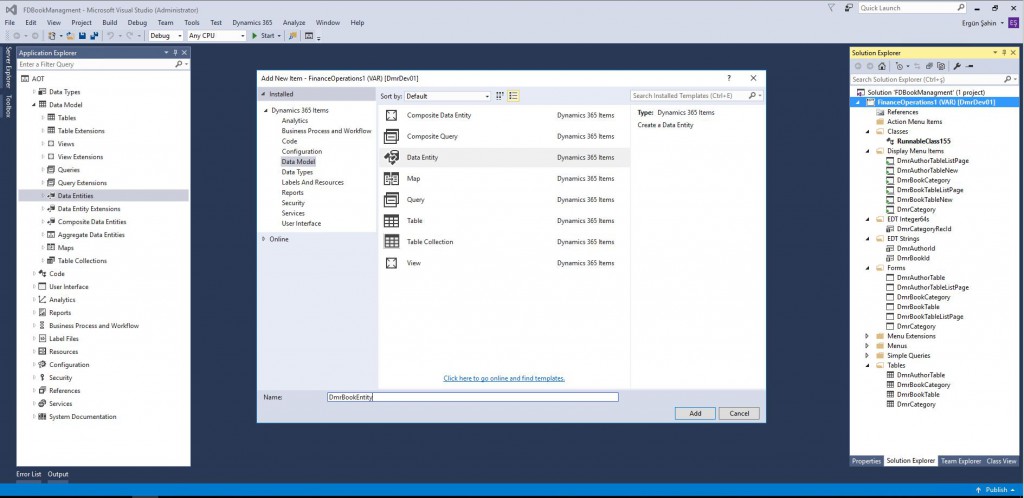
  1. Projeye sağ tıklayıp AddNew item ile yeni Add New Item diyaloğunu açalım.
  2. Data Model > Data Entity, seçip Data Entity adını tanımlayalım.
  3. Add’e tıklayıp Data entity wizard’ı açalım.

Resim-1

Read more

RunBaseBatch Framework İle Toplu İş Nasıl Oluşturulur?

Bu yazıda Dynamics 365 Finance and Operations için yeni bir toplu iş (Batch Job) nasıl oluşturulur anlatmaya çalışacağım. RunBaseBatch kullanarak bir örnek oluşturacağım. İleriki yazılarımda SysOperation ile de örnekler vereceğim. Toplu iş nedir ona bakalım. Bir işi farklı sunucuda ve belli zamanda istersek tekrarlayan şekilde çalıştırmaya yarayan bir alt yapı diyebiliriz. En basit örneği vereyim. Merkez bankası her gün kurları belli saatte açıklıyor. Sizin bu değerleri alıp sisteme kaydetmeniz gerekiyor. Bunun için bir sınıf yazdınız ve bu sınıf servise bağlanıyor ve değerleri alıyor. Ancak bunun her gün aynı saatte tetiklenmesi lazım. İşte burada toplu iş devreye giriyor ve size bu ayarları yapma imkânı veriyor.

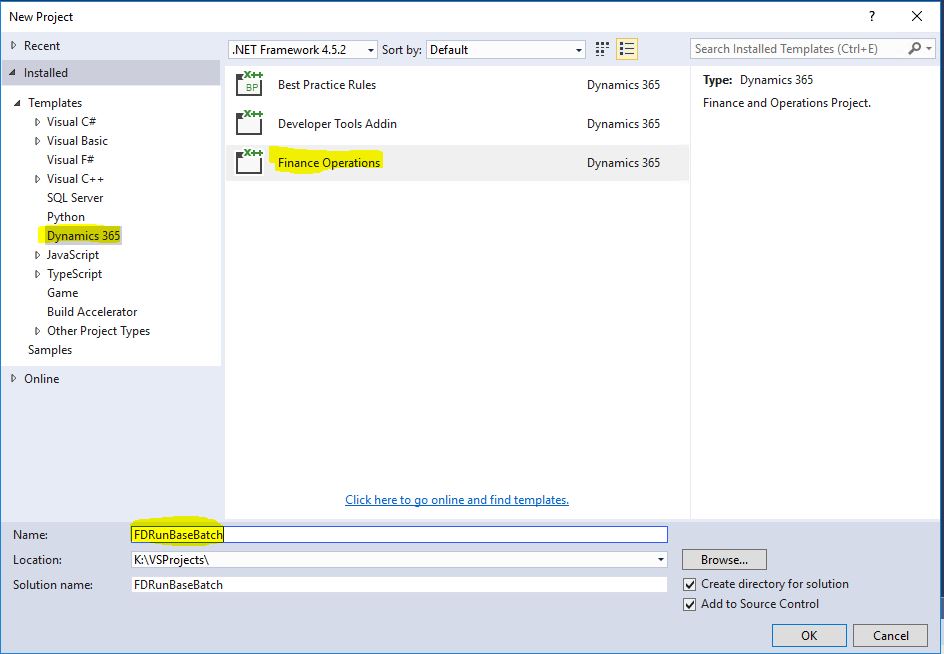
Bu örnekte çok basit bir sınıf oluşturup çalıştıracağız. Öncelikle yeni bir proje oluşturuyorum.

Resim-1

Read more

How to Define Authorization from Dynamics 365 Finance and Operations Development Environment?

In this article, I will try to explain how to create authorization objects from Visual Studio through the Dynamics 365 Finance and Operations development environment. In my article named How to Define Authorization from Dynamics 365 Finance and Operations Interface? I explained how the authorization objects are created from the interface. As I said in that article, my preference is to create the authorization from the development environment. There are several reasons. Most importantly, objects created from the development environment can be included in version control. In this way, they will be directly in your package and the transfer to the desired environment will be made with your development. I think it’s easier to manage.

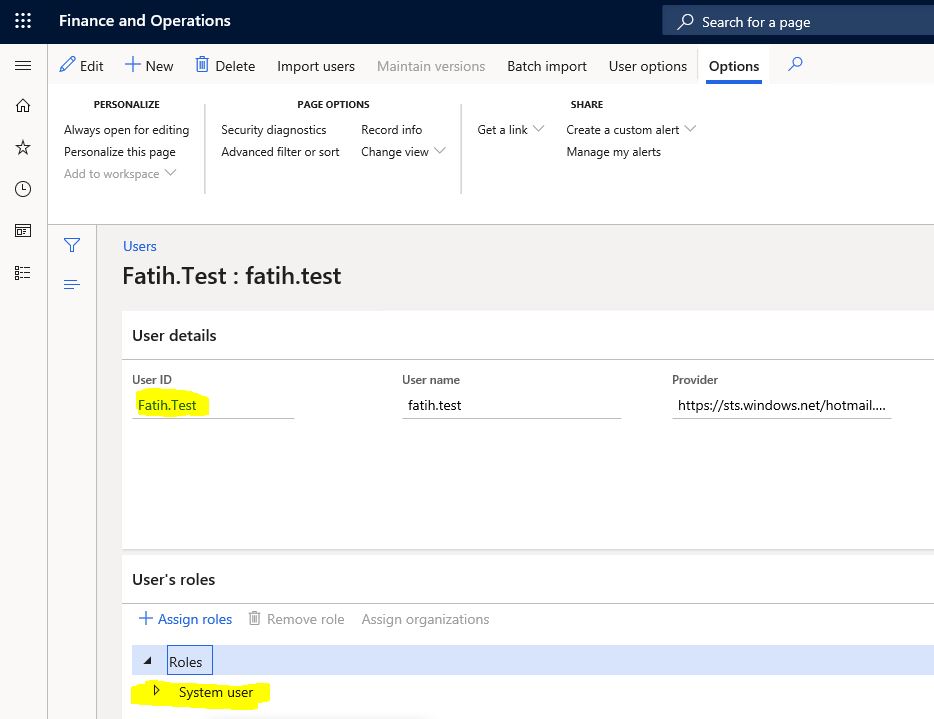
I will now do the same example that I did in my previous article through Visual Studio. My test user only has the System user role.

Image-1

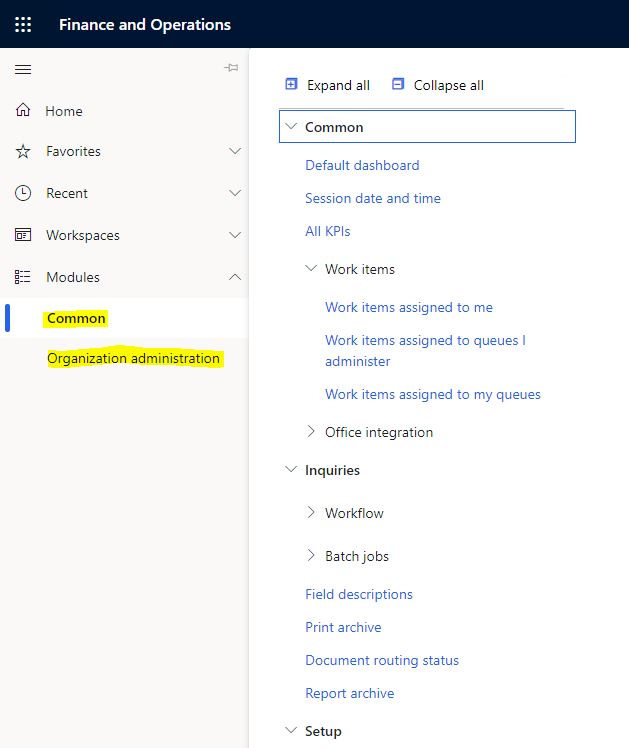
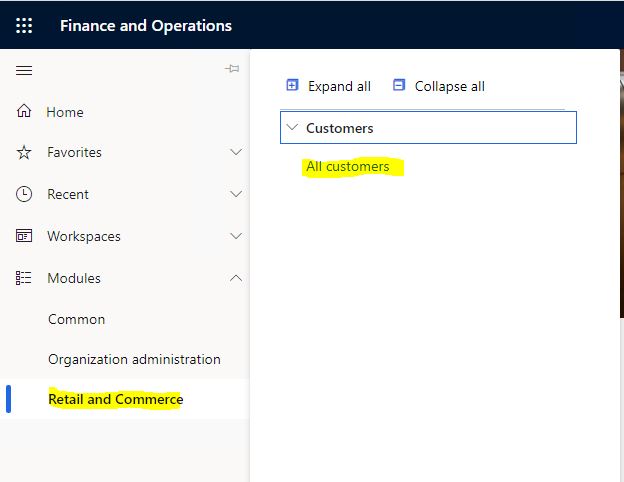
My test user can only see two modules in these roles.

Image-2

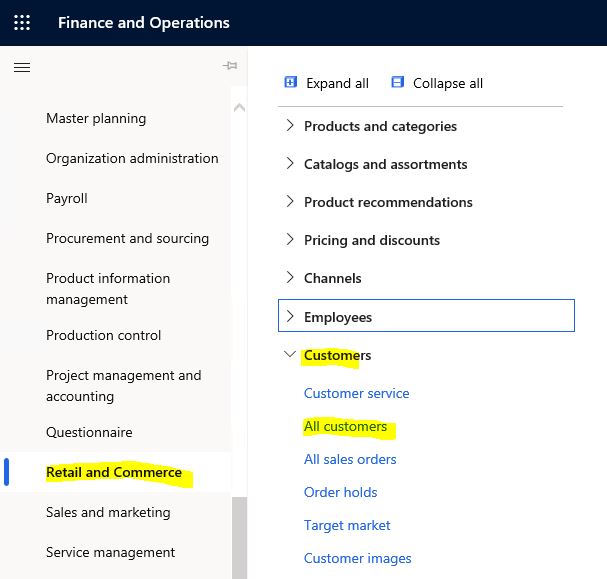
I want to authorize the All customers form.

Image-3

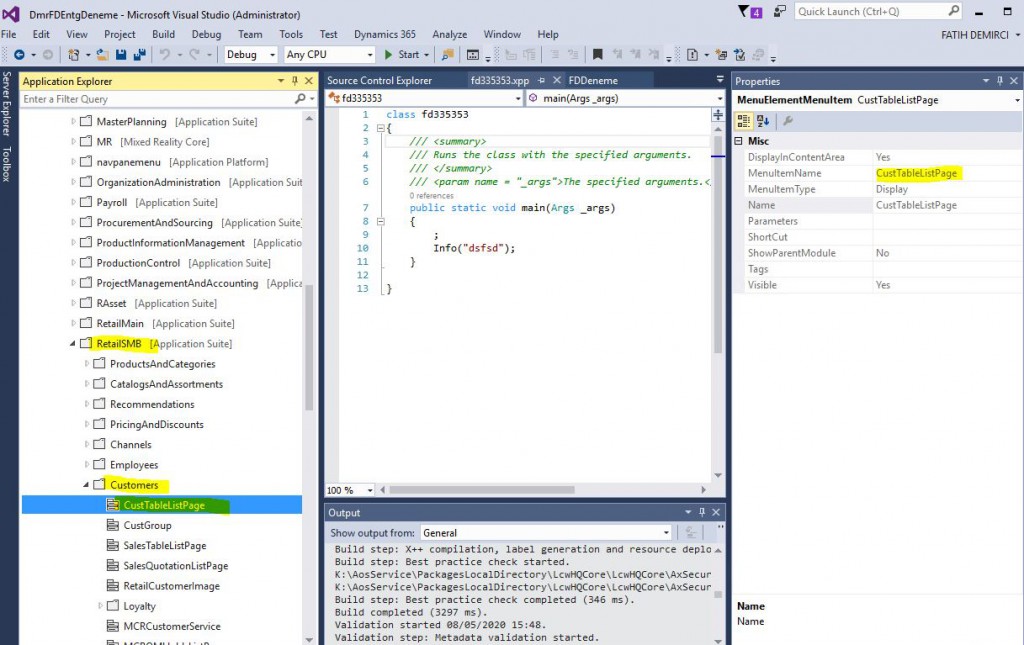
I find the relevant MenuItem on VS. This will be my entry point (EntryPoint) and all authorization assignments will be done through this entry point.

Image-4

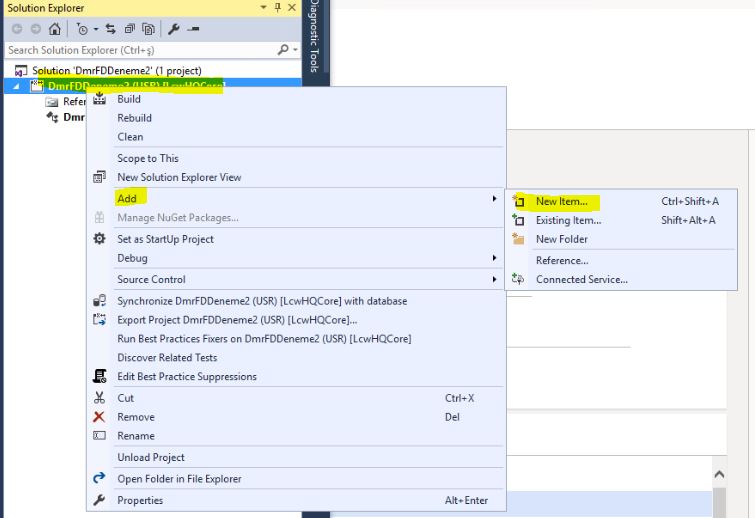
I go to my project and add a new object.

Image-5

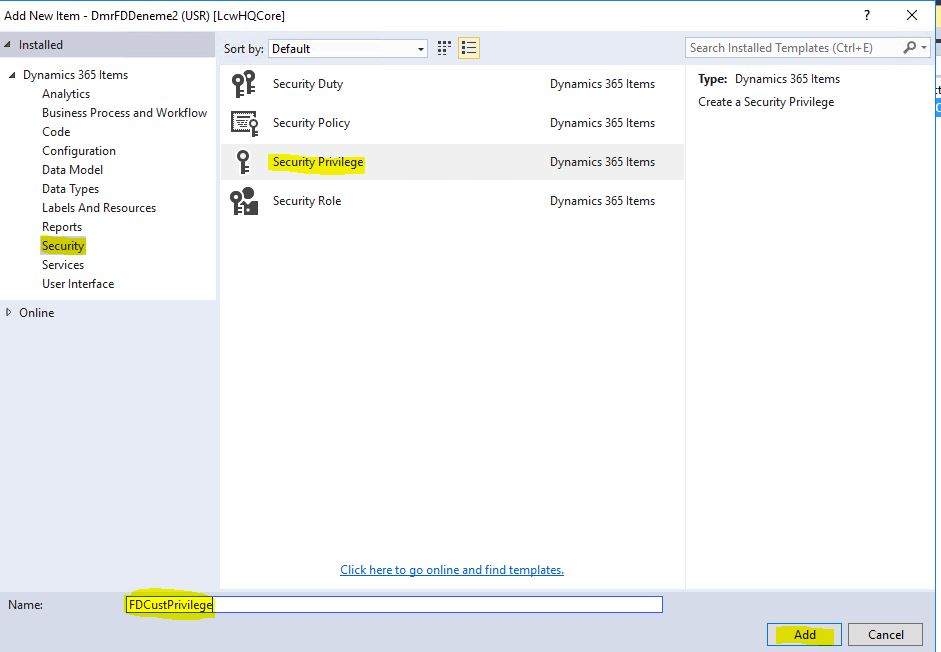
First, we will create a Privilege. I select and name it, and click add.

Image-6

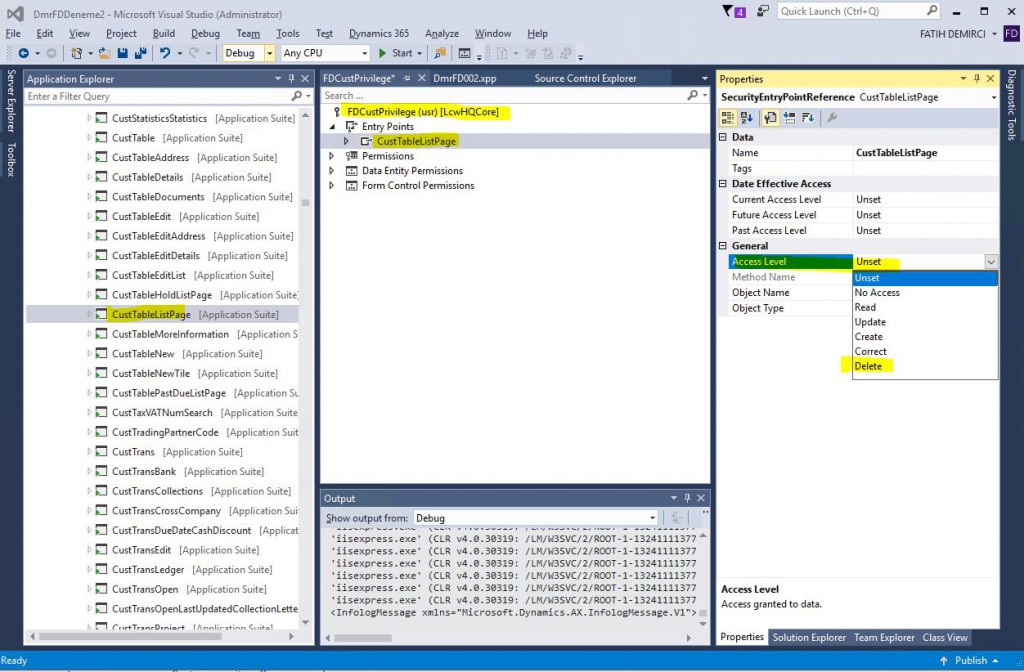
Drag and drop the CustTableListPage MenuItem to the Entry Points tab of the Privilege created. Entry point is created. From its properties, select delete as the Access Level. Delete means full authorization. You can choose the level you want from here. Update and Correct might be confusing for you. Update is the data update authorization. Correct is used in tables with Valid Time State property.  Valid Time State is a mechanism that allows you to perform automatic date checks. I will prepare an article about this later.

Image-7

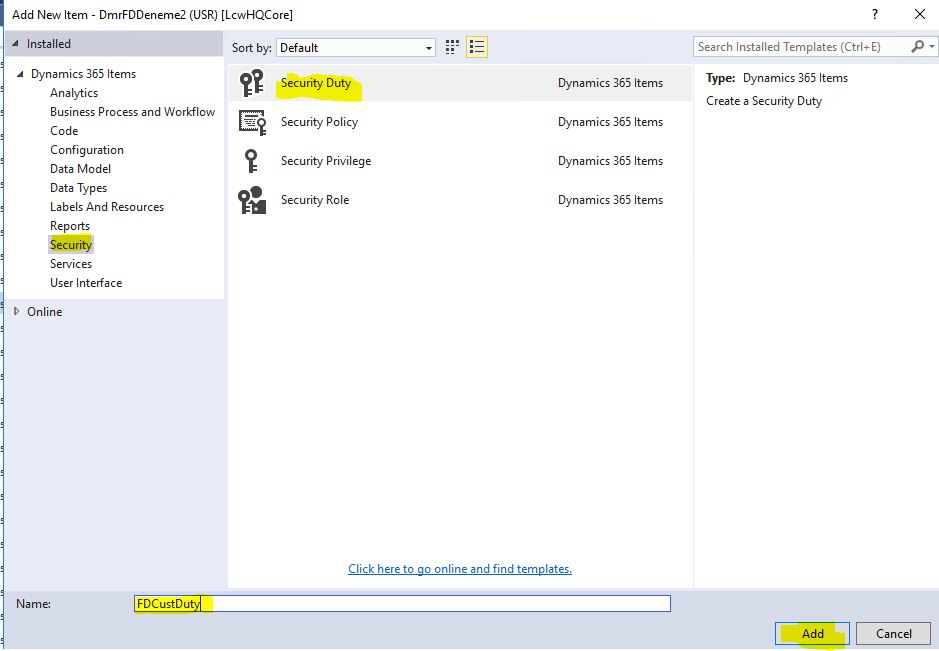
Now create a Duty.

Image-8

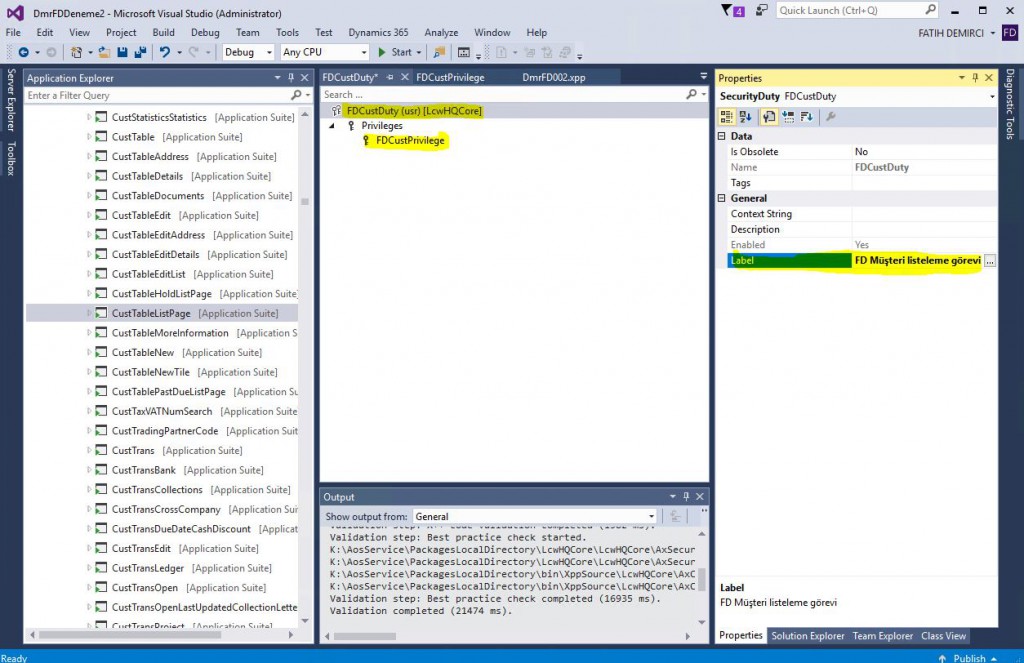
Drag and drop the Privilege to the Duty you created.

Image-9

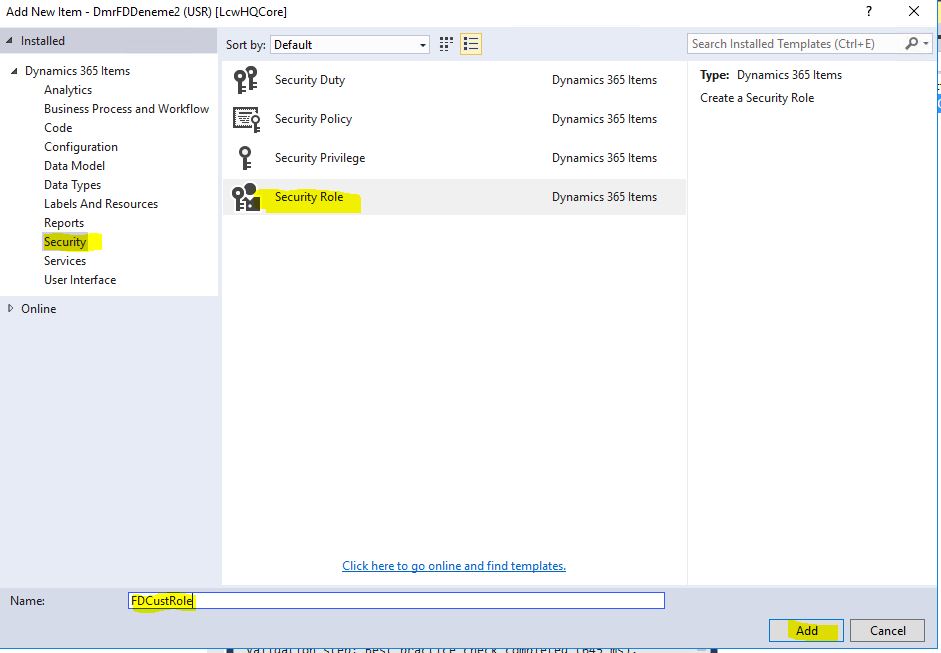
Next step is creating a role.

Image-10

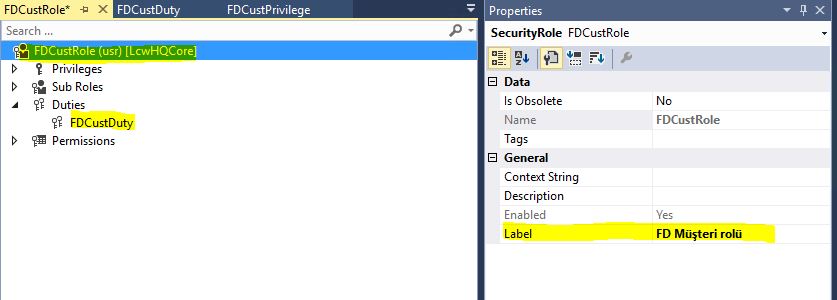
If you want, you can grant Privilege directly to the role you created, but it’s best to follow the steps. That’s why we used Duty. You can drag and drop it. The new role is created.

Image-11

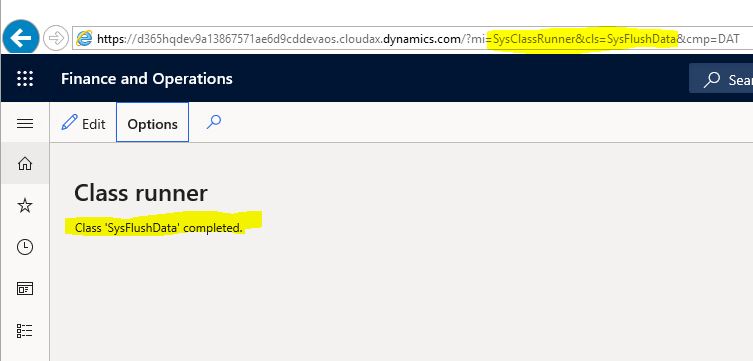
In some cases, it may be necessary to clear the Caches. You can call the SysFlusData class as shown in Image-12.

Image-12

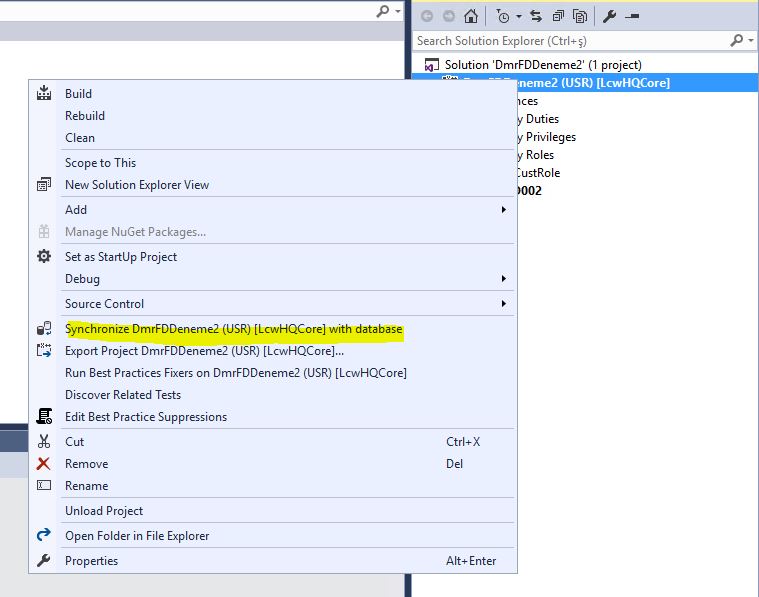
Objects you create via VS will not appear directly in the application. I’m not so sure why but they are visible after DB sync. This is actually data. I don’t know why it needs that.

Image-13

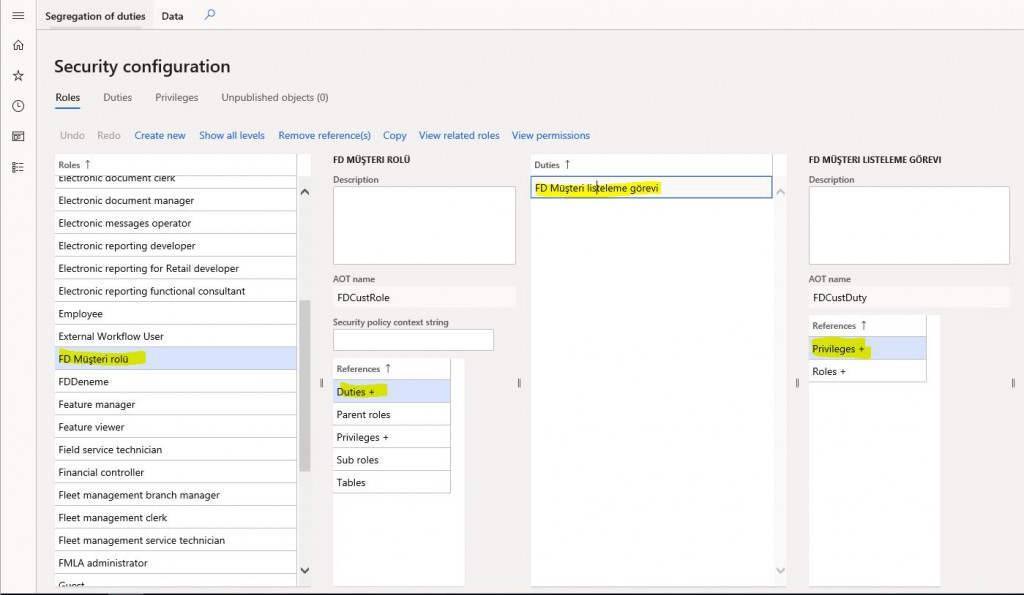
After these operations, you will see the objects you have created when you open the application.

Image-14

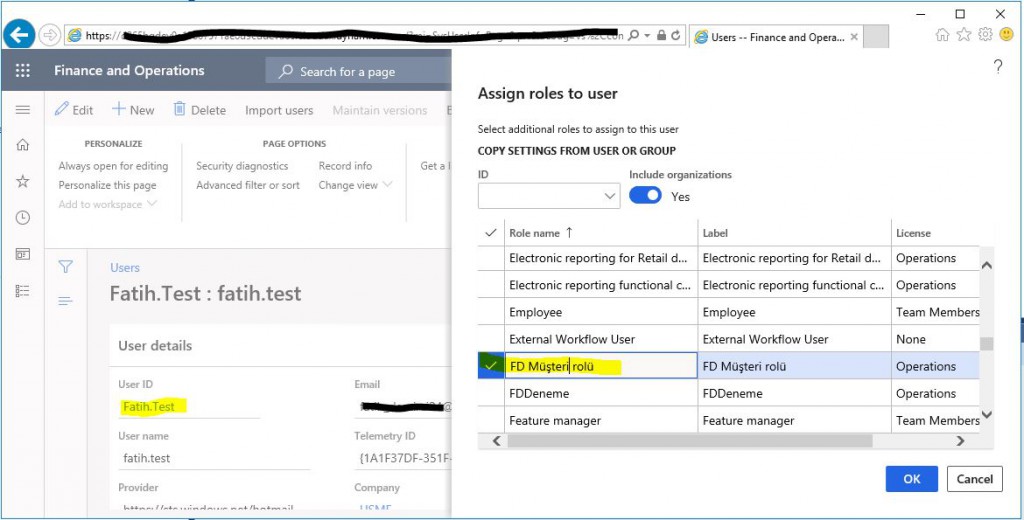
You assign roles to our test user.

Image-15

When you log in to the application, you can see the All Customers form.

Image-16

In this article, I tried to explain how to create security objects via VS. You must take the security and authorization very seriously. If not set up correctly, it can get messy. Try to manage it from the highest level possible. If you go deep into details, it becomes very difficult to manage. Do it if the new role is really required. Use Duty to get things done as much as possible. Do not assign more than 3-5 roles to a user. Too many roles can lead to performance issues.

Regards.

www.fatihdemirci.net

TAGs: Microsoft Life Cycle Services, LCS, Azure, Azure DevOps, Security , Microsoft Dynamics 365, MsDyn365FO, MsDyn365CE, MsDyn365, Dynamics 365 Insights Power BI, Power Automate, Power Apss, Power Virtual Agents, what is Dynamics 365, Dynamics 365 ERP, Dynamics 365 CRM

X++ :17- InitValue Metodu Ne İşe Yarar?

Bu yazıda Dynamics 365 Finance and Operations tablo metotlarından InitValue() metodunu anlatacağım. InitValue() kayıt oluşturulurken otomatik bir alana ilk değer atamaya yarayan bir metottur.  Bir örnek yapalım.

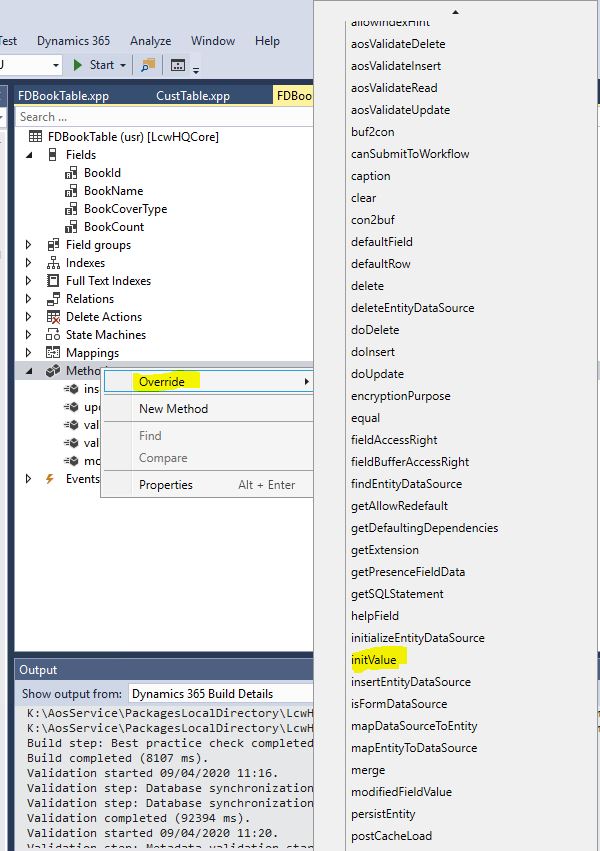
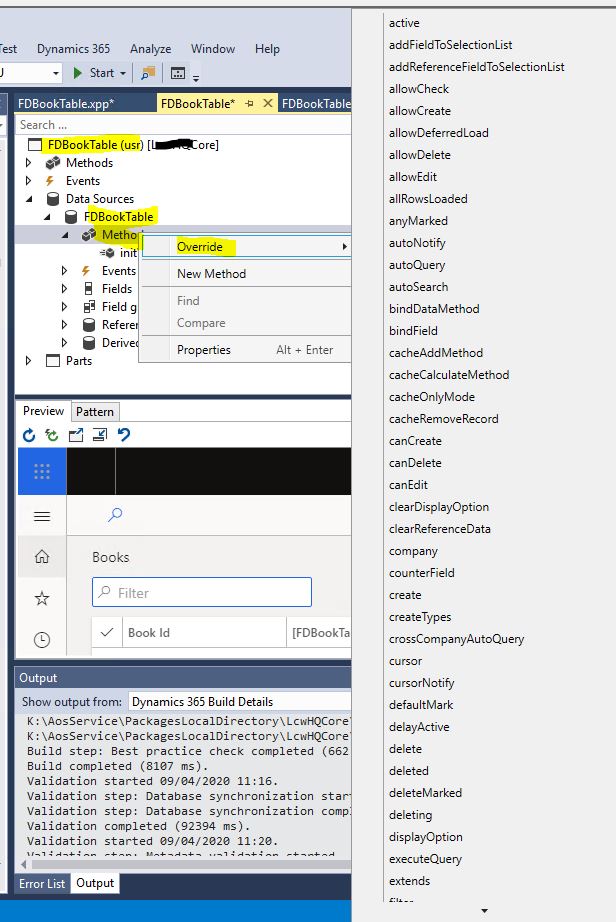
FDBookTable tablosunda metotlara sağ tıklayıp InitValue() metodunu Override ettim.

Resim-1

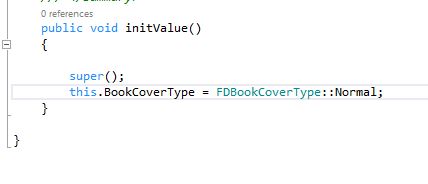
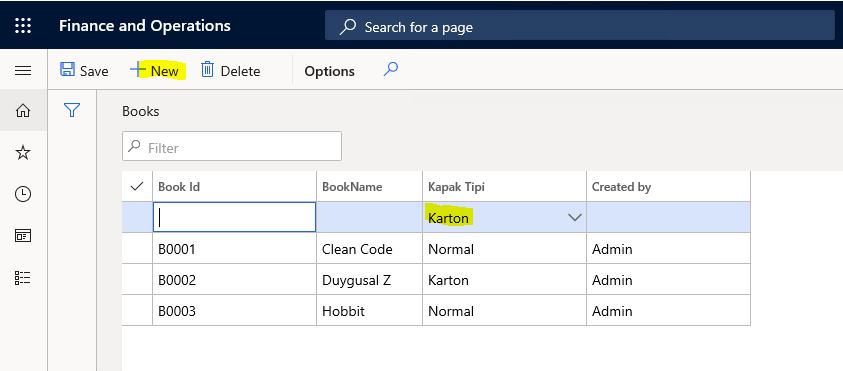
Kitap kapak tipinizi normal olarak atadım. Şimdi tablo tarayıcısını açıp yeni kayıt dediğim anda otomatik kapak tipi normal olarak gelecek.

Resim-2

Şimdi kod çalışma sırasını anlamak için örneğimizi devam ettirelim. Önceki yazılarımda FDBookTable adında bir form yapmıştım. Diyelim ki bu formdan sadece kapak tipi karton olan kitaplar oluşturulabilsin. Bu sefer formun initValue metodunu eziyorum

Resim-3

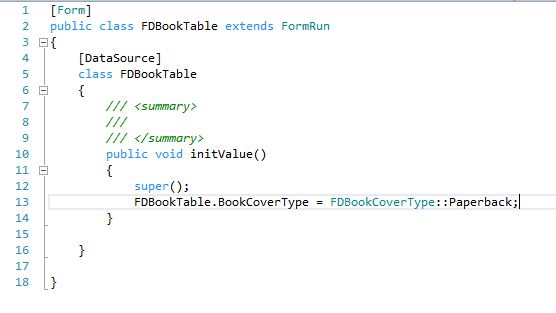
Bu metoda kapak tipi olarak karton ataması yapıyorum.

Resim-4

Şu anda Tabloda normal formda karton diye iki tane ön değer tanımladım hangisi geçerli olacak tabi ki nesne tabanlı programlamanın temel mantığına uygun olarak ezilen üst seviyedeki kod geçerli olacak yanı formda yazdığımız atamayı yapacak.

Resim-5

Bu yazıda InitValue metodundan bahsettim. İlk değer ataması için kullanılan bir metot. Bu metotla birlikte kod çalışma sırasına da biraz değindik. Tablo en alt seviye ve buraya yazılan kodlar form veya alt seviye tasarım nesnelerinden ezilmediği sürece geçerli olurlar. İkisi birlikte çalışsın da diyebiliriz. Bunların da örneklerini ilerleyen yazılarımda yazacağım.

Selamlar.

www.fatihdemirci.net

TAGs: X++, InitValue, Azure, Azure DevOps, Microsoft Dynamics 365, MsDyn365FO, MsDyn365CE, MsDyn365

How to Move Dynamics 365 Finance and Operations Security Objects?

In this article, I will explain how you can move security objects to different environments through Dynamics 365 Finance and Operations application. To do this, I prefer to create objects in Visual Studio and follow the classic development process. However, a software developer is needed for this, and software developers do not always do the security work. So we can perform the same process from the interface. Actually, this is a standard Export / Import process. Now let’s see how it is done.

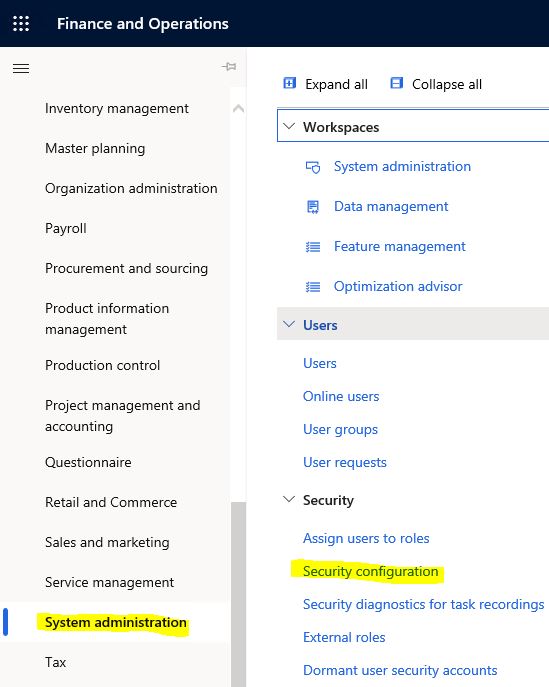
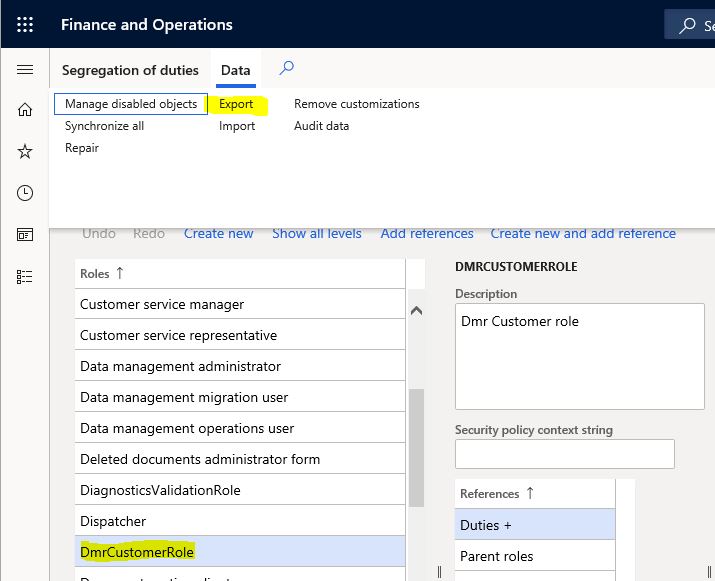
I will use the role I created in my previous article. I open the System Administration-> Security Configuration form.

Image-1

I choose the role I want to export and click Data->Export.

Image-2

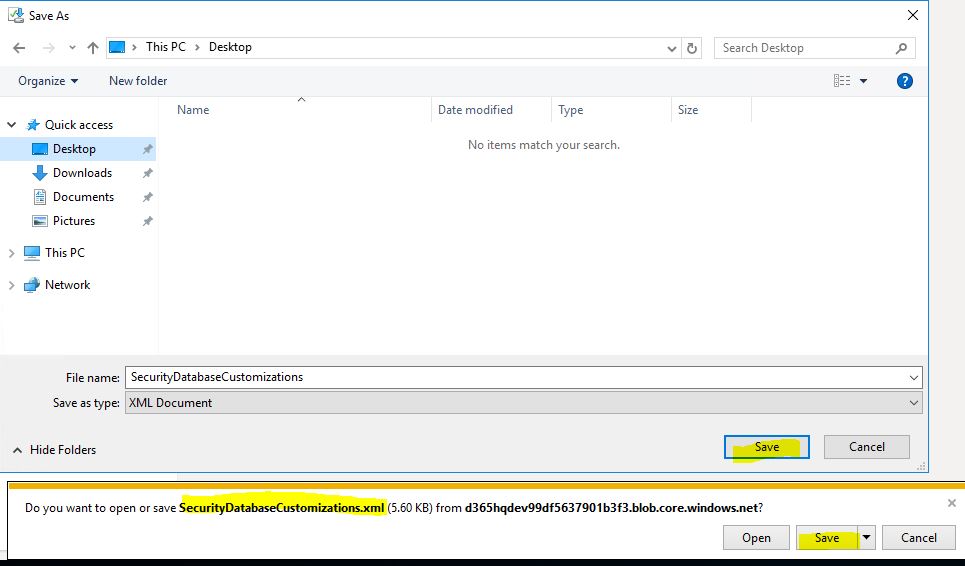
It creates an xml file. You can save it anywhere you want.

Image-3

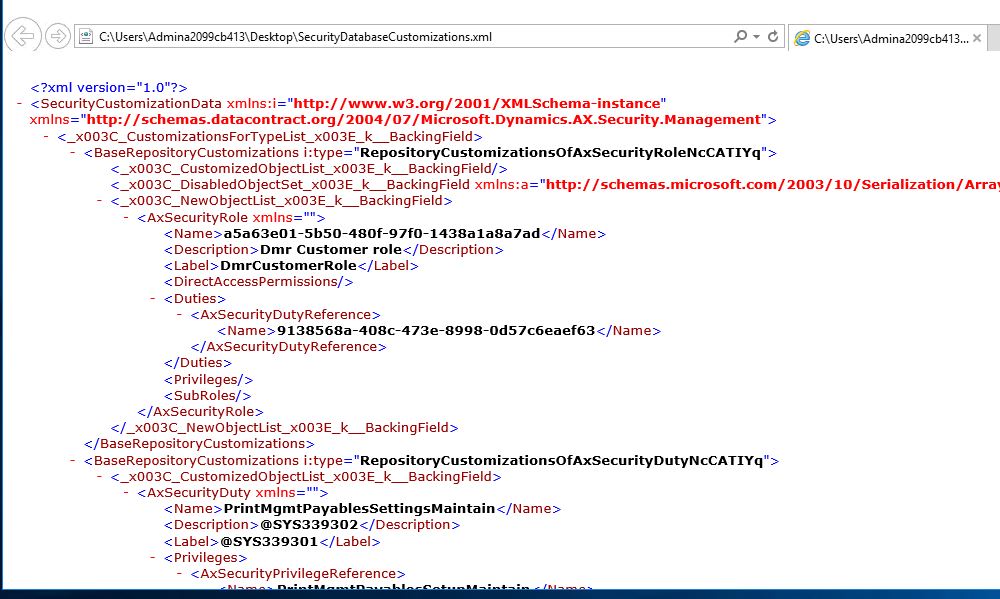
It is useful to examine XML, you can see more clearly what you have exported.

Image-4

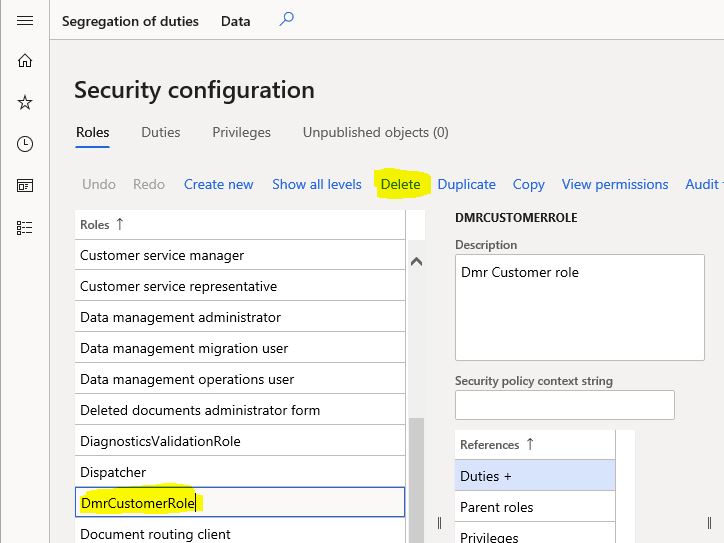
This is the Export process. Let’s delete this role first in order to be able to Import it.

Image-5

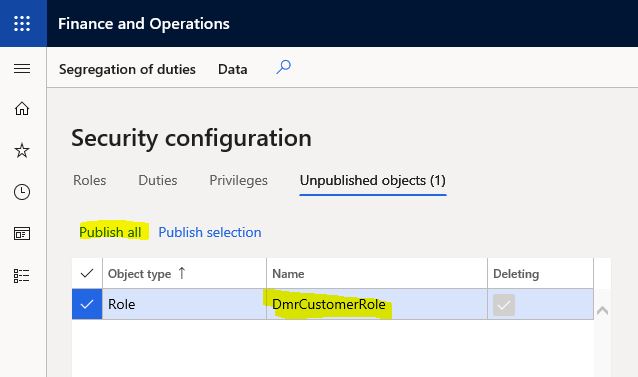
Deleted or imported objects go to the Unpublished Objects tab. When you publish from here, the process is completed. To complete the deletion, click Publish All.

Image-6

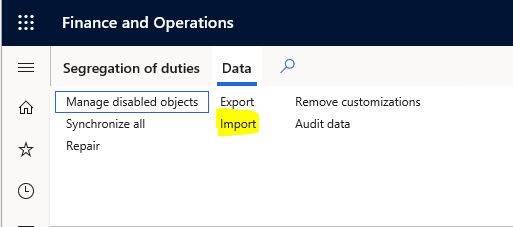
Click Import from the same menu.

Image-7

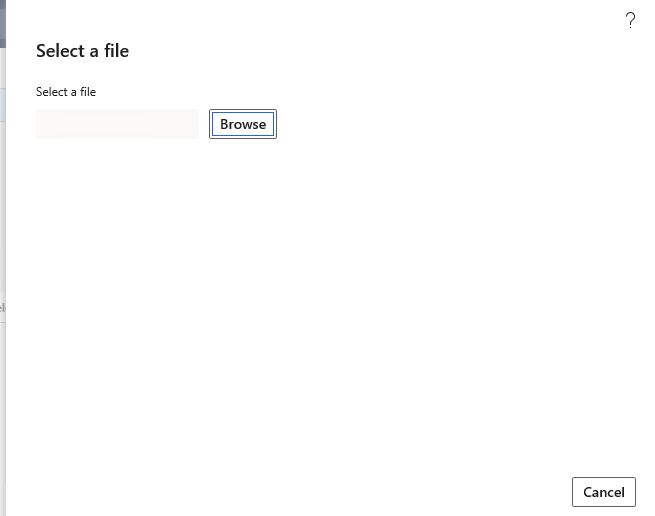
Select the Exported file from the window that opens.

Image-8

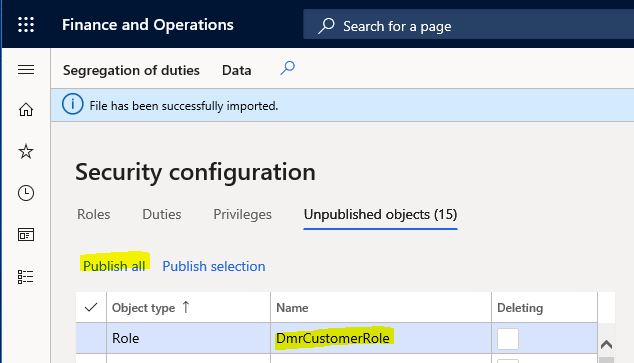
After the selection, import process takes place. Your objects go to Unpublished Objects again. Here, different objects appeared. I investigated the reason for this. When exporting, people say that related objects appear here. It didn’t make much sense, but you should click Publish All.  After that, if you look at the Role list, you can see that the role you deleted appear.

Image-9

In this article, I briefly explained how security objects can be Exported / Imported through the application. There is a point to note here. If the security objects belong to a newly developed application, these objects must be moved first. Otherwise, you make an incorrect operation.

Regards.

www.fatihdemirci.net

TAGs: Microsoft Life Cycle Services, LCS, Azure, Azure DevOps, Security Export Import, Microsoft Dynamics 365, MsDyn365FO, MsDyn365CE, MsDyn365, Dynamics 365 Insights Power BI, Power Automate, Power Apps, Power Virtual Agents, what is Dynamics 365, Dynamics 365 ERP, Dynamics 365 CRM

Yeni bir Dynamics 365 Finance and Operations uygulama projesini Microsoft Life Cycle Services (LCS) üzerinden nasıl ayarlanır.

Bu yazıda size Dynamics 365 Finance, Dynamics 365 Supply Chain Management veya Dynamics 365 Commerce için yeni bir lisans satışından sonra uyarlama projeyi başlatmak için gerekli olan adımları anlatmaya çalışacağım.

Öncelikle firmanın Tenant Administrator hesabıyla Azure Active Directory (Azure AD) de aşağıdaki adımları takip ederek aktivasyon işlemi yapılmalı:

  1. InPrivate/Incognito olarak yeni bir oturum oluşturun ve Microsoft 365 Admin Center’ı açın.
  2. Tenant Administrator hesabıyla giriş yapın.
  3. Billing > Products & services gidin ve orada aldığınız ürünün olduğundan emin olun. Eğer yoksa iş ortağınızla iletişime geçin.
  4. Eğer ürün aboneliği (Subscription)  aktifse uygulama projesi (Implementation Project) oluşturmayı tetiklemek için LCS ye giriş yapın.
  5. Yeni bir sayfada LCS’e Tenant Administrator hesabıyla giriş yapın.
  6. Ekrana çıkan kutucukları onaylayın böylece proje oluşturulmuş olacak.
  7. Tenant Administrator otomatik olarak Project Owner rolüne atanır. Bundan sonra projeyi LCS de görebilirsiniz.

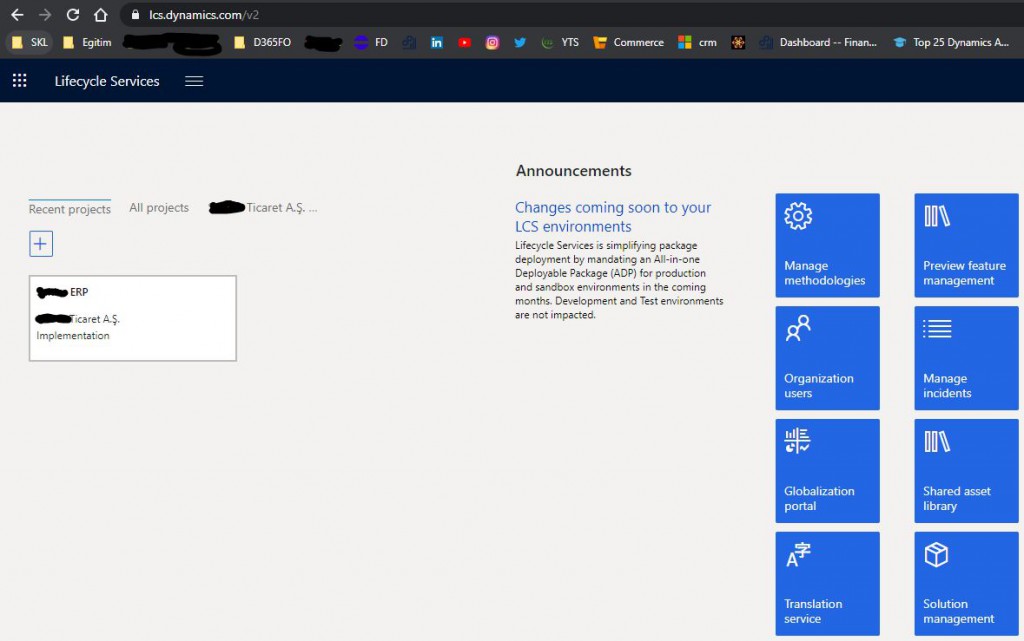
Yukarıdaki adımları tamamladıktan sonra eğer bir sorun yoksa Resim-1 de görünen uyarlama(Implementation) projesi oluşacak.

Resim-1

Read more