Linking Dynamics 365 Finance and Operations Branch Logic and Local Folders to a Azure DevOps project.
In this article, using version control for Dynamics 365 Finance and Operations is now a must. It was also possible to use it in older versions, but it did not work very well, so we used version control in only a few of the projects I have worked on until now. Of course, our development environment is Visual Studio, which makes it very easy. Now let’s look at how to adjust some basic settings that are required at the beginning of the project and the Branch logic. Branch allows you to manage your code and developers to work independently. There are many Branch strategies available. I am not an expert on this subject, so I try to use the simpler versions. The 3 most used approaches are as follows. Main, Main and Dev, Main, Dev and Release. You can use these 3 different methods. For more information, you can review the Branching strategies article. I usually use the Dev and Main structure. If the project is small and there are no other developers other than you, you can just continue with Main. When there is a single Branch, merging is not required, you can bring to live faster, but when you do not want to bring certain things, you need to work with Dev at the very least because one Branch does not cut it. Let’s look at how the first definitions are made.
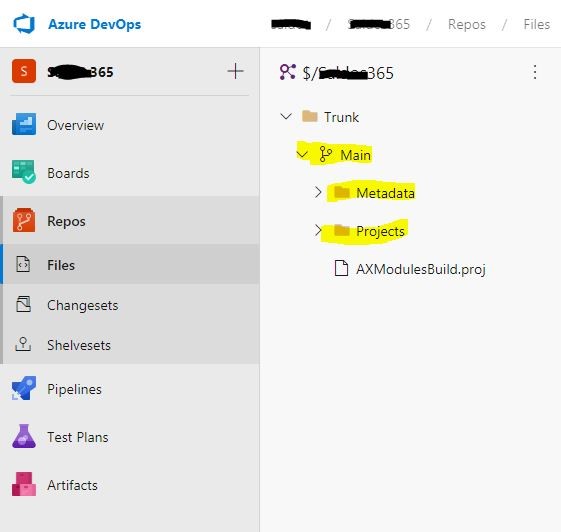
I explained how to connect Azure DevOps over LCS in my previous articles. When you establish this connection, the following Trunk folder will be created in your Azure DevOps project. You have to keep this structure. Initial creation process creates Main as a folder. You have to change this to Branch from Visual Studio. I couldn’t get the screenshot because I didn’t have a brand new environment, so the image shows Main Branch.
Image-1
To turn a folder into Branch, you have to open the Source Control Explorer screen from Visual Studio, right-click the folder and select Branching and Merging -> Convert to Branch.
Image-2
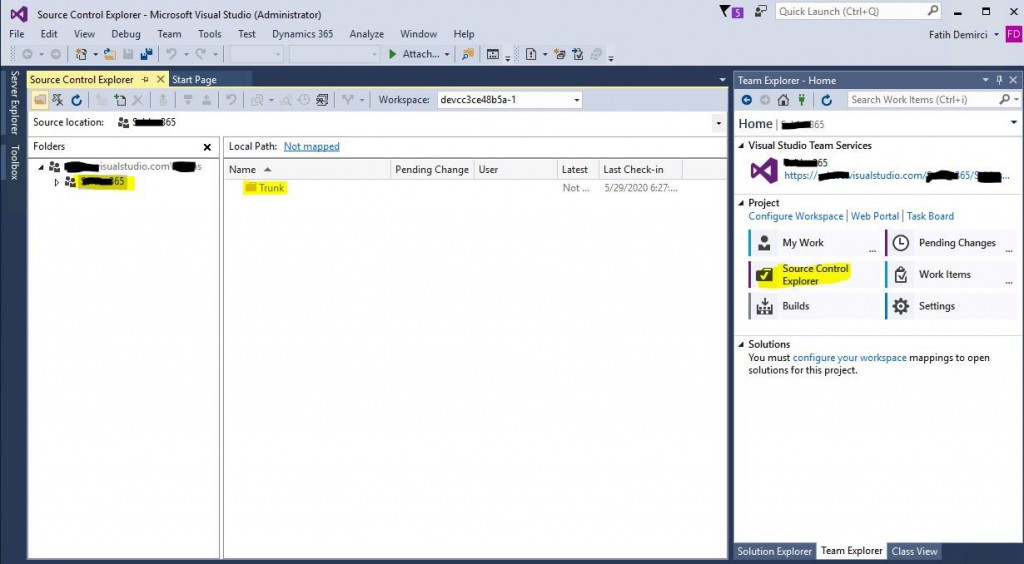
Now, using the model I created in my previous article, let’s associate the Metadata and Projects folders with our Azure DevOps project. Don’t let the images mislead you. Since I don’t have a brand new environment, I took the screenshots from a previously processed environment, but the logic is the same. First of all, this project only includes Main. If you are going to work with Dev, all development environments must be connected to Dev. The process is the same. Open the Source Control Explorer screen.
Image-3
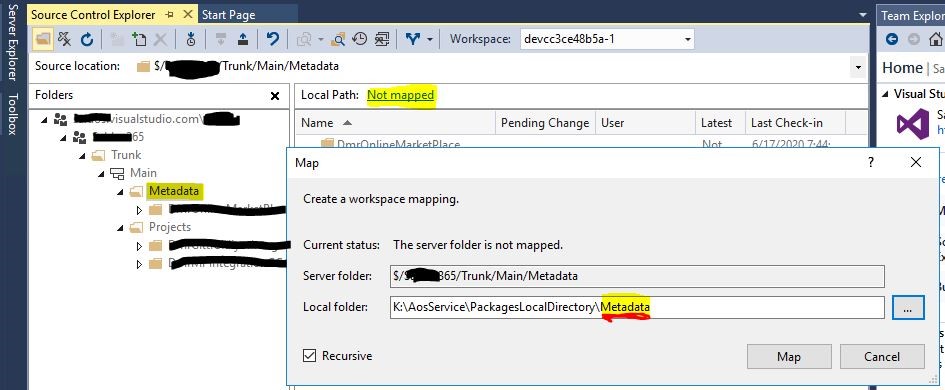
In brand new environment, there is no folder under Metadata and Project. Just ignore them. Now we can associate the Azure DevOps folders on the left with the folders in our virtual machine. Click on the Not Mapped link.
Image-4
Map to K:\AosService\PackagesLocalDirectory. Selecting the folder automatically adds Metadata. Don’t forget to delete it. Complete the process by clicking Map.
Image-5
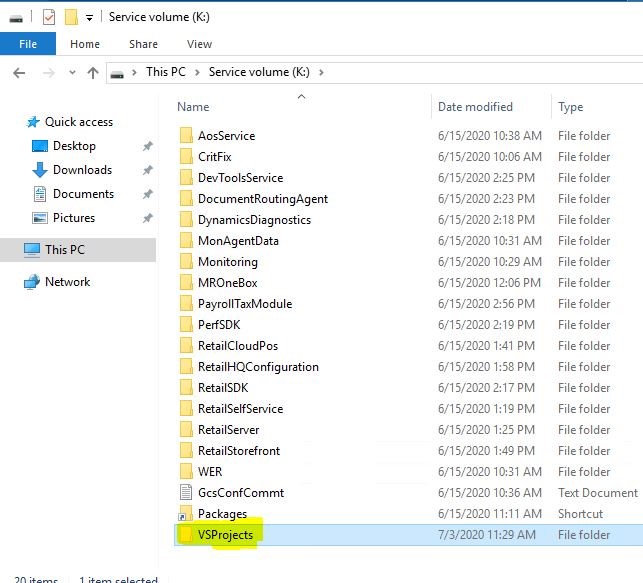
I create the K:\VSProject folder. This is not a must, but it is useful to keep the path short.
Image-6
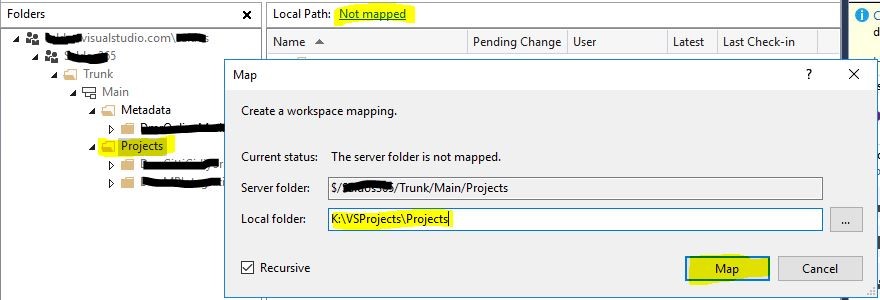
Similarly, when you are on the Projects folder, click the Not mapped link. I associate it with K:\VSProjects. Here it directly adds Projects as well, be careful. I delete it. Complete the process by clicking Map.
Image-7
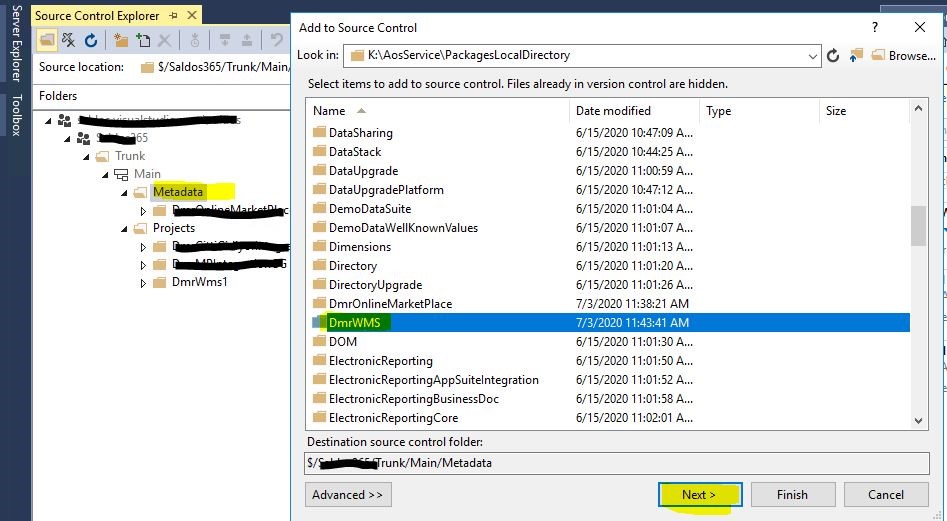
At this point, you have linked your folders. However, you have not specified which files will be included in the version control. Let’s create these connections using the Model and project I created in my previous article. I had a package called DmrWMS. Right click on the Metadata and click Add Item to Folder. Find your package in the window that opens.
Image-8
Go to the Descriptor folder and select the xml file that has the same name as the package. This file contains our package and model information.
Image-9
After you continue and see it in the Item to add section, click Finish.
Image-10
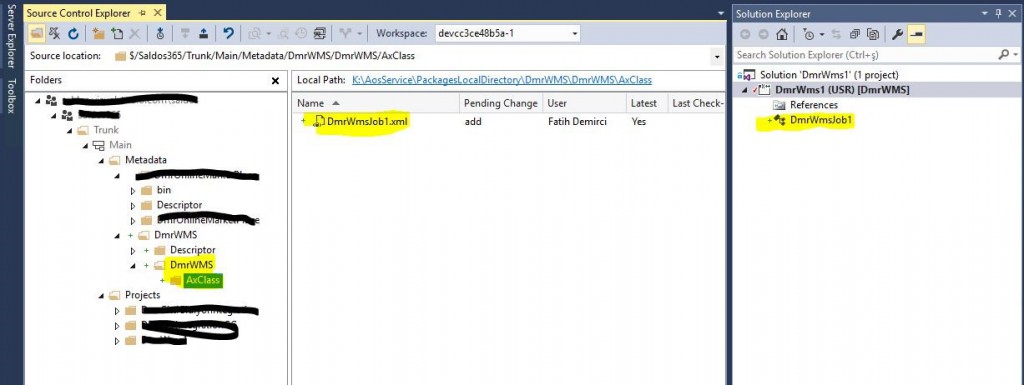
Actually, our codes are stored under the model, but since we are linking this through the project, no further additions are required. If it is not added by default, you can add your project by clicking Add Item to Folder. You only need to add metadata and code to the version control. When you check, you can see all your codes in the DmrWMS model folder. Do not be confused by the same model and package name.
Image-11
Now let’s add a job to our project and see how it looks in version control.
Image-12
While creating my project, I marked it as add to version control. I can also add it later. So when I create a new object it is automatically created in my model folder.
Image-13
I can see my pending Check Ins in the Pending Changes section. There are 3 files. These are the must have ones. My project file, My package file, and Job. Let’s Check In and see our development on Azure DevOps.
Image-14
If you have reached this stage, you are ready to develop. We saw the same structure on Azure DevOps. Now we can test and go live after Build operation.
Image-15
In this article, I tried to explain the required Azure DevOps and Devbox machine’s first folder association for a new project and how to connect the model, package and project we just created. This is a much more comprehensive topic, but I wanted to at least make an introduction. I will cover it in more detail later. For example, in Branch logic, there is no single truth, everyone has different experiences. It is also necessary to make changes when it is required to decide according to the team and the project. There are many people who do not have any experience in Dynamics 365 but are Azure DevOps experts, you can get assistance from them. But it is always useful to explain the unique features of Dynamics 365. You will produce a better solution.
Regards.
www.fatihdemirci.net
TAGs: Microsoft Life Cycle Services, LCS, Azure, Azure DevOps, Project onboarding, Microsoft Dynamics 365, MsDyn365FO, MsDyn365CE, MsDyn365, Dynamics 365 Insights Power BI, Power Automate, Power Apss, Power Virtual Agents, what is Dynamics 365, Dynamics 365 ERP, Dynamics 365 CRM
